---
title: "HTML Panel widget for dashboards"
canonical_url: "https://www.nutrient.io/guides/workflow-automation/admin-guide/settings/dashboards/using-the-dashboard-html-panel-widget-legacy/"
md_url: "https://www.nutrient.io/guides/workflow-automation/admin-guide/settings/dashboards/using-the-dashboard-html-panel-widget-legacy.md"
last_updated: "2026-05-14T16:53:43.956Z"
description: "Learn to use the HTML Panel widget to enhance your dashboard with announcements, buttons, links, and more for dynamic content management."
---
# Maximize dashboard capabilities with the HTML Panel widget
The HTML Panel widget can be added to your dashboard and is used frequently for a variety of purposes.
- Making an announcement
- Launch buttons
- Providing links to processes or external pages
- Displaying videos
- Adding third-party widgets
## Adding an HTML Panel widget
Open the **Dashboard editor** and select **Add Widget** from the upper-right corner of the dashboard area.
Select **HTML Panel**.
## Editing the HTML Panel
The HTML Panel provides a rich text toolbar similar to a word processor but scaled down. You can format text, insert images, insert videos, add links, and more.
## Extending the HTML widget with styling
You can enhance your HTML Panel widgets beyond basic formatting by using inline CSS styles and custom HTML structures to create visually appealing layouts, button grids, and styled containers.
### Styled layouts
You can use inline styles and DIVs to create layout containers and tables with more flair.
For instance, consider the following image.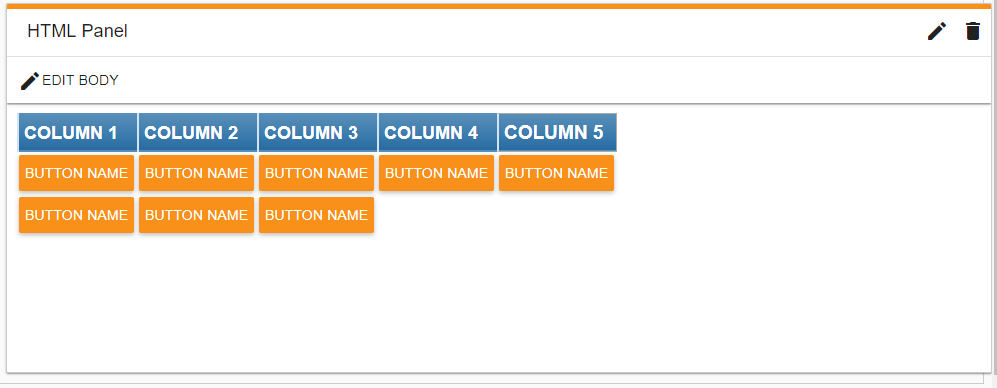
This was created using the following code:
```html
COLUMN 1
COLUMN 2
COLUMN 3
COLUMN 4
COLUMN 5
```
Tables made using `` are more flexible than using straight HTML tables. However, since you can only use inline CSS styles (rather than a linked CSS style sheet), you may want to try some free tools for first creating and styling the DIV table and then turning the output into inline styles:
- [DIVTable.com](https://divtable.com/table-styler/) provides an easy tool for creating styled tables.
- [Emogrifier](https://www.myintervals.com/emogrifier.php) provides a way to merge CSS with HTML to create inline styles.
---
## Related pages
- [Enhance your dashboard with report widgets](/guides/workflow-automation/admin-guide/settings/dashboards/adding-a-report-to-a-dashboard-legacy.md)
- [Adding a KPI’s widget](/guides/workflow-automation/admin-guide/settings/dashboards/adding-a-kpi-widget.md)
- [How to add widgets to your dashboard](/guides/workflow-automation/admin-guide/settings/dashboards/adding-an-html-widget-to-your-dashboard-legacy.md)
- [Adding a report widget](/guides/workflow-automation/admin-guide/settings/dashboards/adding-a-report-to-a-dashboard.md)
- [Adding an HTML Panel widget](/guides/workflow-automation/admin-guide/settings/dashboards/adding-an-html-widget-to-your-dashboard.md)
- [Adding a DashForm widget](/guides/workflow-automation/admin-guide/settings/dashboards/adding-dashform-widget.md)
- [Adding Manage Requests widget](/guides/workflow-automation/admin-guide/settings/dashboards/adding-manage-requests-widget.md)
- [Adding a My Requests widget](/guides/workflow-automation/admin-guide/settings/dashboards/adding-my-requests-widget.md)
- [Adding a Monitor Requests widget](/guides/workflow-automation/admin-guide/settings/dashboards/adding-monitor-requests-widget.md)
- [Adding a Today’s Messages widget](/guides/workflow-automation/admin-guide/settings/dashboards/adding-today-messages-widget.md)
- [Adding a My Tasks widget](/guides/workflow-automation/admin-guide/settings/dashboards/adding-my-tasks-widget-to-dashboard.md)
- [How to assign and share dashboards](/guides/workflow-automation/admin-guide/settings/dashboards/assigning-and-sharing-dashboards-legacy.md)
- [Managing roles and permissions for dashboards](/guides/workflow-automation/admin-guide/settings/dashboards/assigning-and-sharing-dashboards.md)
- [Customize and enhance your dashboards](/guides/workflow-automation/admin-guide/settings/dashboards/configuring-dashboards-legacy.md)
- [How to create and manage dashboards](/guides/workflow-automation/admin-guide/settings/dashboards/creating-dashboards-legacy.md)
- [View or edit a dashboard layout](/guides/workflow-automation/admin-guide/settings/dashboards/configuring-dashboards.md)
- [Streamline your workflow with our dashboard interface](/guides/workflow-automation/admin-guide/settings/dashboards/dashboard-interface-legacy.md)
- [How to create and manage dashboards](/guides/workflow-automation/admin-guide/settings/dashboards/creating-dashboards.md)
- [Accessing dashboards and navigating the interface](/guides/workflow-automation/admin-guide/settings/dashboards/dashboard-interface.md)
- [Customize dashboards for improved user experience](/guides/workflow-automation/admin-guide/settings/dashboards/legacy-dashboard.md)
- [Streamline your workflows with launch buttons](/guides/workflow-automation/admin-guide/settings/dashboards/launch-buttons-legacy.md)
- [Customize dashboards for improved user experience](/guides/workflow-automation/admin-guide/settings/dashboards/modern-dashboard.md)