Create documents with Document Generation
The Document Generation task is powered by Nutrient Document Engine and enables you to create PDF and DOCX files from request data using a DOCX file template that contains placeholders.
Prerequisites
Before using Document Generation, ensure you have:
- Access to Nutrient Document Engine
- Administrative permissions to configure tasks in your workflow process
- A DOCX editor (such as Microsoft Word) to create templates
Advantages of using Document Generation
Document Generation offers several advantages over using the traditional PDF Generator task:
- Integrated template authoring — Create and edit document templates directly within the workflow interface using the built-in Document Authoring editor, eliminating the need for external software.
- Simplified template creation — Design your document templates using the integrated document editor or any editor that supports saving files in DOCX format, avoiding the complexity of creating fillable PDFs, which often requires specialized third-party software.
- Version management — Built-in version control allows you to maintain multiple template versions, track changes, and easily switch between versions as needed.
- Grid mapping — Document Generation enables you to seamlessly map entire grid data sets into your documents — functionality that’s not available with the traditional PDF Generator task.
- Enhanced multi-option question handling — This task provides more flexible ways to represent multi-option questions within your documents.
- Support for multiple output formats — With Document Generation, you can generate your documents as either PDF or DOCX files, giving you more options based on your needs.
How to generate a document
Create a DOCX template with placeholders. You can create templates in two ways:
Option 1: Using the built-in Document Authoring editor
- When adding a new Document Generation task or when no template exists, click the Create Document chip with the edit icon.
- This opens the integrated Document Authoring editor with a default welcome message.
- Use the document editor to design your template directly within the workflow interface.
- Add placeholders as needed using the delimiter syntax described below.
Option 2: Using external editors
- Design your template using any editor that can save DOCX files (e.g., Microsoft Word).
- Upload the completed template file to the task configuration.
Template placeholder guidelines
- Use placeholders as unique identifiers wrapped in delimiters to mark where dynamic data will be inserted.
- By default, placeholders use
{{and}}, but you can customize the delimiters. - Placeholders must be alphanumeric, contain no spaces, and be unique within the document.
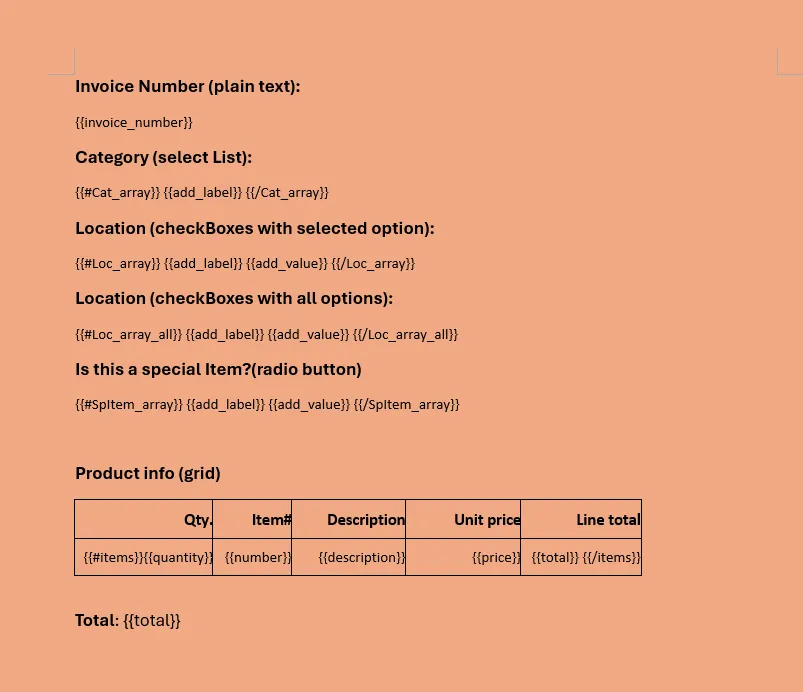
There are two types of placeholders that you can have in your template document:
- Single placeholders — These represent one-to-one mappings of text-based data, e.g.
{{invoice_number}}. - Loop placeholder sets — These are used to insert repeating data like grid rows or multi-option question answers. They’re defined by an opening placeholder starting with
#, a closing placeholder starting with/, and placeholders in between.
Example:
{{#Loc_array}} {{add_label}} {{add_value}} {{/Loc_array}}
Here, Loc_array is an array of data, and add_label and add_value are fields within each item.
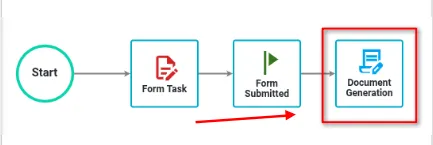
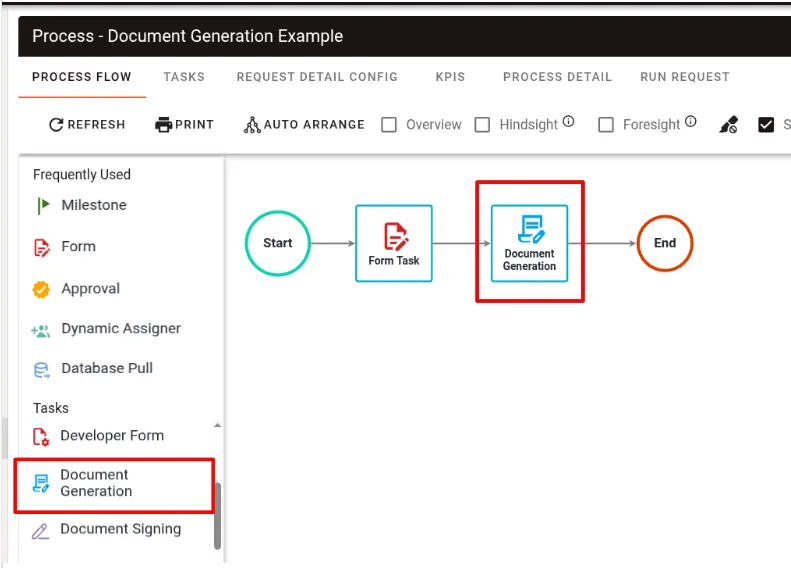
Add the Document Generation task to your process. Select Configuration > Configure Task.
Configure the general settings.
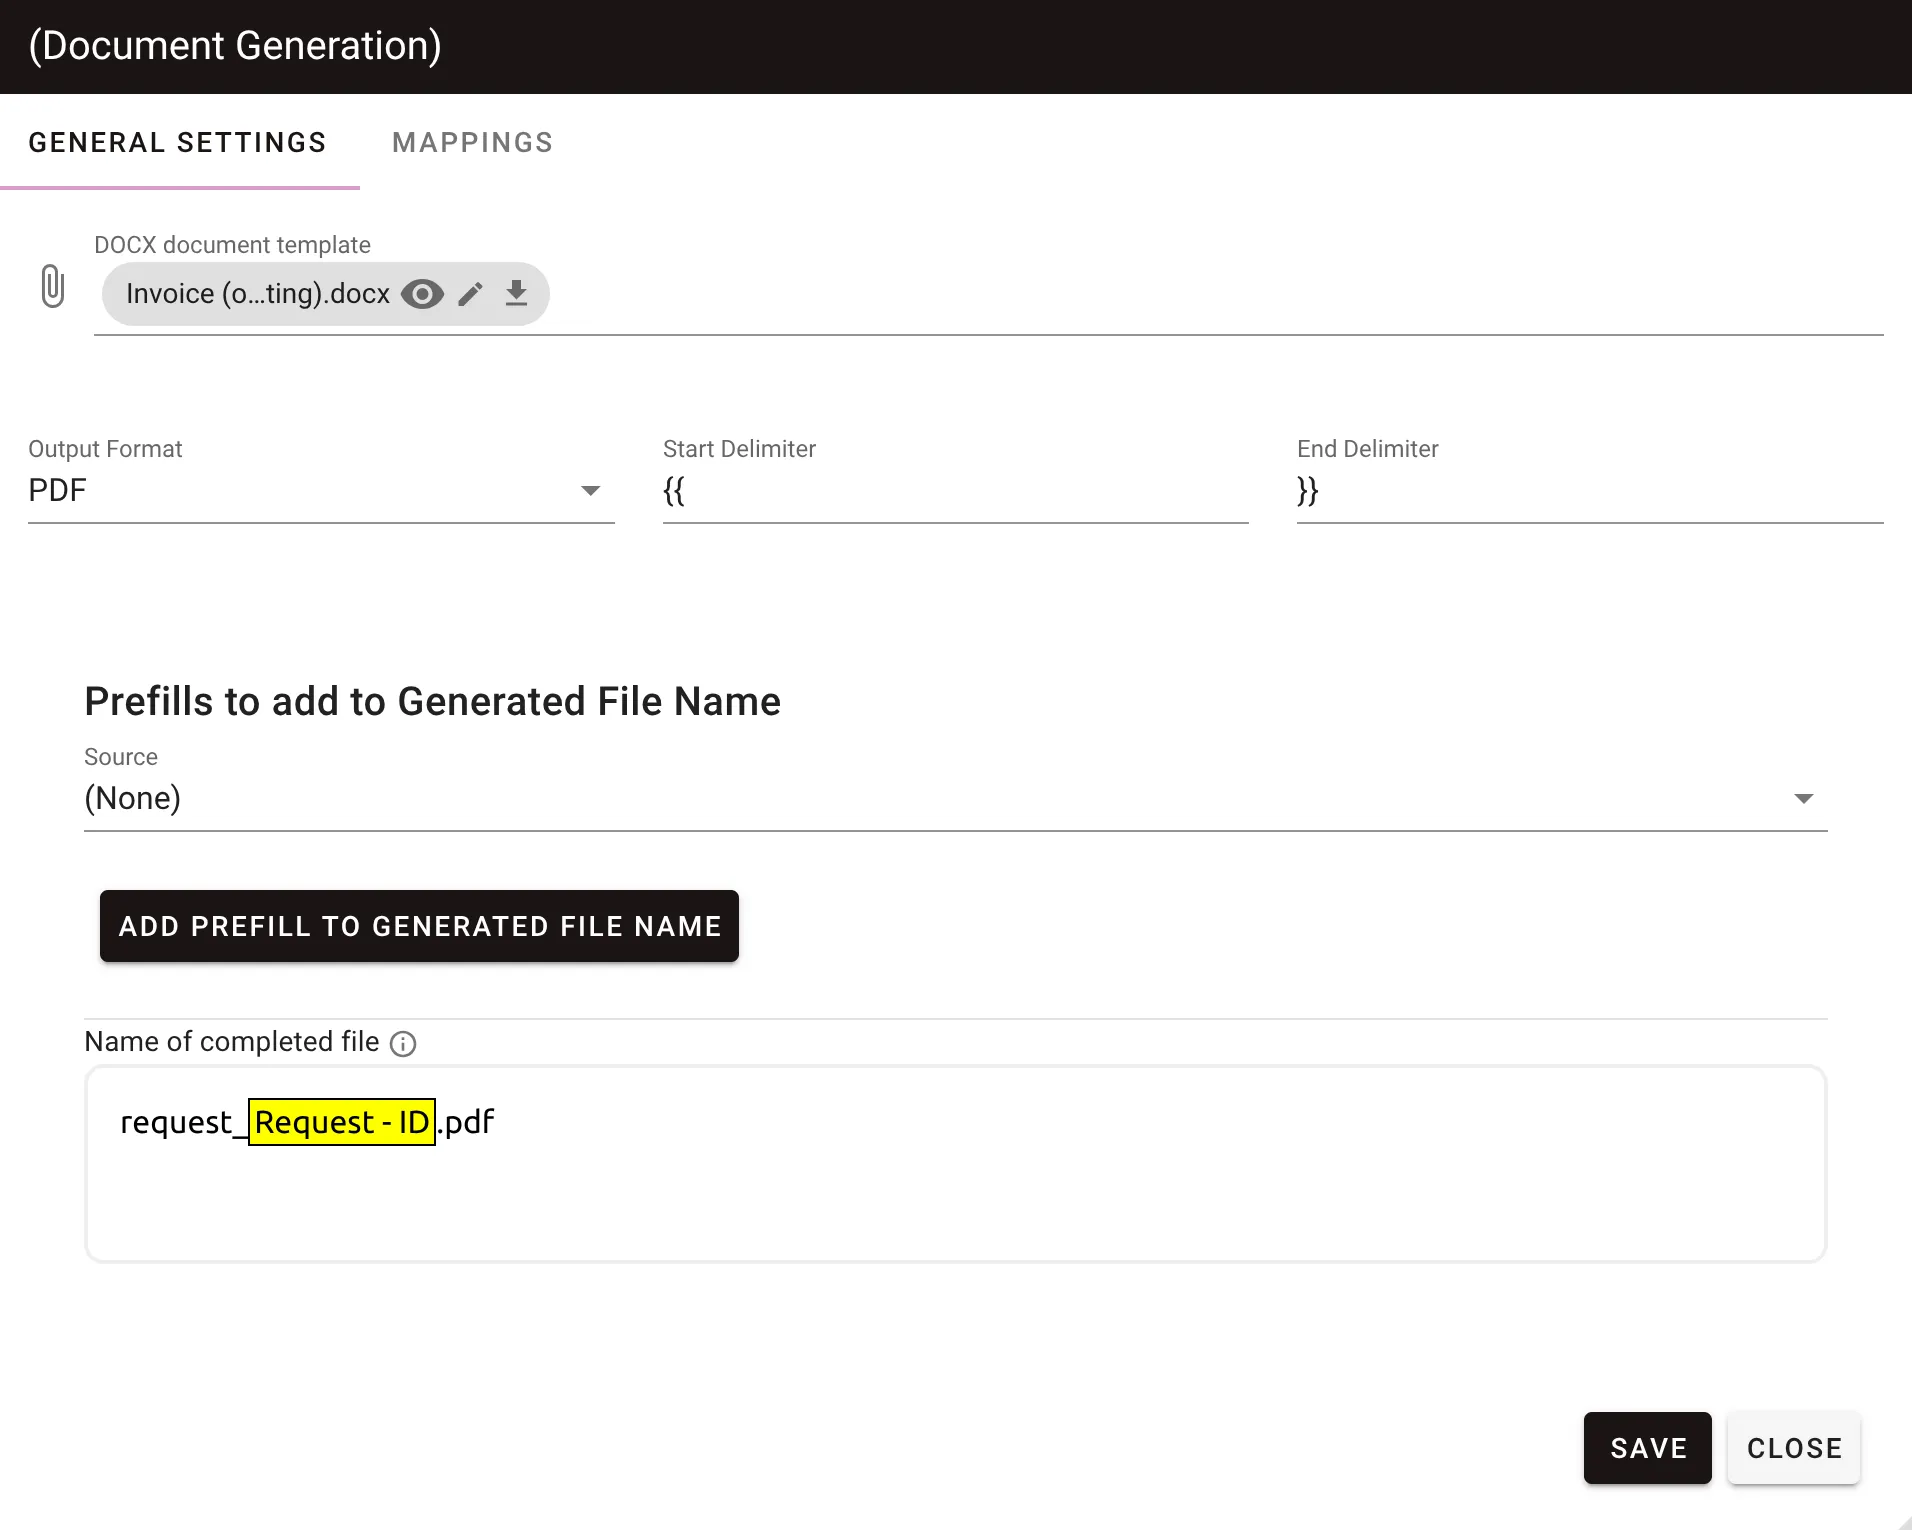
- Go to the General Settings tab.
- In the DOCX document template field, either:
- Click Create Document to create a new template using the built-in editor, or
- Upload an existing DOCX file template, or
- If a template already exists, click the edit icon to open it in the Document Authoring editor
- In the Output Format field, choose PDF or DOCX as your output.
- Fill in the Start Delimiter and End Delimiter fields.
- Under Prefills to add to Generated File Name, add the dynamic values to the Name of completed file field. You can add as many prefills as you want. The
.docxor.pdfextension will be added automatically based on the output format selected. - Click Save.
Map your data fields.
- Switch to the MAPPINGS tab.
- The system automatically detects all placeholders from your template.
- Map each placeholder to the corresponding data source in your system.
Set recipients (optional).
- After configuring the general settings and mappings, you can assign recipients to the Document Generation task.
- Recipients can review and make final edits to the generated document before submission.
- This is useful when you want users to verify the document content or make any necessary adjustments before the document is finalized.
- To configure recipients, right-click on the task, select Recipients from the menu, and add the users or groups who should receive the generated document for review.
- For detailed information on configuring recipients, including static and dynamic recipient options, refer to the recipient configuration guide.
Using the Document Authoring editor
The integrated Document Authoring editor provides a WYSIWYG document editing experience directly within the task configuration. This professional document editor is available when creating new templates or editing existing ones.
Creating and editing templates
- New templates — Click the edit icon next to Create Document to open the editor.
- Existing templates — Click the edit icon next to an existing template file to open it in the editor.
- Professional document editing — Use the WYSIWYG editor to format text, add placeholders, and design your document template with precise layout control.
- Template variables — Add dynamic placeholders using the configured delimiter syntax (default:
{{variable_name}}).
Version management
When working with templates that have multiple versions:
- Version sidebar — A version history panel appears on the left side of the editor when multiple versions exist.
- Version selection — Click any version in the sidebar to load and preview it in the editor.
- Active version indicator — The system shows which version is currently being used in task execution.
- Use this version — When viewing a version different from the active one, click Use this version to set it as the active template.
Saving and renaming templates
- Template naming — Edit the filename in the text field at the top of the editor.
- Save document — Click Save Document to create a new version with the current filename and content.
- Version creation — Each save operation creates a new version, preserving the complete history of template changes.
- Author tracking — Each version records the author and creation timestamp for audit purposes.
Mapping questions
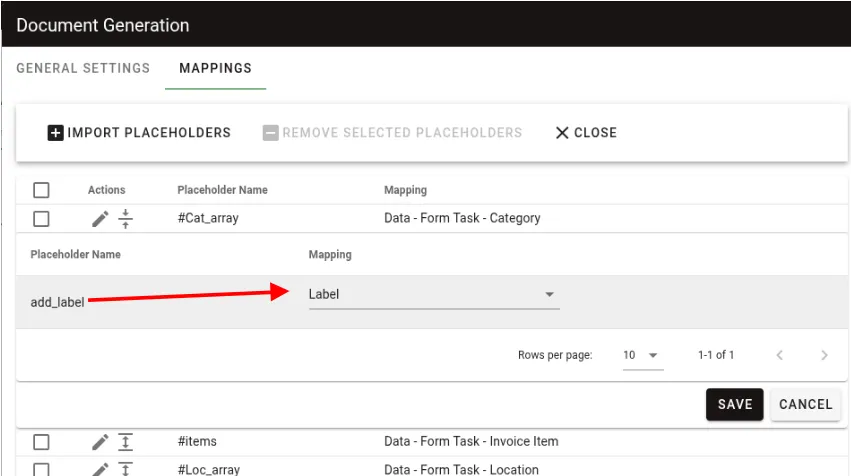
To map text-based questions, for example, short text, calendar, search box, map the single placeholders to your desired data source. The image below shows an example of a text-based question mapping.
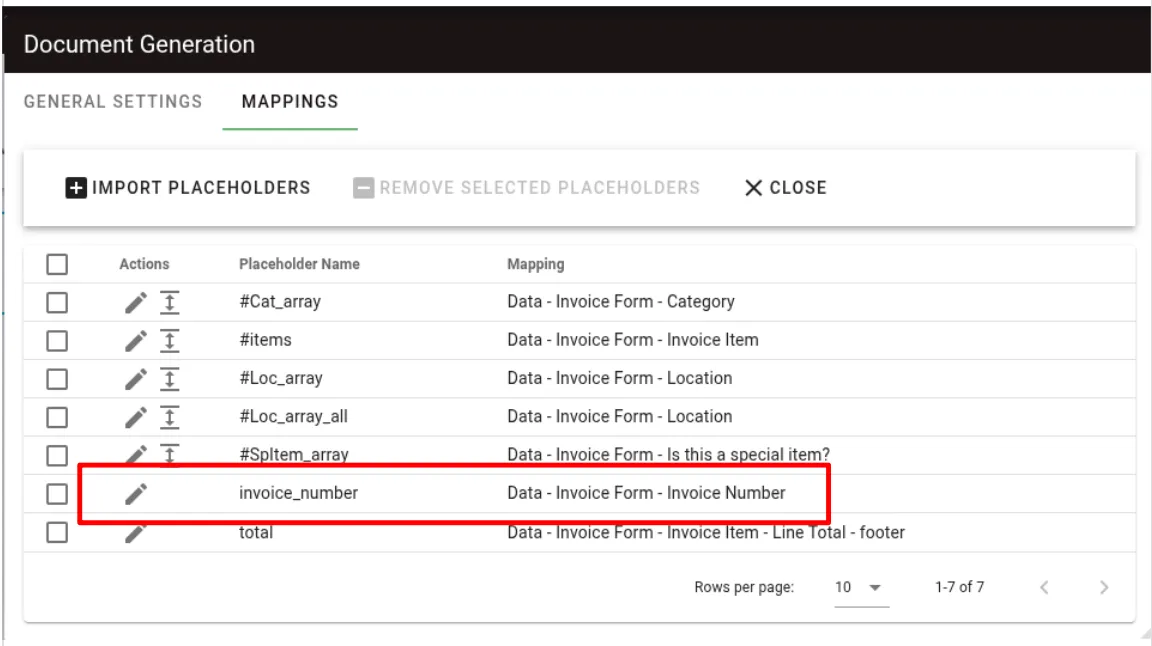
The Mappings tab displays all detected placeholders from your template along with their corresponding data sources.

To map multi-option questions, for example, checkboxes, radio buttons, select list, follow the instructions below.
Checkbox mapping
Map the loop placeholder from your template to the checkbox question in your form. For example, if your template has:
{{#Loc_array}} {{add_label}} {{add_value}} {{/Loc_array}}Map
Loc_arrayto your checkbox question.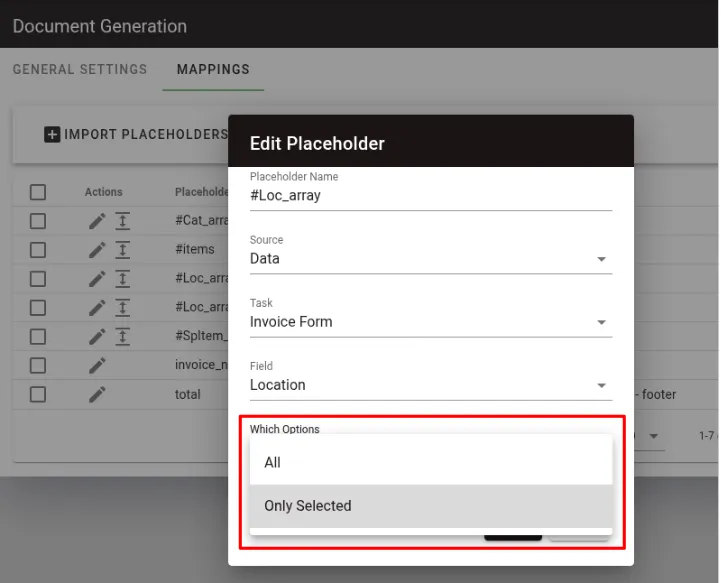
You can choose whether to display All options (both selected and unselected) or Only Selected options in your output. Make your choice and click Save.
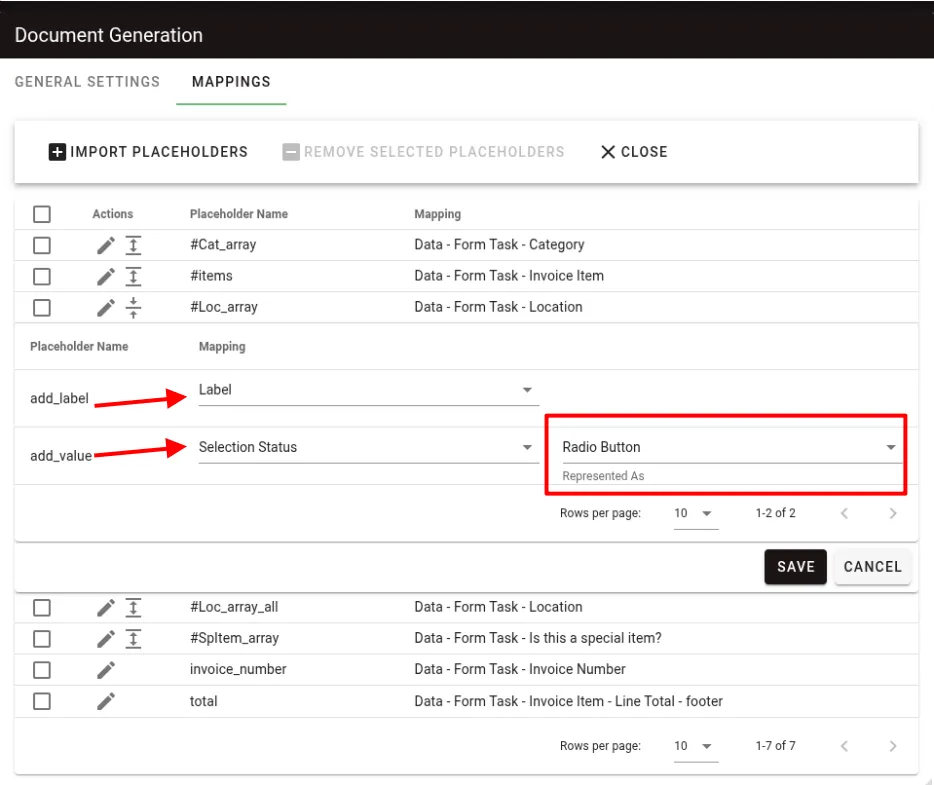
Click the icon to expand additional settings.

For the placeholders inside the loop:
- Map
add_labelto the option label (for example, the checkbox text). - Map
add_valueto the selection status (whether the option is checked).
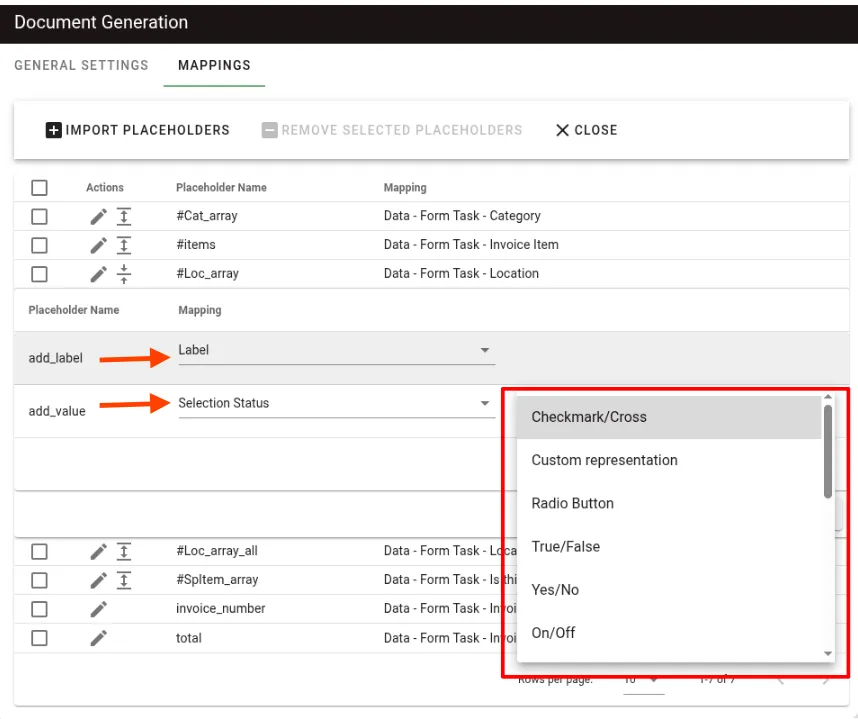
- Map
Under Represented As, choose how you want the checkbox to appear. Then click Save.
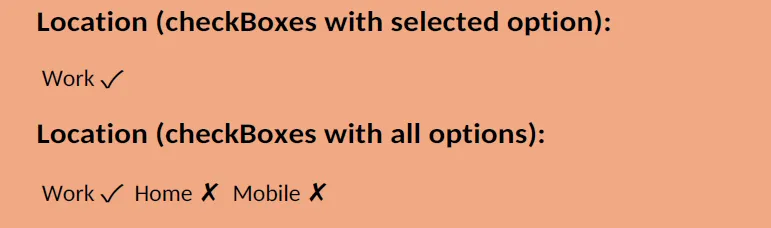
Example
Here’s a checkbox shown with all options vs. only selected options in a checkmark/cross format.
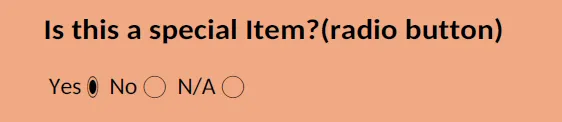
Radio button mapping
- Mapping a radio button question is similar to a checkbox, but you can only select one option.
- Use a loop placeholder as you would with a checkbox, but expect only a single choice to be mapped.
Example
Select list mapping
- To display the selected value as text, map it using a single placeholder similar to a text-based question.
- To show graphical representations (similar to checkboxes or radio buttons), define a loop placeholder and map it similar to the checkbox or radio button examples.
Example
Here’s how a select list is mapped with labels only.

How to map a grid
- Create a loop placeholder named
itemsin your DOCX template, enclosing all the columns you want to map. Each placeholder inside corresponds to a grid column. For example:
| Qty. | Item# | Description | Unit price | Line total |
|---|---|---|---|---|
| {{#items}}{{quantity}} | {{number}} | {{description}} | {{price}} | {{total}}{{/items}} |
Map the
itemsplaceholder to the grid question in your form. Then click Save.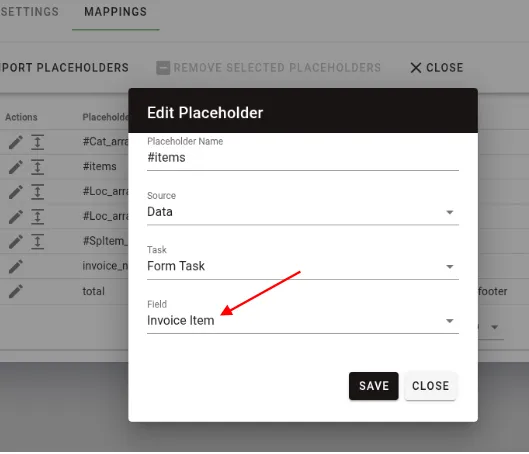
Map each individual placeholder (
quantity,number,description,price,total) to the corresponding grid columns in your form.For currency fields like
priceortotal, make sure to specify the appropriate currency format.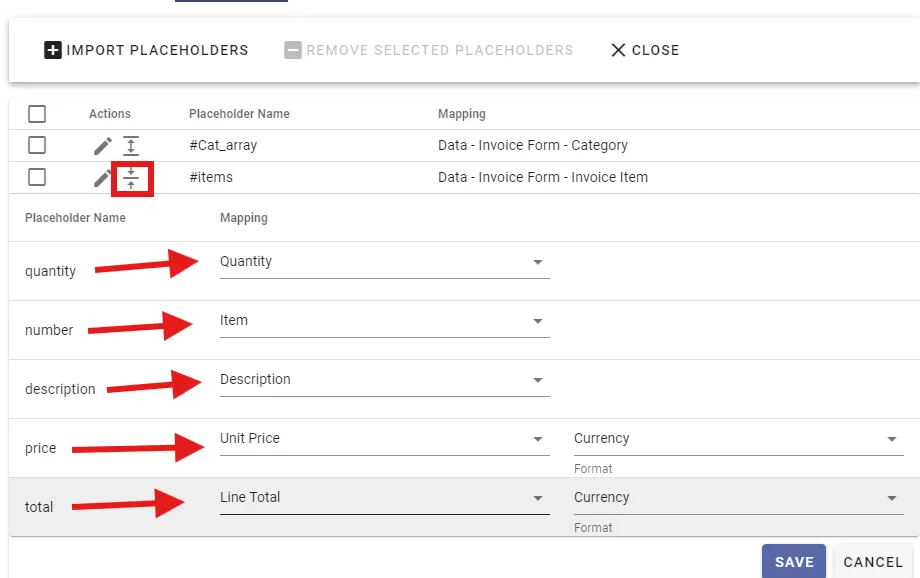
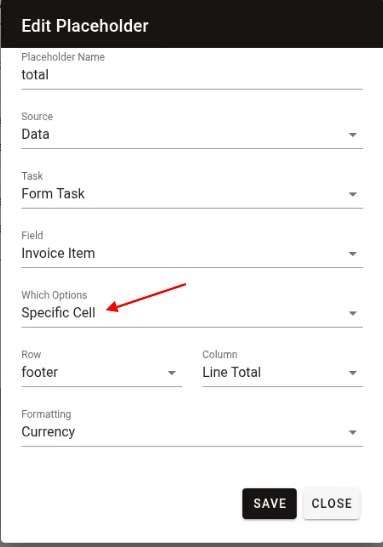
How to map a footer total in a grid
To map a footer value such as a total:
- Add a new parameter for the total.
- Select the grid question in the Field dropdown.
- For Which Options, choose Specific Cell.
- Set Row to footer.
- Set Column to the column containing the total (for example, Line Total).
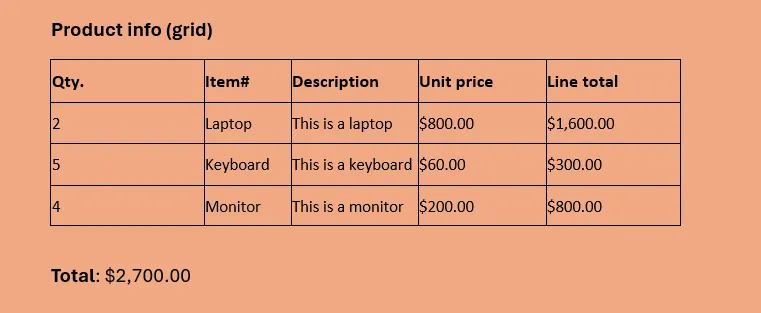
Example of a complete grid mapping
Troubleshooting common issues
- Template not detected — Ensure your DOCX file is saved in the correct format and placeholders use the specified delimiters.
- Mapping errors — Verify that placeholder names match exactly (case-sensitive) and contain only alphanumeric characters.
- Output generation fails — Check that your Nutrient Document Engine is properly configured and has sufficient resources.
- Missing data in output — Confirm that all mapped placeholders correspond to actual data sources in your workflow.
- Template formatting issues — Avoid complex formatting within placeholder text that might interfere with data insertion.
Attaching generated documents to other tasks
Documents created by the Document Generation task can be attached to subsequent tasks in your workflow, including Approval tasks. This enables approvers to review the generated document as part of their approval workflow.
To attach a generated document to an Approval task:
- Add the Document Generation task before the Approval task in your process flow
- In the Approval task configuration, use the attachment settings to reference the output from the Document Generation task
- The generated document will be available for the approver to view when they receive the approval request
Next steps
After setting up Document Generation:
- Test your templates with sample data to verify mapping accuracy
- Configure automated workflows to trigger document generation based on form submissions
- Set up file storage locations for generated documents
- Attach generated documents to Approval tasks for review workflows
- Train your team on template creation recommendations
Conclusion
Document Generation enables you to automate your document creation process by generating customized DOCX or PDF files. By leveraging placeholders and advanced mapping options — including grid data and footer totals — you can create workflows that produce professional documents for your business needs.
If you’re interested in adding this premium feature to your license or want to learn more about Document Generation, contact our Customer Success team.