Custom snap-in implementation
Before starting, complete the your first DocuVieware ASP.NET Web Forms page and client/server coming and going with custom actions guides.
A snap-in is an interface element that can be used for various purposes. DocuVieware comes with several built-in snap-ins, such as the Thumbnails, Bookmarks, Text Search, and Annotations palette.
This guide shows how to create a custom snap-in with a button that sends a ping command to the server, which replies with a pong message.
Requirements — .NET Framework 4.6 or above
Note — Screenshots were taken using Visual Studio and GdPicture.NET 14. They may differ from the current release.
Preparing the custom snap-in content
Add the custom snap-in content in the
Page_Loadcode behind (Default.aspx.cs).Do this only when the page isn’t in a
PostBackcontext.A custom snap-in is created using the
AddCustomSnapInmethod, which takes several mandatory elements:- A name — Use this if you want to select your custom snap-in by code using the
SelectSnapInJavaScript API method. - A title — This is displayed on top of it when selected; in other words, it’s the snap-in label, here it’s “Custom Snap-In.”
- An icon — In this guide, it’s a lightning bolt SVG icon.
- A content — The HTML content your snap-in contains; in this guide, it’s a
<div>with a<button>in it.
C# protected void Page_Load(object sender, EventArgs e){if (!IsPostBack){using (HtmlGenericControl icon = new HtmlGenericControl("svg")){icon.Attributes["viewBox"] = "0 0 16 16";icon.Attributes["width"] = "100%";icon.Attributes["height"] = "100%";icon.InnerHtml = "<path d=\"M6 0l-6 8h6l-4 8 14-10h-8l6-6z\"></path>";using (HtmlGenericControl panel = new HtmlGenericControl("div")){panel.ClientIDMode = ClientIDMode.Static;panel.ID = "customSnapInTutorialPanel" + DocuVieware1.UniqueID;using (HtmlGenericControl customSnapInTutorialButtonDiv = new HtmlGenericControl("div")){customSnapInTutorialButtonDiv.Style["float"] = "left";customSnapInTutorialButtonDiv.Style["margin-top"] = "6px";customSnapInTutorialButtonDiv.Style["margin-left"] = "6px";using (HtmlGenericControl customSnapInTutorialButton = new HtmlGenericControl("button")){customSnapInTutorialButton.ID = "customSnapInSubmit" + DocuVieware1.UniqueID;customSnapInTutorialButton.Style["height"] = "26px";customSnapInTutorialButton.Style["background-color"] = HexConverter(DocuVieware1.ActiveSelectedColor);customSnapInTutorialButton.InnerHtml = "Ping";customSnapInTutorialButton.Attributes["class"] = "btn-valid";customSnapInTutorialButton.Attributes["onclick"] = "ping(); return false;";customSnapInTutorialButtonDiv.Controls.Add(customSnapInTutorialButton);}panel.Controls.Add(customSnapInTutorialButtonDiv);}DocuVieware1.AddCustomSnapIn("customSnapInTutorial", "Custom Snap-In", icon, panel, true);}}}}The
onclickevent on the button calls theping()function, which you’ll implement later on the client side.- A name — Use this if you want to select your custom snap-in by code using the
Add two more things: the
HexConverterutility function, and the custom action handler that sends the message to the client:C# private static string HexConverter(Color c){return "#" + c.R.ToString("X2") + c.G.ToString("X2") + c.B.ToString("X2");}public static void HandleCustomSnapInAction(CustomActionEventArgs e){e.message = new DocuViewareMessage("Pong", icon: DocuViewareMessageIcon.Information);}Add the custom action event handler in the
Global.asax.csfile:C# private void CustomActionsHandler(object sender, CustomActionEventArgs e){if ((e.actionName == "ping")){Default.HandleCustomSnapInAction(e);}}
Now proceed to the client side.
Preparing your custom action client-side
There isn’t much to do client-side aside from setting up the JavaScript function that triggers the custom action you implemented previously. Add a <script> tag in the <head> section of the page:
<script> function ping() { DocuViewareAPI.PostCustomServerAction("DocuVieware1", true, "ping"); }</script>Compile and start the page. The custom snap-in icon appears in the left panel.
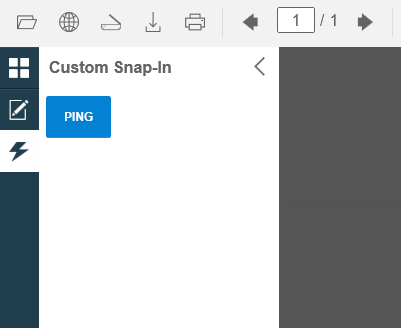
Now, if you select it and click the Ping button, it triggers the custom action and you should see a Pong message coming back from the server.