Integrating DocuVieware into SharePoint 2019
This guide creates an add-in instead of a SharePoint solution.
A SharePoint add-in has many advantages compared to farm solutions when you consider the safety, scaling, and integration of the deployment environment.
Below are important notes regarding SharePoint apps when compared with SharePoint solutions:
- App code doesn’t run in the SharePoint host environment.
- They can work within the scope of a SharePoint site, and also in a special SharePoint site (App Catalog).
- No downtime is required for the whole environment when an app is being upgraded.
Prerequisites
This guide uses the following tools:
- Microsoft Visual Studio Enterprise 2019
- Microsoft .NET Framework Version 4.8.04084
- SharePoint 2019
- DocuVieware 3.1.0.75 or higher
The SharePoint 2019 solution is hosted in an Azure cloud environment.
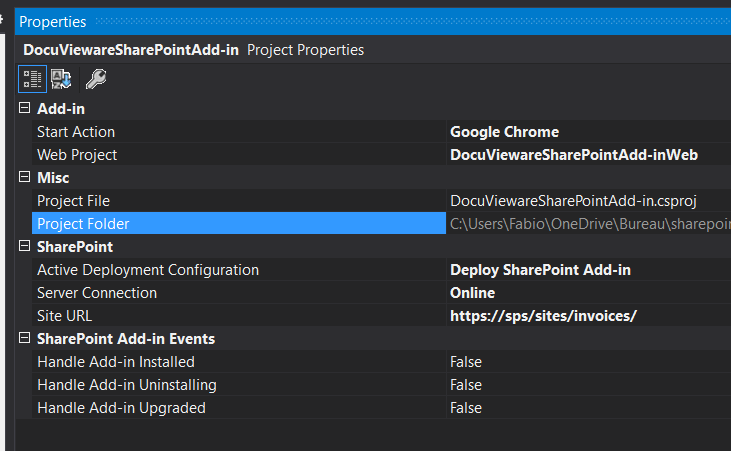
Creating your application
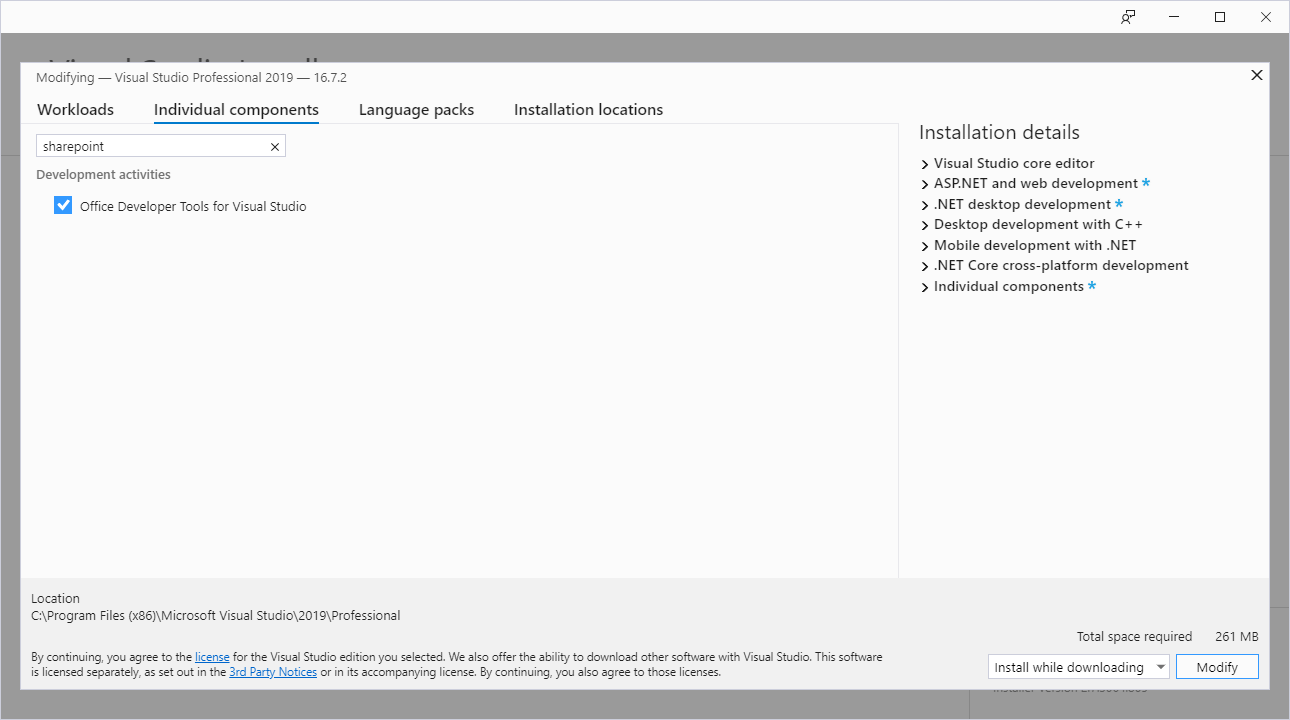
Add the Office Developer Tools for Visual Studio component using the Visual Studio installer to make the add-in application work.
Then, create the app as described below:
Launch Visual Studio.
Create a new project.
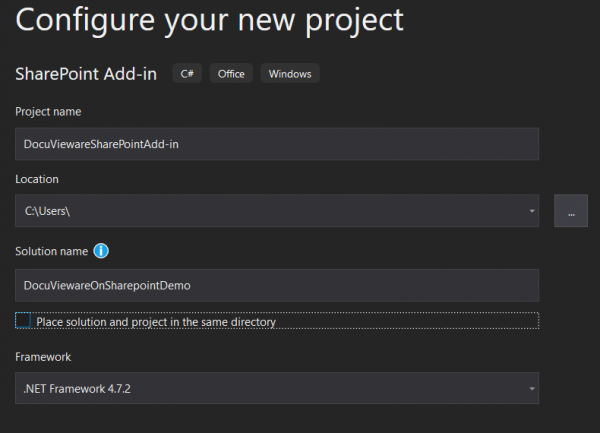
Select SharePoint Add-in and C# as the language.

Configure the projects.
Click Create.
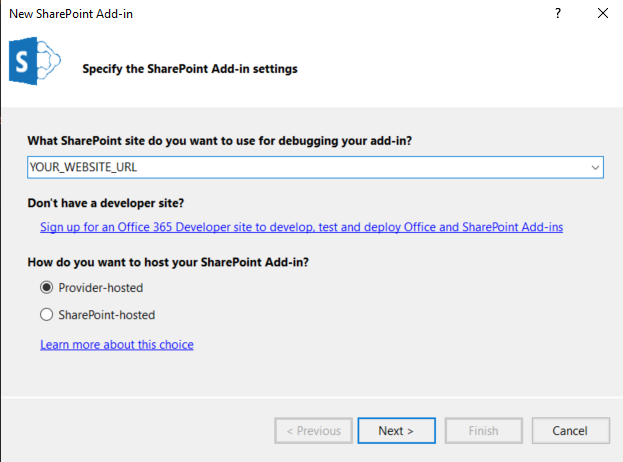
Specify your SharePoint Add-in settings:
- Provider-hosted — Selecting this hosts the app externally from SharePoint and uses all the options available with the client-side object model.
- SharePoint-hosted — Selecting this hosts the app within SharePoint and uses the JavaScript client-side object model.
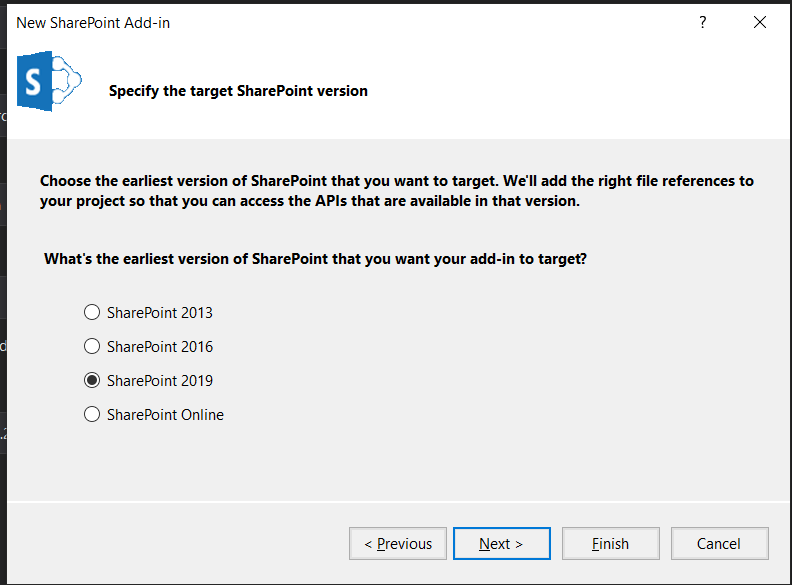
Specify the target SharePoint version.
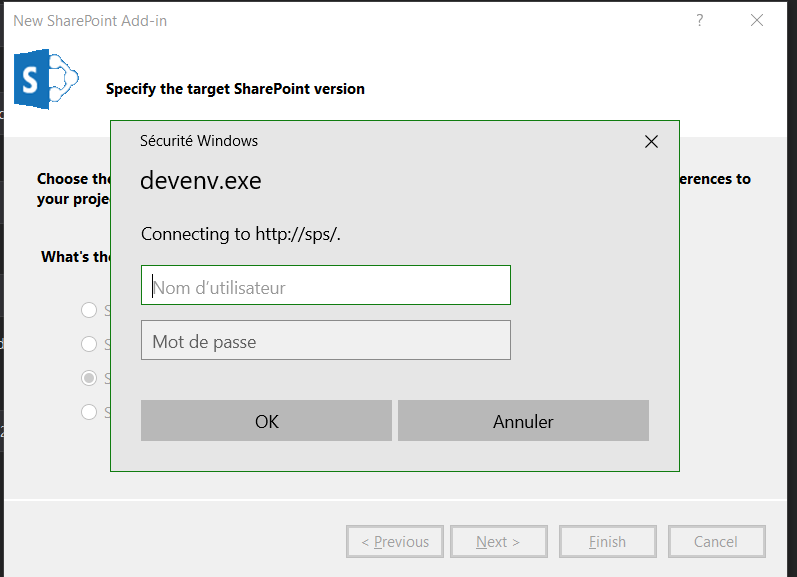
Type your login/password for the SharePoint server.
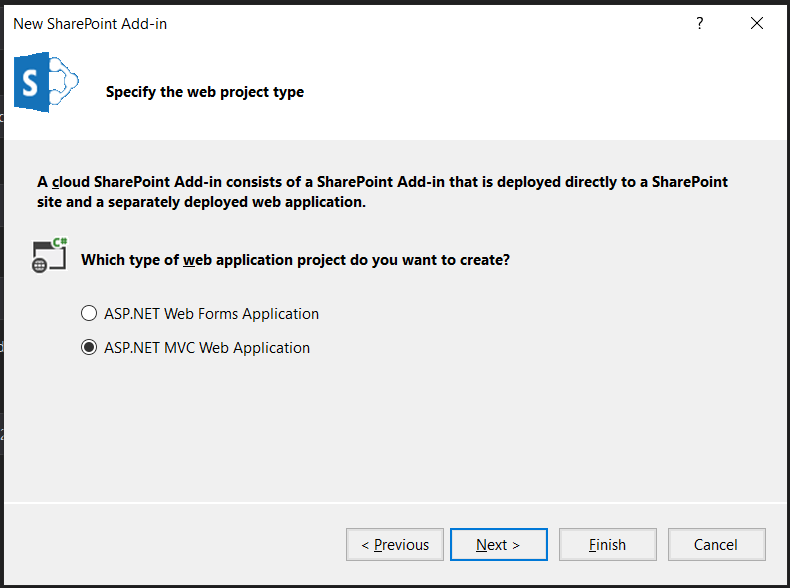
Choose ASP.NET MVC Web Application.
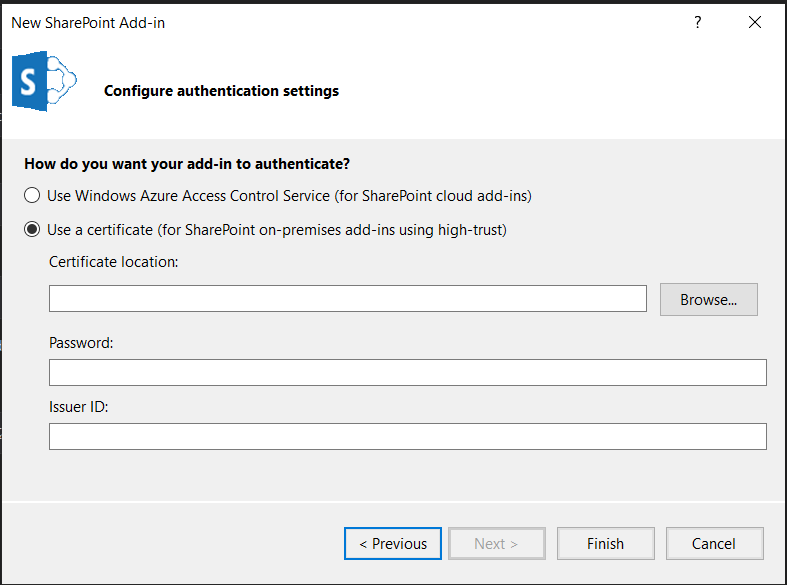
Set the STS certificate location’s field to the path where the created certificate is. Learn how to create/replace the certificate by referring to the replace the STS certificate for SharePoint Server(opens in a new tab) guide.
Type your password and your issuer ID (creator’s ID).
Click Finish.
Your add-in is generated.
SharePoint configuration
To declare an application in SharePoint, create an App Catalog Site Collection.
Check out the Microsoft documentation(opens in a new tab) for this step.
To deploy your application from Visual Studio to SharePoint, link the two of them.
You can deploy or publish solutions to a local SharePoint server on your development computer. The deployment process copies the .wsp file to the SharePoint server, installs the solution, and then activates the features. The publishing process only copies the .wsp file to the server and installs it. You must manually activate it to enable it in SharePoint.
By following the MSDN documentation, you’ll be able to have a well-implemented solution in your SharePoint environment:
- Developing SharePoint Solutions - Visual Studio(opens in a new tab)
- Set up a general development environment for SharePoint(opens in a new tab)
Below is the environment used to develop this solution.
DocuVieware integration
For the DocuVieware integration, the process is similar to other implementations:
- Right-click References (in the Solution Explorer).
- Add reference.
- Click Browse.
- Select
GdPicture.NET.14.NET.WEB.DocuVieware.dll.
You also need to set your Global.asax for:
- Setting your DocuVieware API key (if you don’t have one, go to the download page)
- Setting
SESSION_TIMEOUT(number value, set-1to handle session timeout through ASP.NET session mechanism) - Setting
STICKY_SESSION(Boolean) - Loading the assembly correctly
public class MvcApplication : HttpApplication { public const int SESSION_TIMEOUT = 20; private const bool STICKY_SESSION = true; private const DocuViewareSessionStateMode DOCUVIEWARE_SESSION_STATE_MODE = DocuViewareSessionStateMode.InProc;
 public static string GetCacheDirectory() { return HttpRuntime.AppDomainAppPath + "\\Cache"; }
 protected void Application_Start() { try { Assembly.Load("GdPicture.NET.14.WEB.DocuVieware"); } catch (System.IO.FileNotFoundException) { throw new System.IO.FileNotFoundException(" The system cannot find the DocuVieware assembly. Please set the Copy Local Property of the GdPicture.NET.14.WEB.DocuVieware reference to true. More information: https://msdn.microsoft.com/en-us/library/t1zz5y8c(v=vs.100).aspx"); }
 DocuViewareLicensing.RegisterKEY("YOUR_API_KEY"); DocuViewareManager.SetupConfiguration(STICKY_SESSION, DOCUVIEWARE_SESSION_STATE_MODE, GetCacheDirectory());
 AreaRegistration.RegisterAllAreas(); FilterConfig.RegisterGlobalFilters(GlobalFilters.Filters); RouteConfig.RegisterRoutes(RouteTable.Routes); BundleConfig.RegisterBundles(BundleTable.Bundles); } }
Once the assembly is implemented, add the JavaScript client library.
Add these files:
docuvieware-min.cssdocuvieware-min.js
Reference them in the code. There are two different ways to do this.
Implement them into the BundleConfig as demonstrated below:
public class BundleConfig { public static void RegisterBundles(BundleCollection bundles) { bundles.Add(new ScriptBundle("~/bundles/jquery").Include( "~/Scripts/jquery-{version}.js"));
 bundles.Add(new ScriptBundle("~/bundles/bootstrap").Include( "~/Scripts/bootstrap.min.js"));
bundles.Add(new ScriptBundle("~/bundles/docuvieware").Include( "~/Scripts/docuvieware-min.js"));
 bundles.Add(new ScriptBundle("~/bundles/spcontext").Include( "~/Scripts/spcontext.js"));
 bundles.Add(new StyleBundle("~/Content/css").Include( "~/Content/bootstrap.min.css"));
 bundles.Add(new StyleBundle("~/Content/css").Include( "~/Content/docuvieware-min.css"));
 }
Or implement them in the cshtml main page:
<head> <title>DocuVieware - SharePoint Documents Reading Made Simple</title> <meta name="viewport" content="width=device-width, initial-scale=1" /> <link href="~/Content/docuvieware-min.css" rel="stylesheet" type="text/css" /> <script src="~/Scripts/docuvieware-min.js"></script> <script src="https://code.jquery.com/jquery-3.5.1.min.js" crossorigin="anonymous"></script></head>Declare the client ID in the application to make the communication work.
Set the client ID in the AppRegNew.aspx at <site_url>/_layouts/15/AppRegNew.aspx.
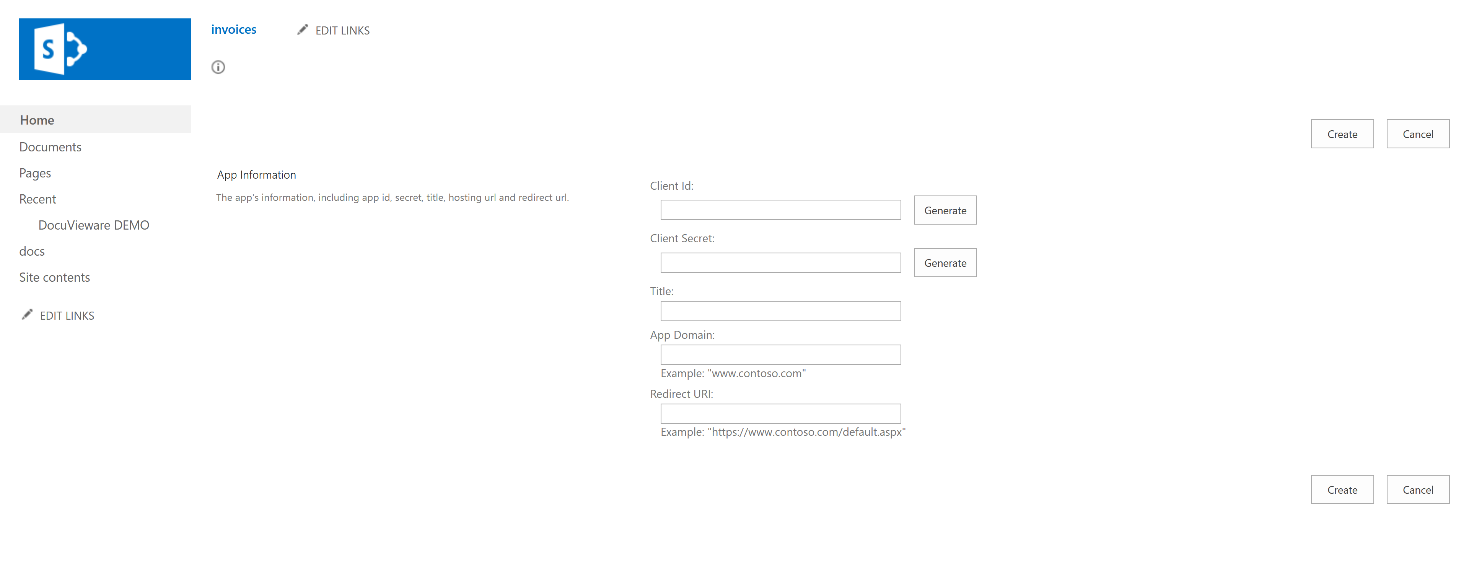
After this, declare the client ID in the AppManifest.xml as mentioned below:
- Right-click
App.manifest.xml. - Click Open with.
- Choose XML (Text) Editor.
Declare the <remotewebapplication> with the client ID:
<Properties> <Title>DocuVieware DEMO</Title> <StartPage>~remoteAppUrl/?{StandardTokens}</StartPage> </Properties>
 <AppPrincipal> <RemoteWebApplication ClientId="YOUR_CLIENT_ID" /> </AppPrincipal> <AppPermissionRequests AllowAppOnlyPolicy="true"> <AppPermissionRequest Scope="http://sharepoint/content/sitecollection/web/list" Right="FullControl" /> <AppPermissionRequest Scope="http://sharepoint/content/sitecollection/web" Right="FullControl" /> <AppPermissionRequest Scope="http://sharepoint/projectserver" Right="Manage" /> </AppPermissionRequests> <RemoteEndpoints> <RemoteEndpoint Url="https://sps/" /> </RemoteEndpoints>
Finish the configuration with one of the most specific requirements.
To create a plugged .NET application to SharePoint, set a security certificate for the communication between SharePoint and your add-in.
In the TokenHelper.cs file, set the username, the password, and the domain name to make the demo work.
This information is used by SharePoint only to generate a temporary security token to enable the POST request between the application and the SharePoint server.
Below is the specific line for creating a token and giving the client app the authorization to communicate with the SharePoint server with the POST method:
var dig = clientContext.GetFormDigestDirect().DigestValue;public static ClientContext GetClientContextWithAccessToken(string targetUrl, string accessToken) { ClientContext clientContext = new ClientContext(targetUrl) { AuthenticationMode = ClientAuthenticationMode.Anonymous, FormDigestHandlingEnabled = false }; CredentialCache myCache = new CredentialCache(); myCache.Add(new Uri(clientContext.Url), "NTLM", new NetworkCredential("sharepoint_demo", "Sharepoint2019", "SHAREPOINT")); clientContext.Credentials = myCache; var dig = clientContext.GetFormDigestDirect().DigestValue; clientContext.ExecutingWebRequest += delegate(object oSender, WebRequestEventArgs webRequestEventArgs) { webRequestEventArgs.WebRequestExecutor.WebRequest.PreAuthenticate = true; webRequestEventArgs.WebRequestExecutor.WebRequest.KeepAlive = true; webRequestEventArgs.WebRequestExecutor.WebRequest.UnsafeAuthenticatedConnectionSharing = true; webRequestEventArgs.WebRequestExecutor.WebRequest.Headers.Add("X-FORMS_BASED_AUTH_ACCEPTED", "f"); webRequestEventArgs.WebRequestExecutor.WebRequest.Headers[/fusion_text][/fusion_builder_column][/fusion_builder_row][/fusion_builder_container][fusion_builder_container hundred_percent="yes" overflow="visible" type="legacy"][fusion_builder_row][fusion_builder_column type="1_1" layout="1_1" background_position="left top" background_color="" border_color="" border_style="solid" spacing="yes" background_image="" background_repeat="no-repeat" padding_top="" padding_right="" padding_bottom="" padding_left="" margin_top="0px" margin_bottom="0px" class="" id="" animation_type="" animation_speed="0.3" animation_direction="left" hide_on_mobile="no" center_content="no" min_height="none" align_self="flex-start" border_sizes_undefined="" first="true" last="true" hover_type="none" link="" border_position="all" type="1_1"][fusion_text]["Authorization"] = "Bearer " + accessToken; if (webRequestEventArgs.WebRequestExecutor.WebRequest.Method == "POST" && !webRequestEventArgs.WebRequestExecutor.WebRequest.Headers.AllKeys.Contains("X-RequestDigest")) {
webRequestEventArgs.WebRequestExecutor.WebRequest.Headers.Add("X-RequestDigest", dig); } };
return clientContext; }Implementation
This section shows the custom development for saving on the server.
Specify where SharePoint should save files by configuring the defaultFolder path in web.config.
This way of setting the
defaultFolderis for demonstration purposes only and not production due to security issues.
<configuration> <appSettings> <add key="webpages:Version" value="3.0.0.0" /> <add key="webpages:Enabled" value="false" /> <add key="ClientValidationEnabled" value="true" /> <add key="UnobtrusiveJavaScriptEnabled" value="true" /> <add key="ClientId" value="YOUR_CLIENT_ID" /> <add key="ClientSecret" value="YOUR_CLIENT_SECRET" /> <add key="ClientSigningCertificatePath" value="C:\certs\sharepointaddin_cert.pfx" /> <add key="ClientSigningCertificatePassword" value="YOUR_SERVER_PASSWORD" /> <add key="IssuerId" value="YOUR_USER_ID" /> <add key="defaultFolder" value="/sites/invoices/Shared documents" /> </appSettings> …Implement the call method on the main page:
<body style="overflow: hidden; margin: 0; height: 100%"> @{ Model.Control.RenderControl(Output); Model.Control.Dispose(); }
<script> function SaveOnSharePoint() { $.post( `SaveToSharepoint${window.location.search}`, { documentId: "@Model.DocumentId.ToString()", dvSessionId: "@sessionId" }, (data) => DocuViewareAPI.DisplayMessageBox("@Model.Control.ID" , { text: data.Message, icon: data.Status === 1 ? 16 : 128 }), "json") } </script></body>public class SharePointContextFilterAttribute : ActionFilterAttribute { public override void OnActionExecuting(ActionExecutingContext filterContext) { if (filterContext == null) { throw new ArgumentNullException("filterContext"); }
Uri redirectUrl; switch (SharePointContextProvider.CheckRedirectionStatus(filterContext.HttpContext, out redirectUrl)) { case RedirectionStatus.Ok: return; case RedirectionStatus.ShouldRedirect: filterContext.Result = new RedirectResult(redirectUrl.AbsoluteUri); break; case RedirectionStatus.CanNotRedirect: filterContext.Result = new ViewResult { ViewName = "Error" }; break; } } }The SharePointContext.cs file is a class generated by Visual Studio when it links SharePoint with the MVC projects.
This guide was developed outside of an Active Directory environment, so the auto-generated classes (TokenHelper.cs and SharePointContext.cs) were modified to work in that setup.
If you face issues (for example, a 401 error on the POST request to the SharePoint server), you’ll find the modifications in the SharePoint sample delivered with the SDK on your computer’s main drive.
Contact Support(opens in a new tab) if you have any questions.