Set up digital signing in Salesforce
This guide walks Salesforce administrators through the one-time setup required to send documents for signing from Nutrient Documents for Salesforce.
Digital signing in Salesforce is powered by Nutrient Document Web Services (DWS). The Salesforce setup wizard creates or guides most Salesforce-side configuration, but you still finish a few steps in Salesforce Setup and the DWS Signer dashboard(opens in a new tab).
The signing setup has two parts:
- Outbound — Salesforce calls DWS to create envelopes, send documents, remind recipients, void envelopes, and download signed files.
- Inbound — DWS calls Salesforce to fetch documents and send signing status updates back to Salesforce.
Who should use this guide
Use this guide if you’re a Salesforce administrator or implementation owner configuring Nutrient document signing for your organization.
Prerequisites
Before you start, ensure you have:
- The basic Nutrient Documents for Salesforce setup completed
- Admin access to your Salesforce organization
- The Nutrient package installed in Salesforce
- Access to DWS Signer and an API key
- Permission to create or update Salesforce named credentials, external credentials, external client apps, permission set groups, and users
If your organization still needs the app-level setup, refer to the set up Nutrient Documents for Salesforce guide. If users will send documents for signing from Salesforce records, refer to the set up document generation in Salesforce guide as well.
If you need the Salesforce installation link, contact our Sales team. They can also help with DWS Signer dashboard access or a DWS Signer API key.
If you already have access to the DWS Signer dashboard, follow these steps to obtain the API key:
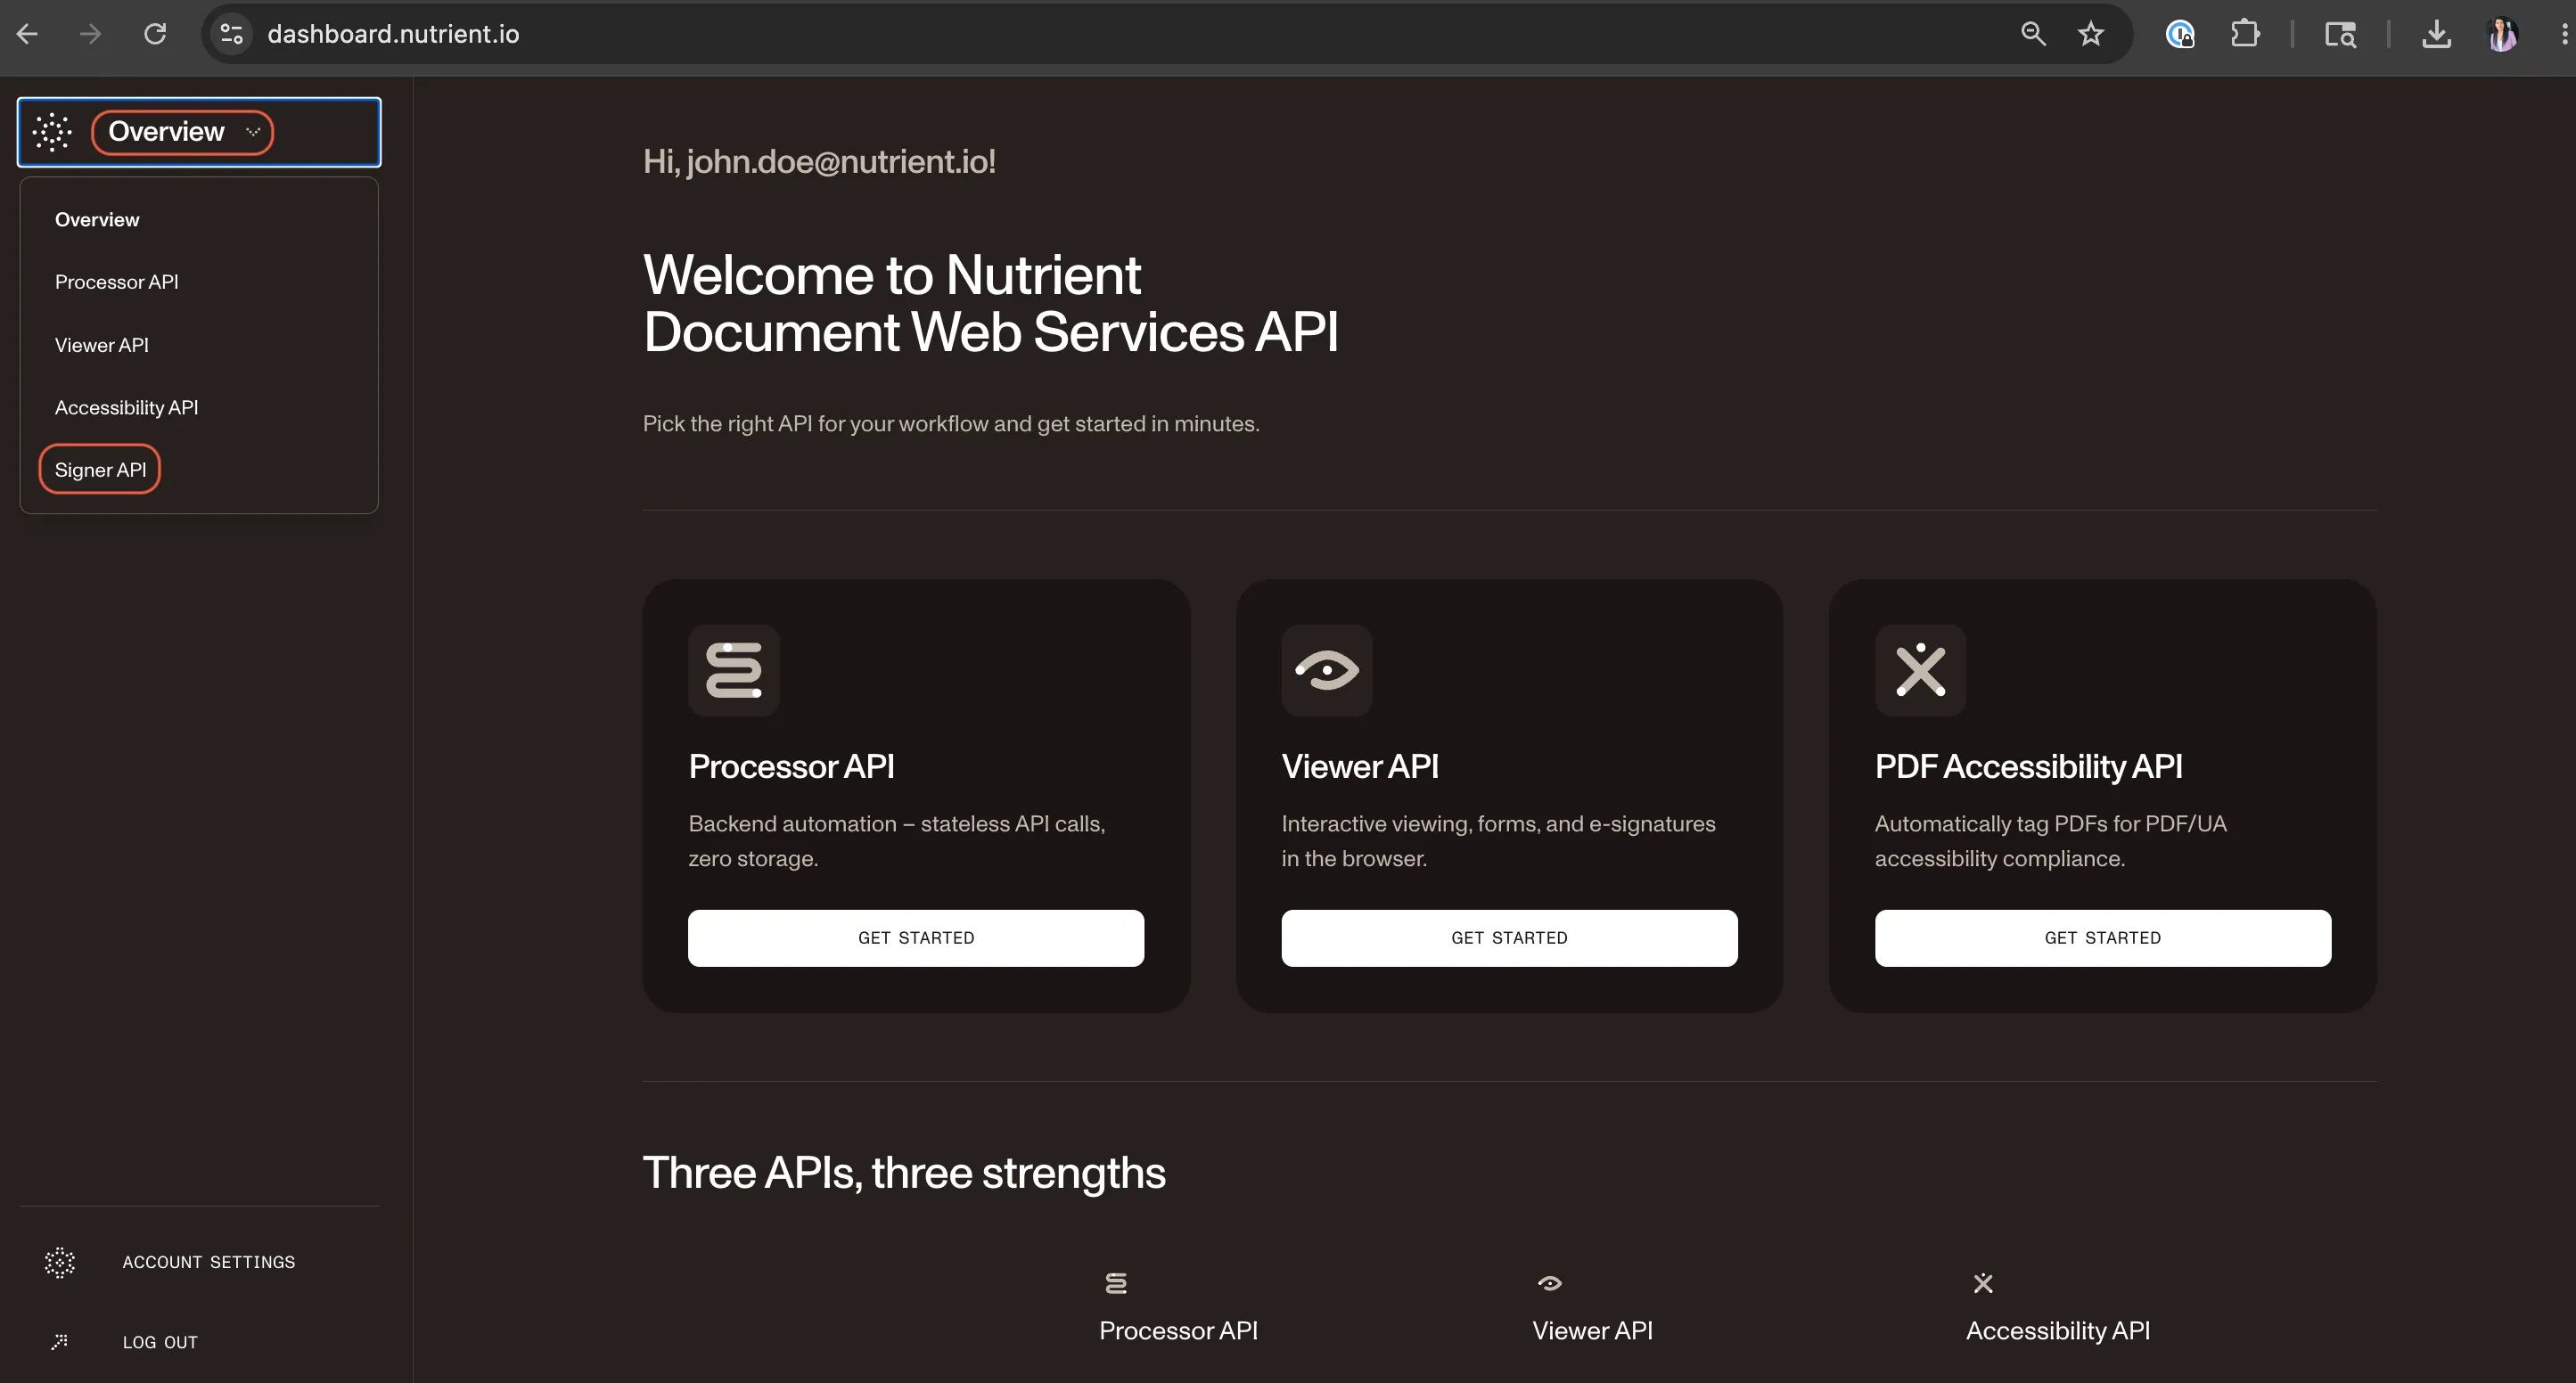
Select Signer API in the upper-left corner.
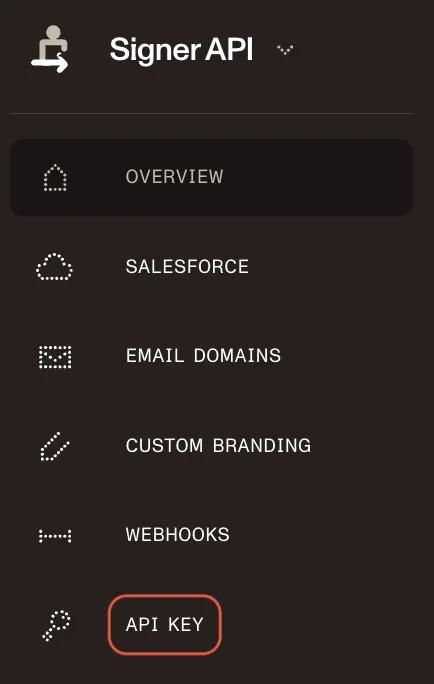
Click the API key tab in the left navigation panel.
Copy the API key.
Open the DWS Signing setup wizard
- Open the Nutrient Documents app from the Salesforce App Launcher.
- Open the Admin tab.
- In the left sidebar, go to DWS Signing.
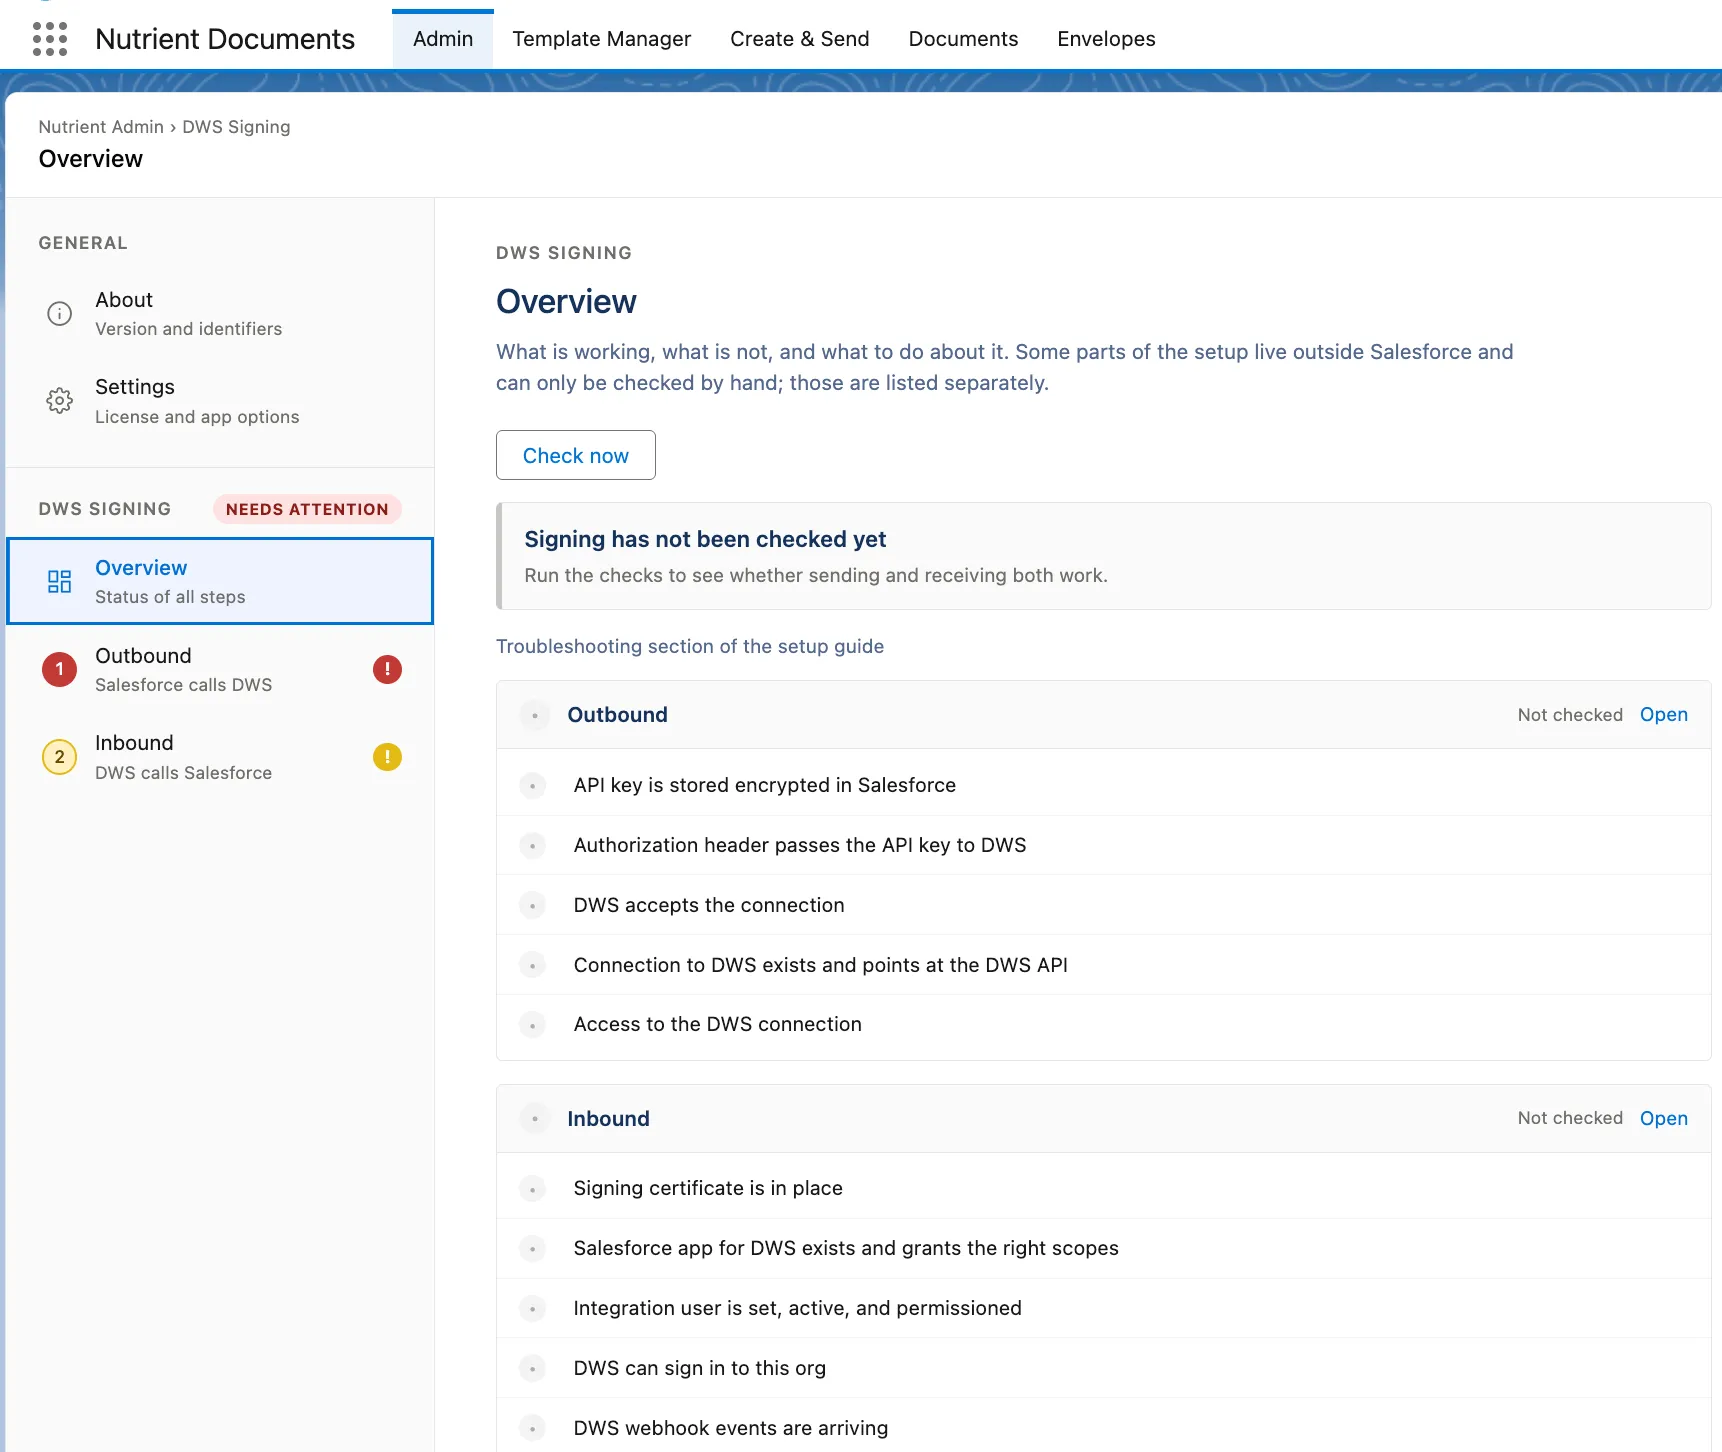
The wizard includes:
- Overview — Runs setup checks and links to fixes.
- Outbound — Configures how Salesforce calls DWS.
- Inbound — Configures how DWS calls Salesforce.
Check the current setup status
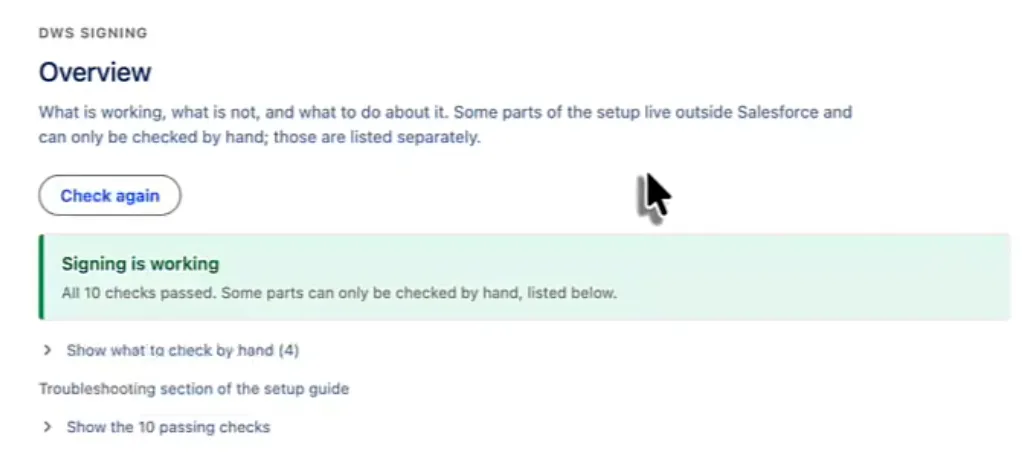
Start on DWS Signing > Overview and click Check now.
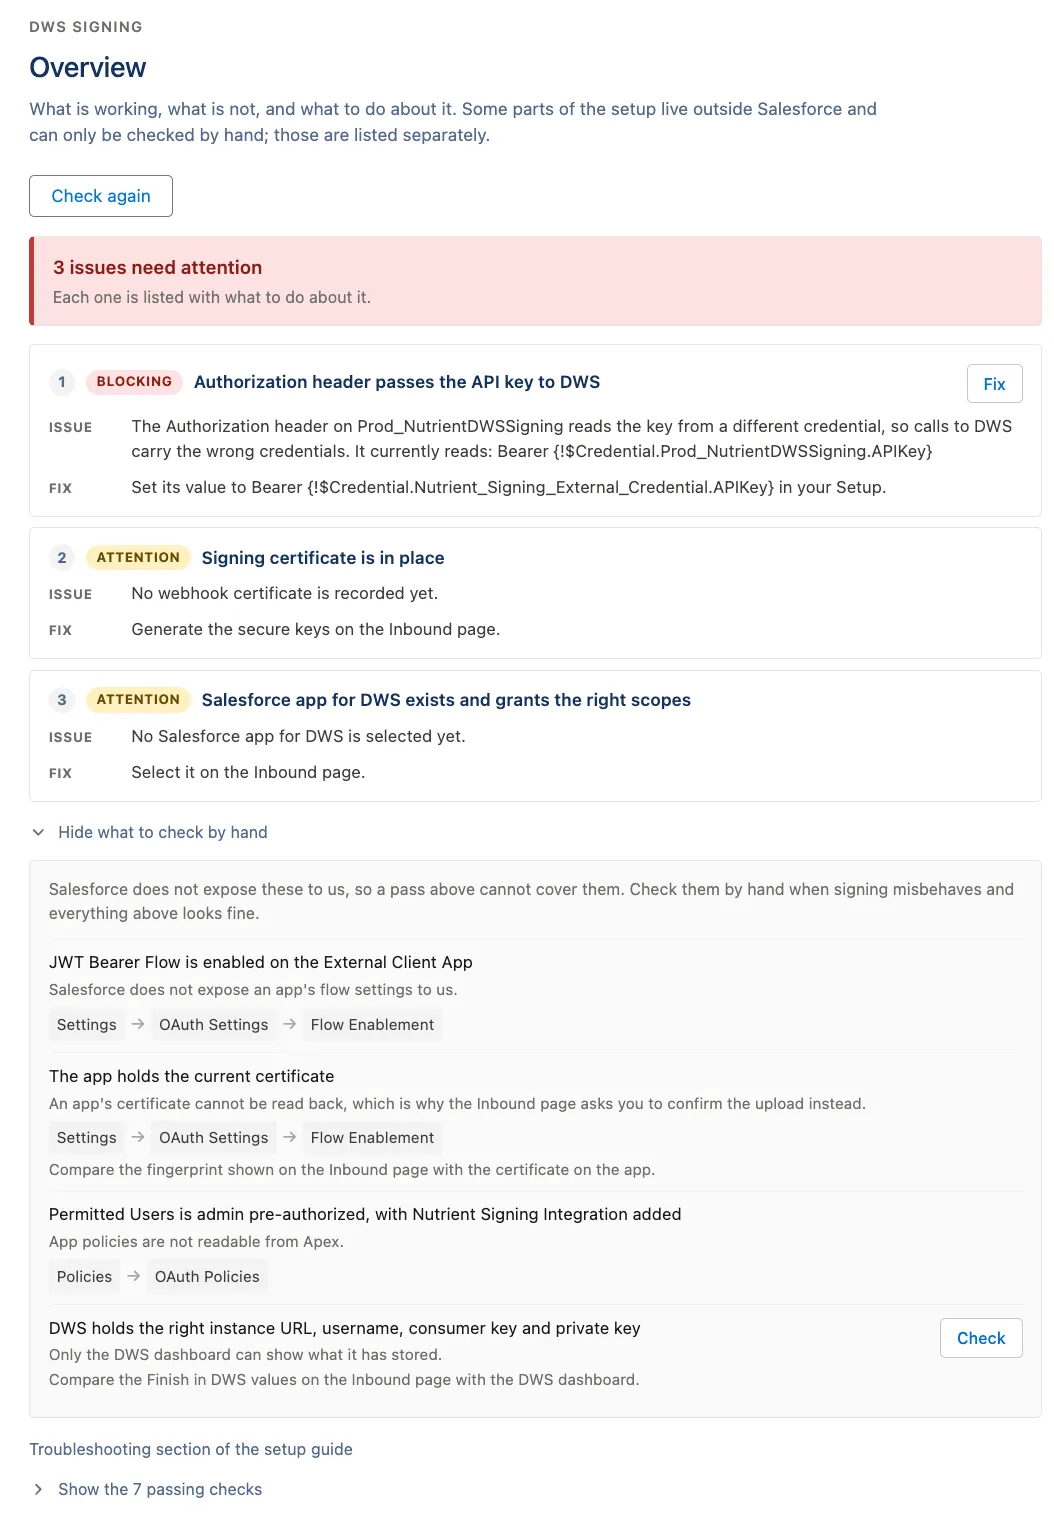
The Overview page checks the parts Nutrient can validate automatically, including:
- Whether the DWS API key is stored in Salesforce
- Whether the authorization header passes the API key to DWS
- Whether the named credential points to the DWS API
- Whether users have access to the DWS connection
- Whether the signing certificate, Salesforce app, integration user, DWS sign-in, and webhook events are working
Some items live outside Salesforce or can’t be read by the package. The wizard lists those as manual checks and links to the relevant Salesforce or DWS page.
Run Check now after each setup phase. If a check fails, expand the issue and use the provided fix link before continuing.
Part A — Connect Salesforce to DWS API (outbound)
Go to DWS Signing > Outbound.
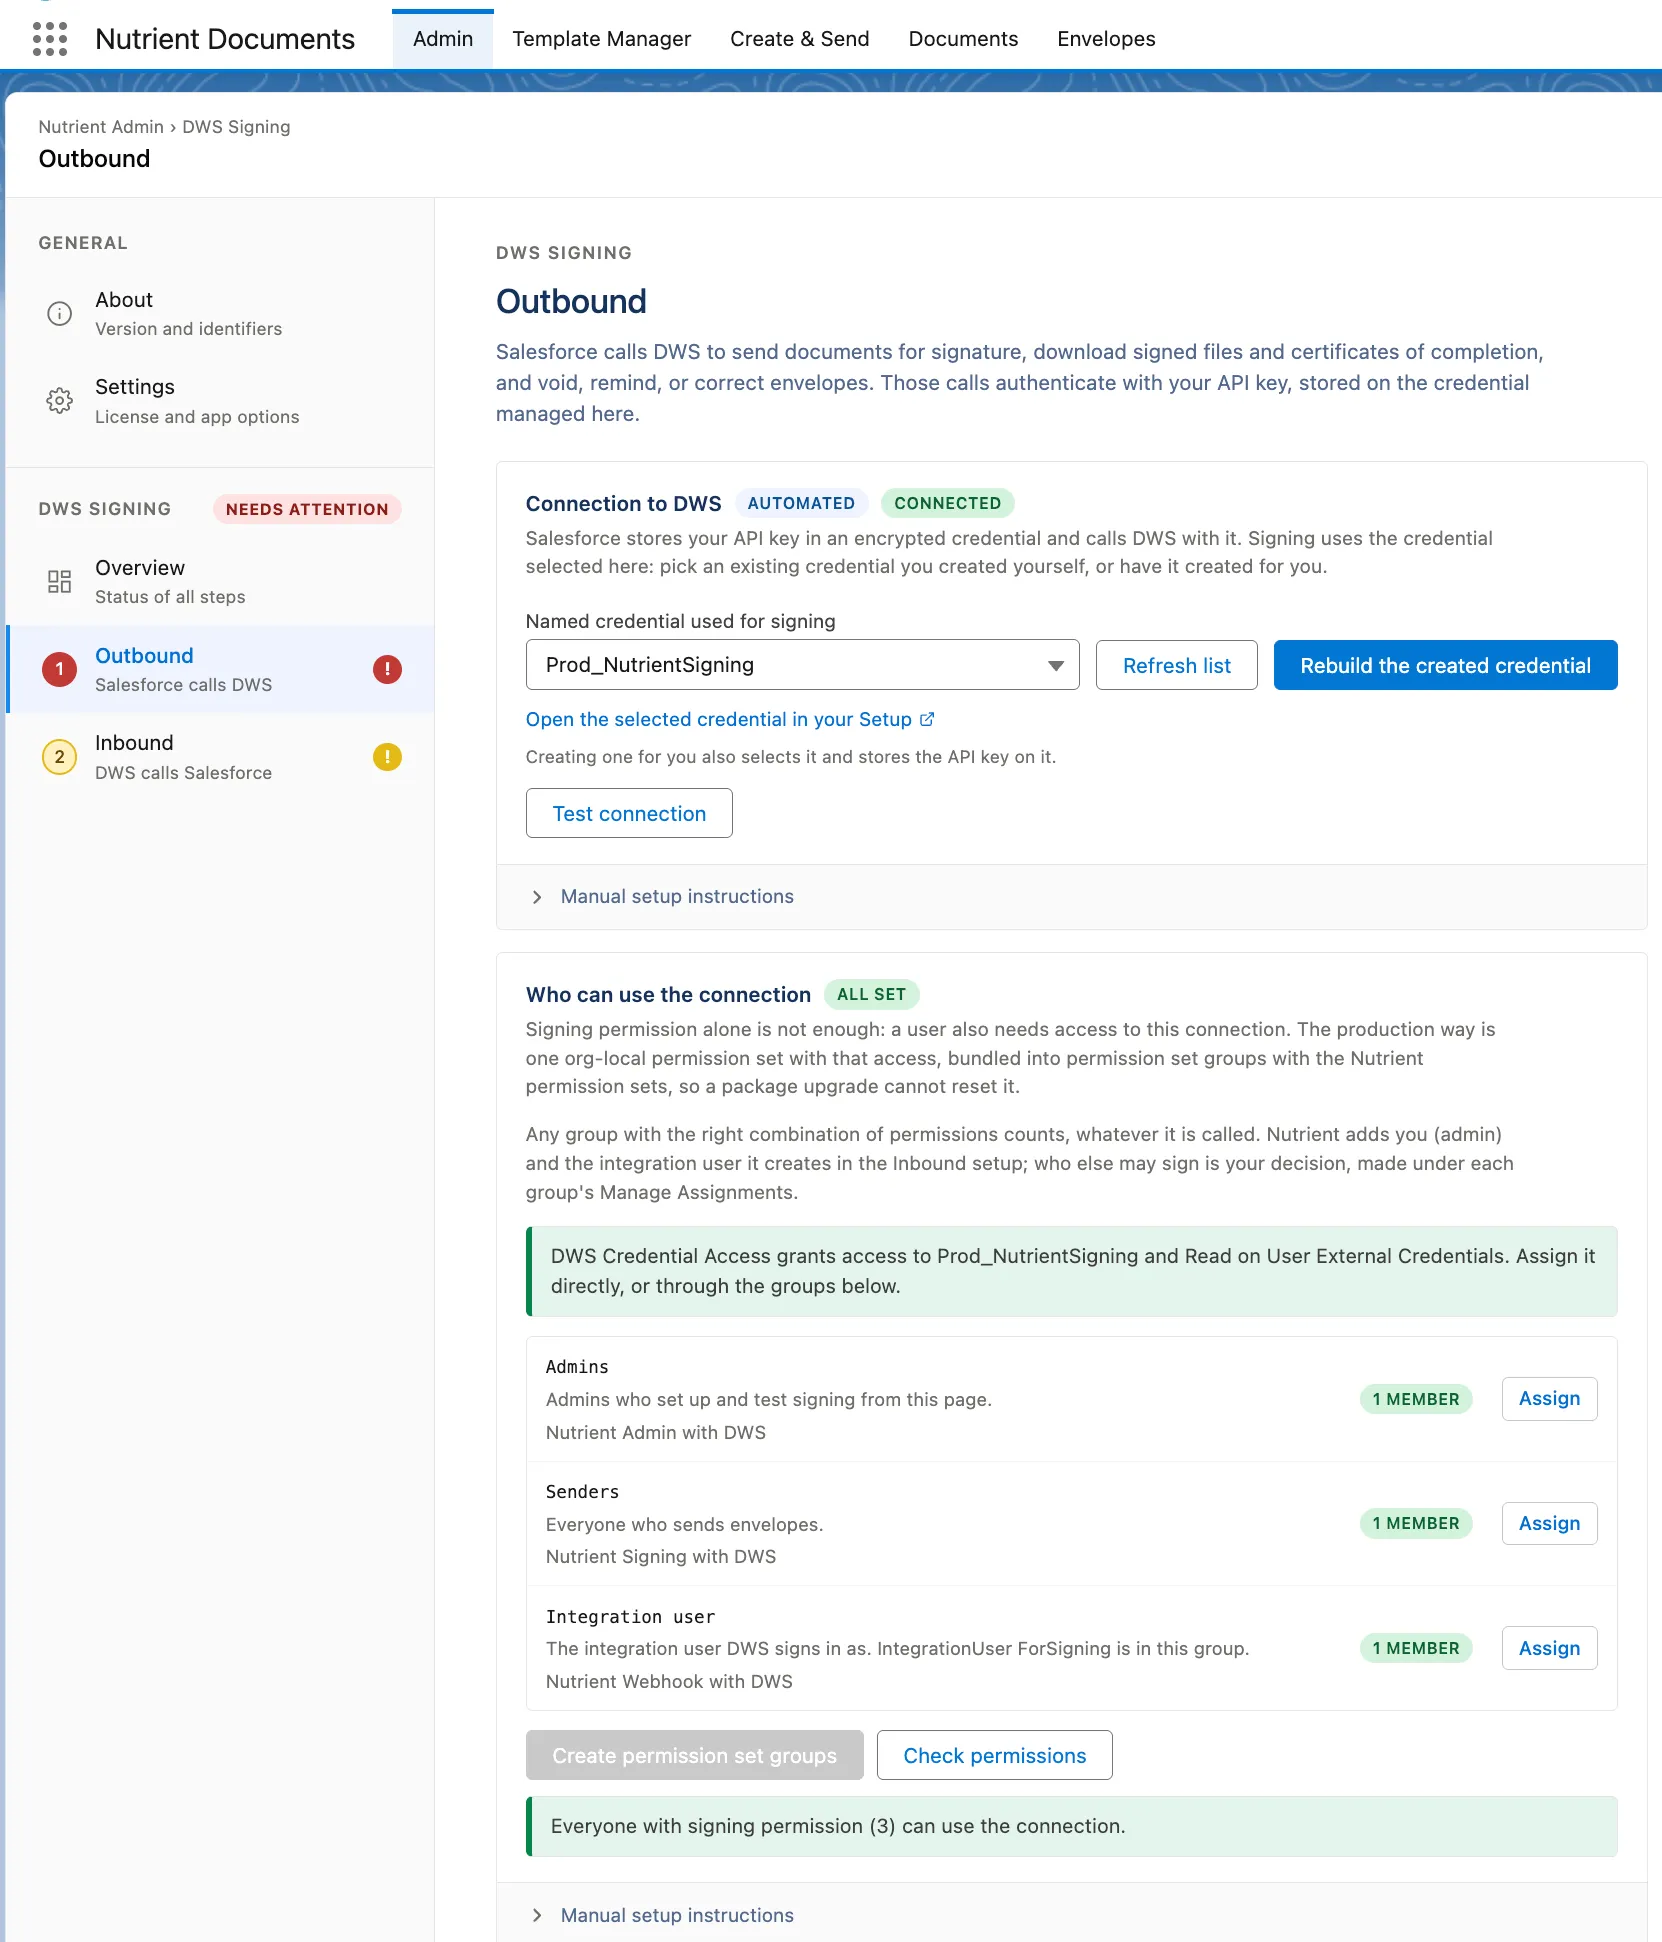
The outbound setup creates or selects the Salesforce credential used for signing calls. It stores your DWS Signer API key in an encrypted Salesforce external credential behind a named credential.
1. Create or select the DWS connection
In Connection to DWS, choose one of these paths:
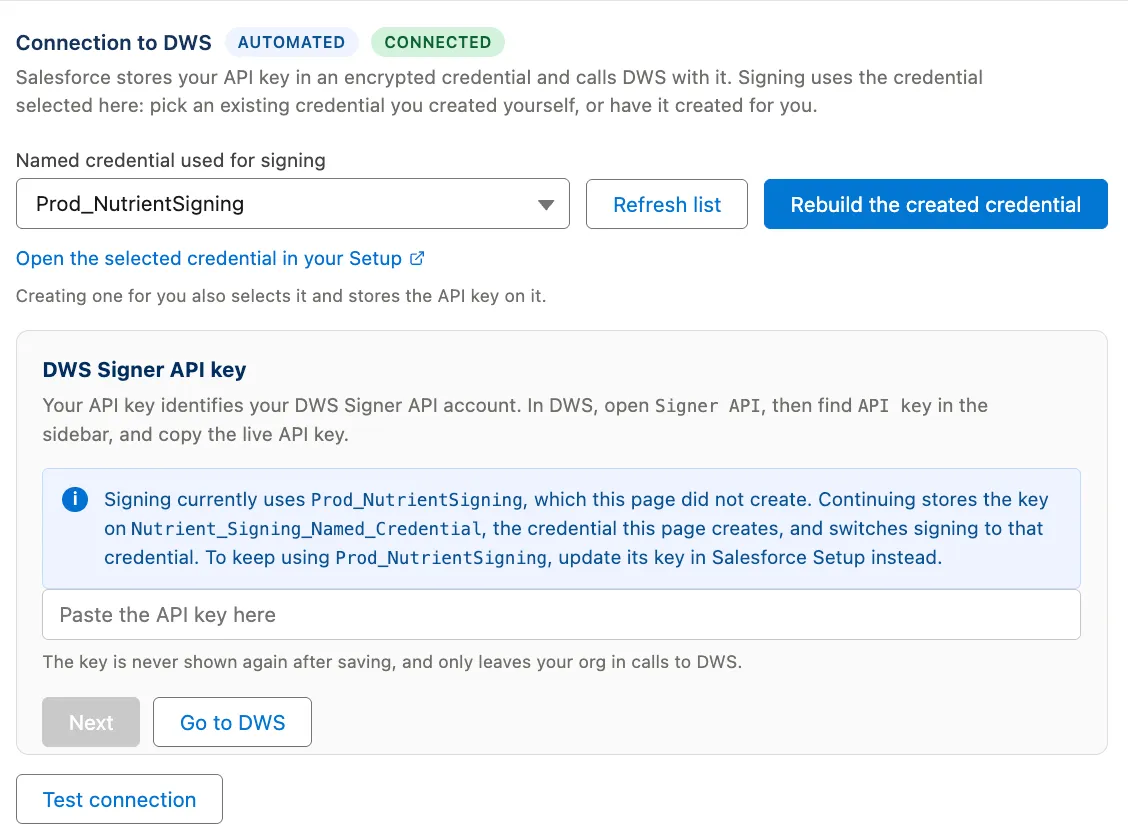
- To let the wizard create the credential, click the create or rebuild credential button, paste your DWS Signer API key, and continue.
- To use an existing credential, select it from Named credential used for signing and click Test connection.
The wizard-created connection uses this structure:
| Salesforce item | Purpose |
|---|---|
| Named credential | Points Salesforce callouts to https://api.nutrient.io. |
| External credential | Stores the DWS Signer API key as an encrypted credential parameter. |
| Authorization header | Sends the API key to DWS as a bearer token. |
2. Enable callouts on the named credential
Salesforce creates API-made named credentials with callouts disabled, and the wizard can’t enable this switch automatically.
If the wizard tells you callouts are disabled:
- Click Open the selected credential in your Setup.
- Click Edit on the named credential.
- Enable callouts.
- Save.
- Return to the wizard and click Test connection again.
3. Set up credential access
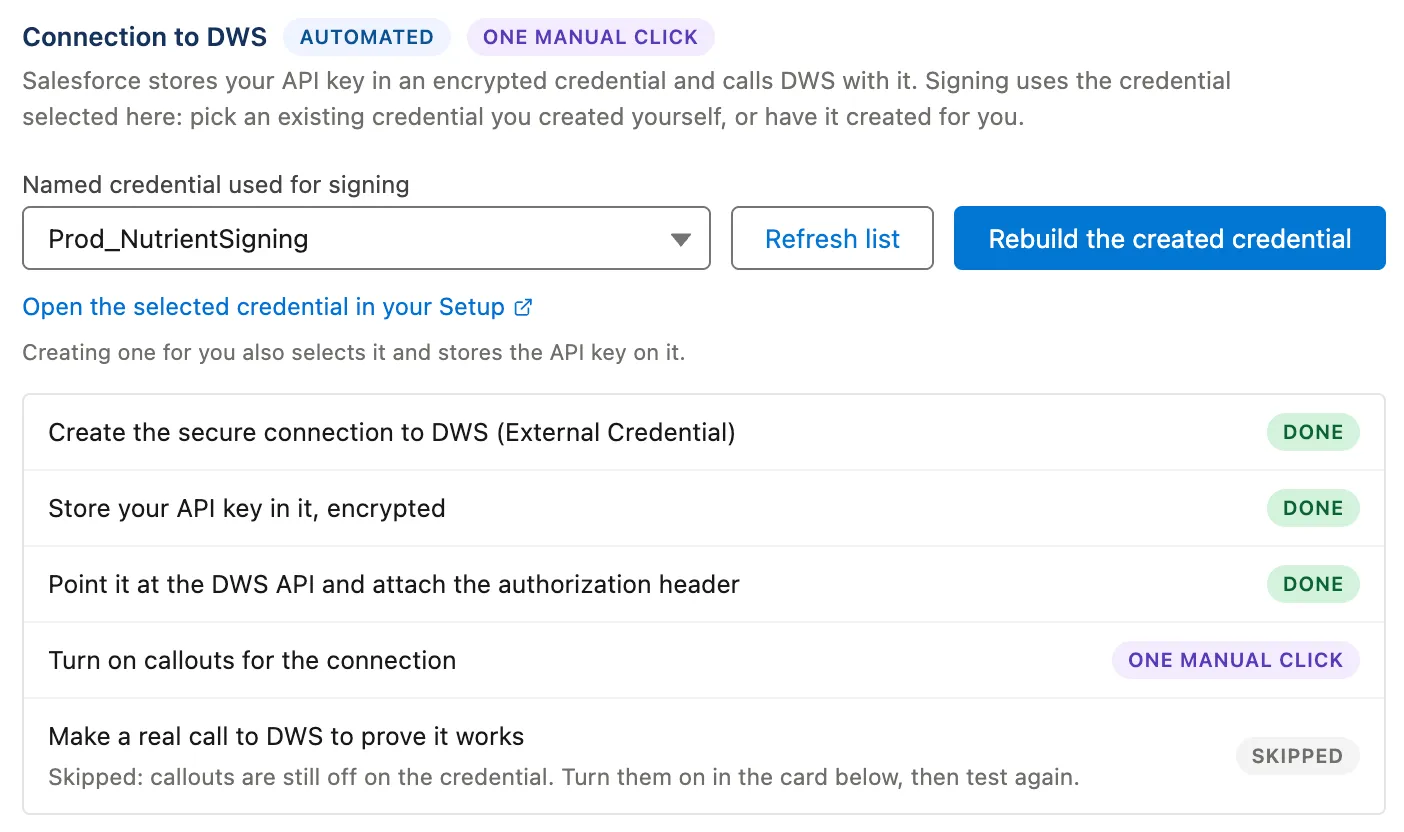
Signing permission alone isn’t enough. Every user who sends envelopes must also be allowed to use the selected DWS credential.
In Who can use the connection, click Create permission set groups or Set up credential access. The wizard creates the durable permission structure for you when possible:
| Permission set group | Includes | Assign to |
|---|---|---|
Nutrient Admin with DWS | Nutrient_Admin + DWS credential access | Admins who configure or test signing |
Nutrient Signing with DWS | Nutrient_Sign_Documents + DWS credential access | Users who send envelopes |
Nutrient Webhook with DWS | Nutrient_Signing_Integration + DWS credential access | The integration user DWS signs in as |
The wizard assigns the admin running setup and the integration user it creates. You decide which other users may sign.
To assign signing users:
- In the Senders row, click Assign.
- Add the users or groups who should send envelopes.
- Return to the wizard and click Check permissions.
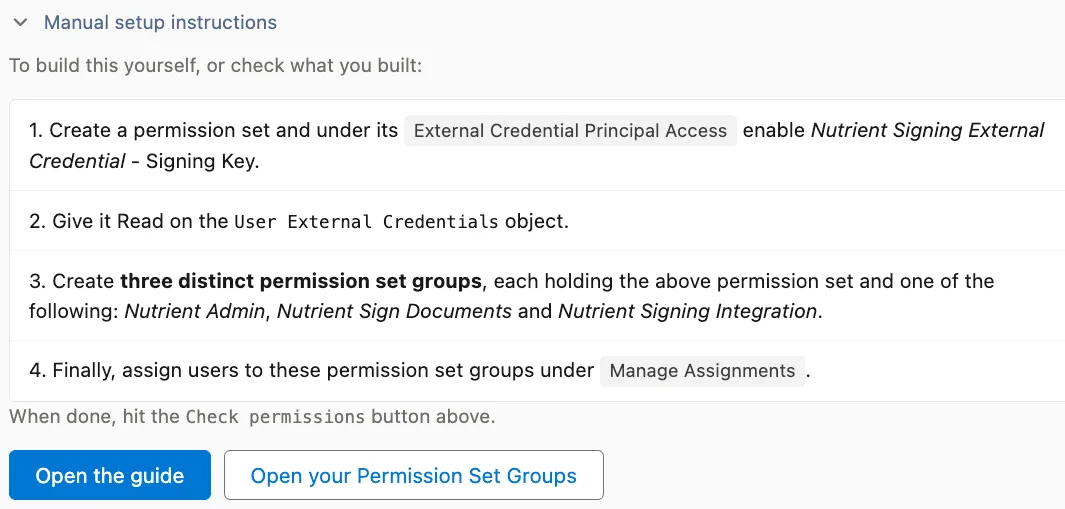
Do not rely on grants written directly to packaged Nutrient permission sets. Package upgrades can reset changes made to packaged sets. Use the wizard-created org-local access set and permission set groups instead.
Manual outbound setup
Use manual setup only if your organization needs to control each Salesforce object directly.
Expand Manual setup instructions in the wizard for the current values and direct Salesforce Setup links.
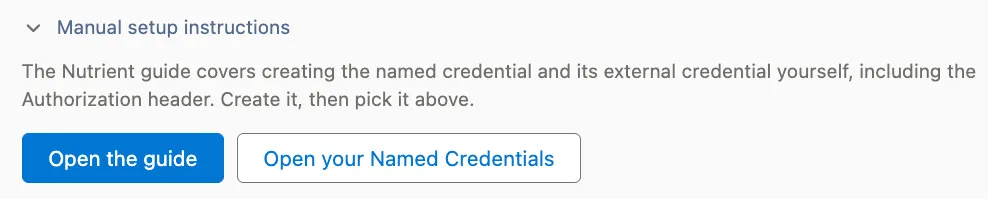
1. Create an external credential
- In Salesforce Setup, open Named Credentials > External Credentials.
- Click New.
- Create an external credential for DWS signing.
- Set Authentication Protocol to
Custom. - Save.
2. Create a named credential
- In Salesforce Setup, open Named Credentials.
- Click New.
- Create a named credential that points to
https://api.nutrient.io. - Select the external credential you created.
- Enable:
- Enabled for Callouts
- Generate Authorization Header
- Allow Formulas in HTTP Header
- Save.
3. Store the API key and set the authorization header
- Open the external credential.
- Add a named principal for the signing key.
- Store your DWS Signer API key as an encrypted authentication parameter named
APIKey. - Add a custom header named
Authorization. - Set the header value to a bearer-token formula that references the
APIKeyparameter on the external credential. - Return to the wizard, select the named credential, and click Test connection.
Option B — Recommended production setup
For production, grant access through an org-local permission set and permission set groups. The wizard can create this structure for you, but you can also build it manually:
- Create an org-local permission set for DWS credential access.
- Grant External Credential Principal Access to the signing principal on the selected external credential.
- Grant Read access to User External Credentials.
- Create three permission set groups that combine the org-local access set with the packaged Nutrient permission sets:
Nutrient Admin with DWSNutrient Signing with DWSNutrient Webhook with DWS
- Assign admins, senders, and the integration user to the relevant groups.
- Return to the wizard and click Check permissions.
Part B — Configure DWS webhooks to Salesforce (inbound)
Go to DWS Signing > Inbound.
Inbound setup lets DWS sign in to Salesforce, fetch documents, and send webhook events back to Salesforce. DWS authenticates with OAuth 2.0 JWT Bearer Flow through a Salesforce External Client App.
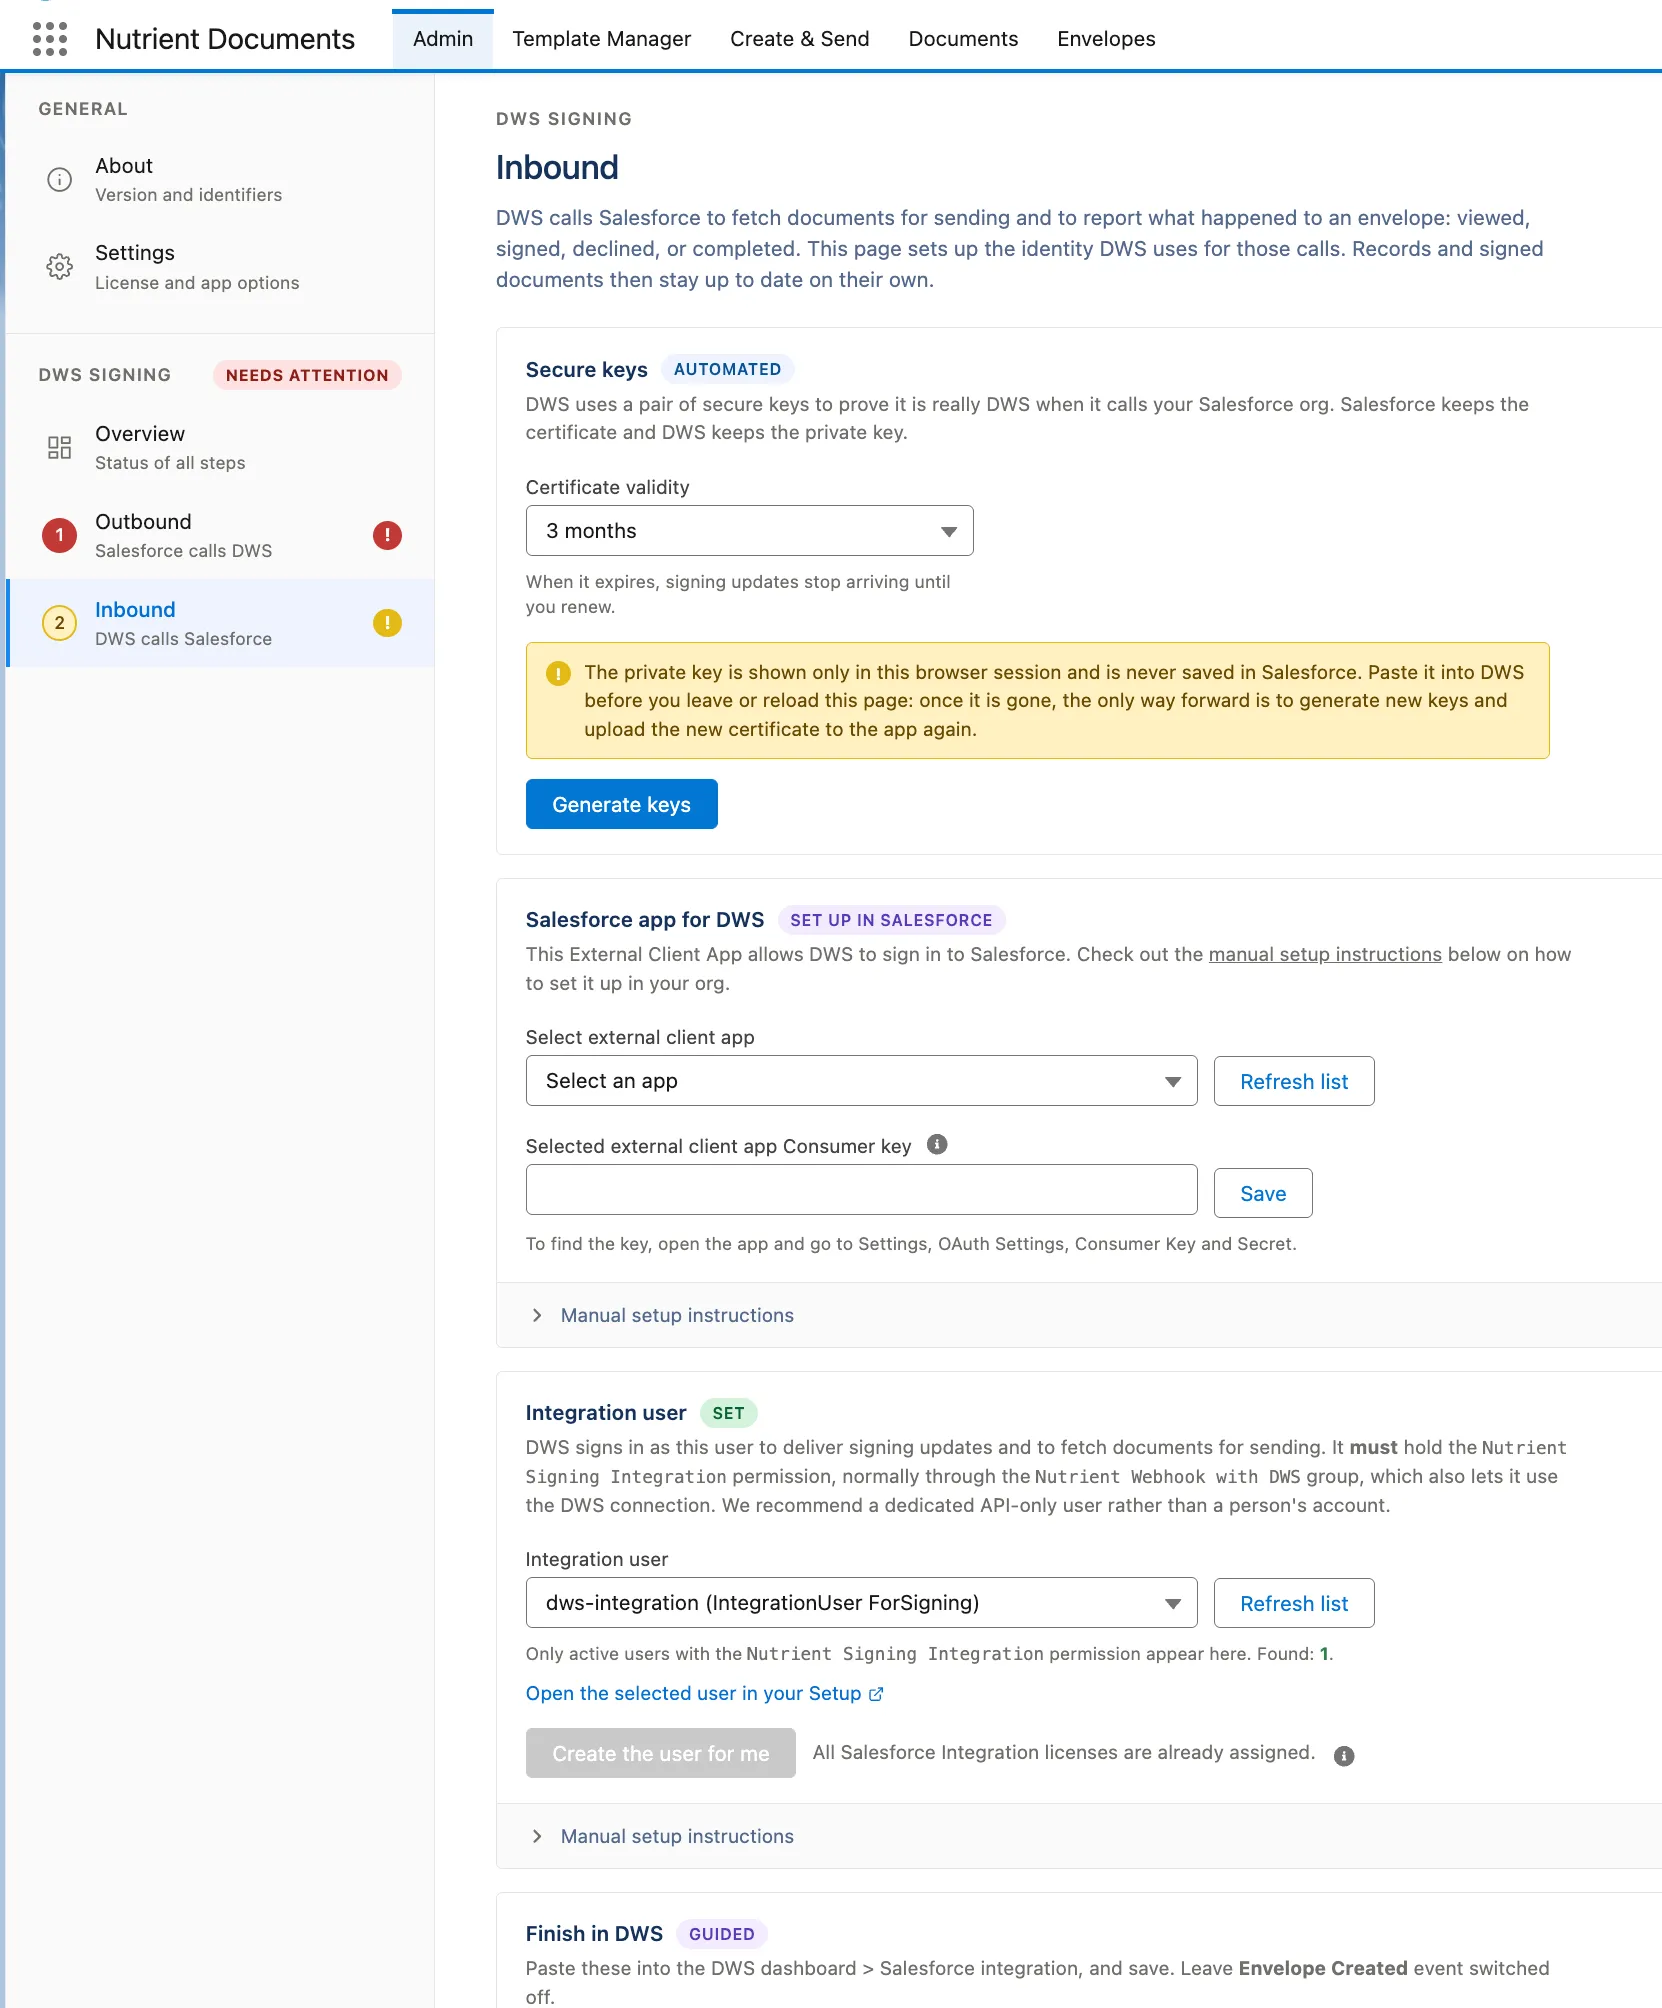
2. Generate a key pair for JWT signing
In Secure keys:
- Select the certificate validity period.
- Click Generate keys.
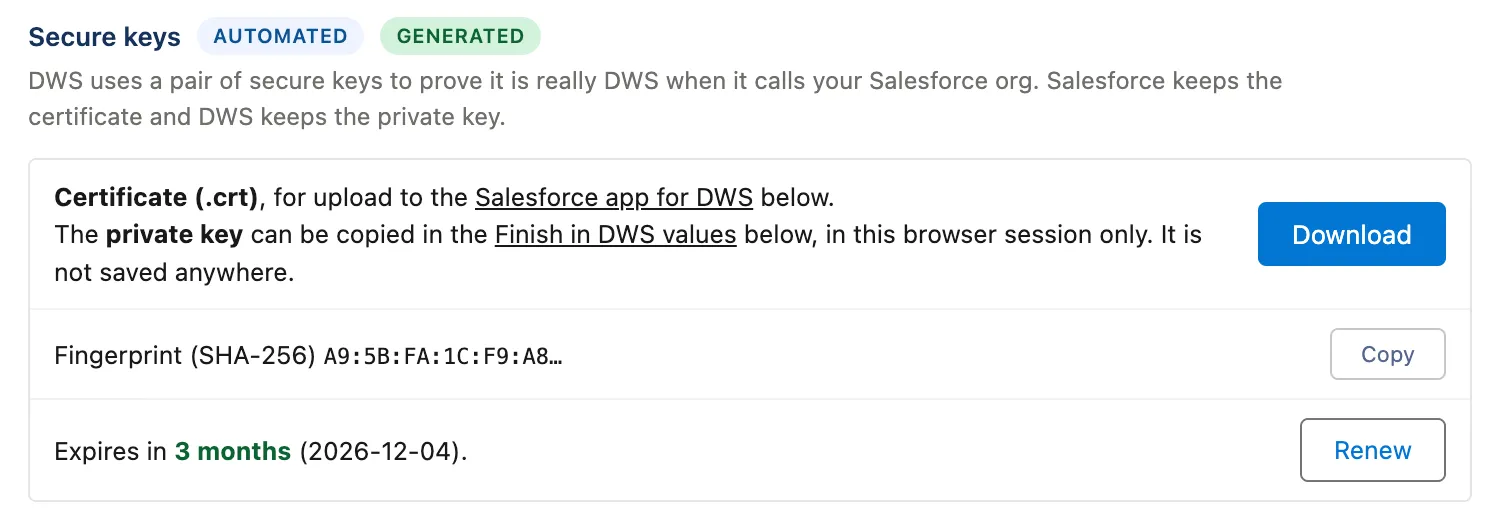
- Download the certificate (
.crt). - Keep the private key available for the Finish in DWS step.
Salesforce keeps the certificate, fingerprint, and expiration metadata. The private key is shown only in the browser session and is never stored in Salesforce.
Copy and store the private key securely before leaving or reloading the page. If the private key is lost, generate a new key pair, upload the new certificate to the Salesforce app, and update DWS with the new private key.
3. Configure the external client app for the JWT Bearer Flow
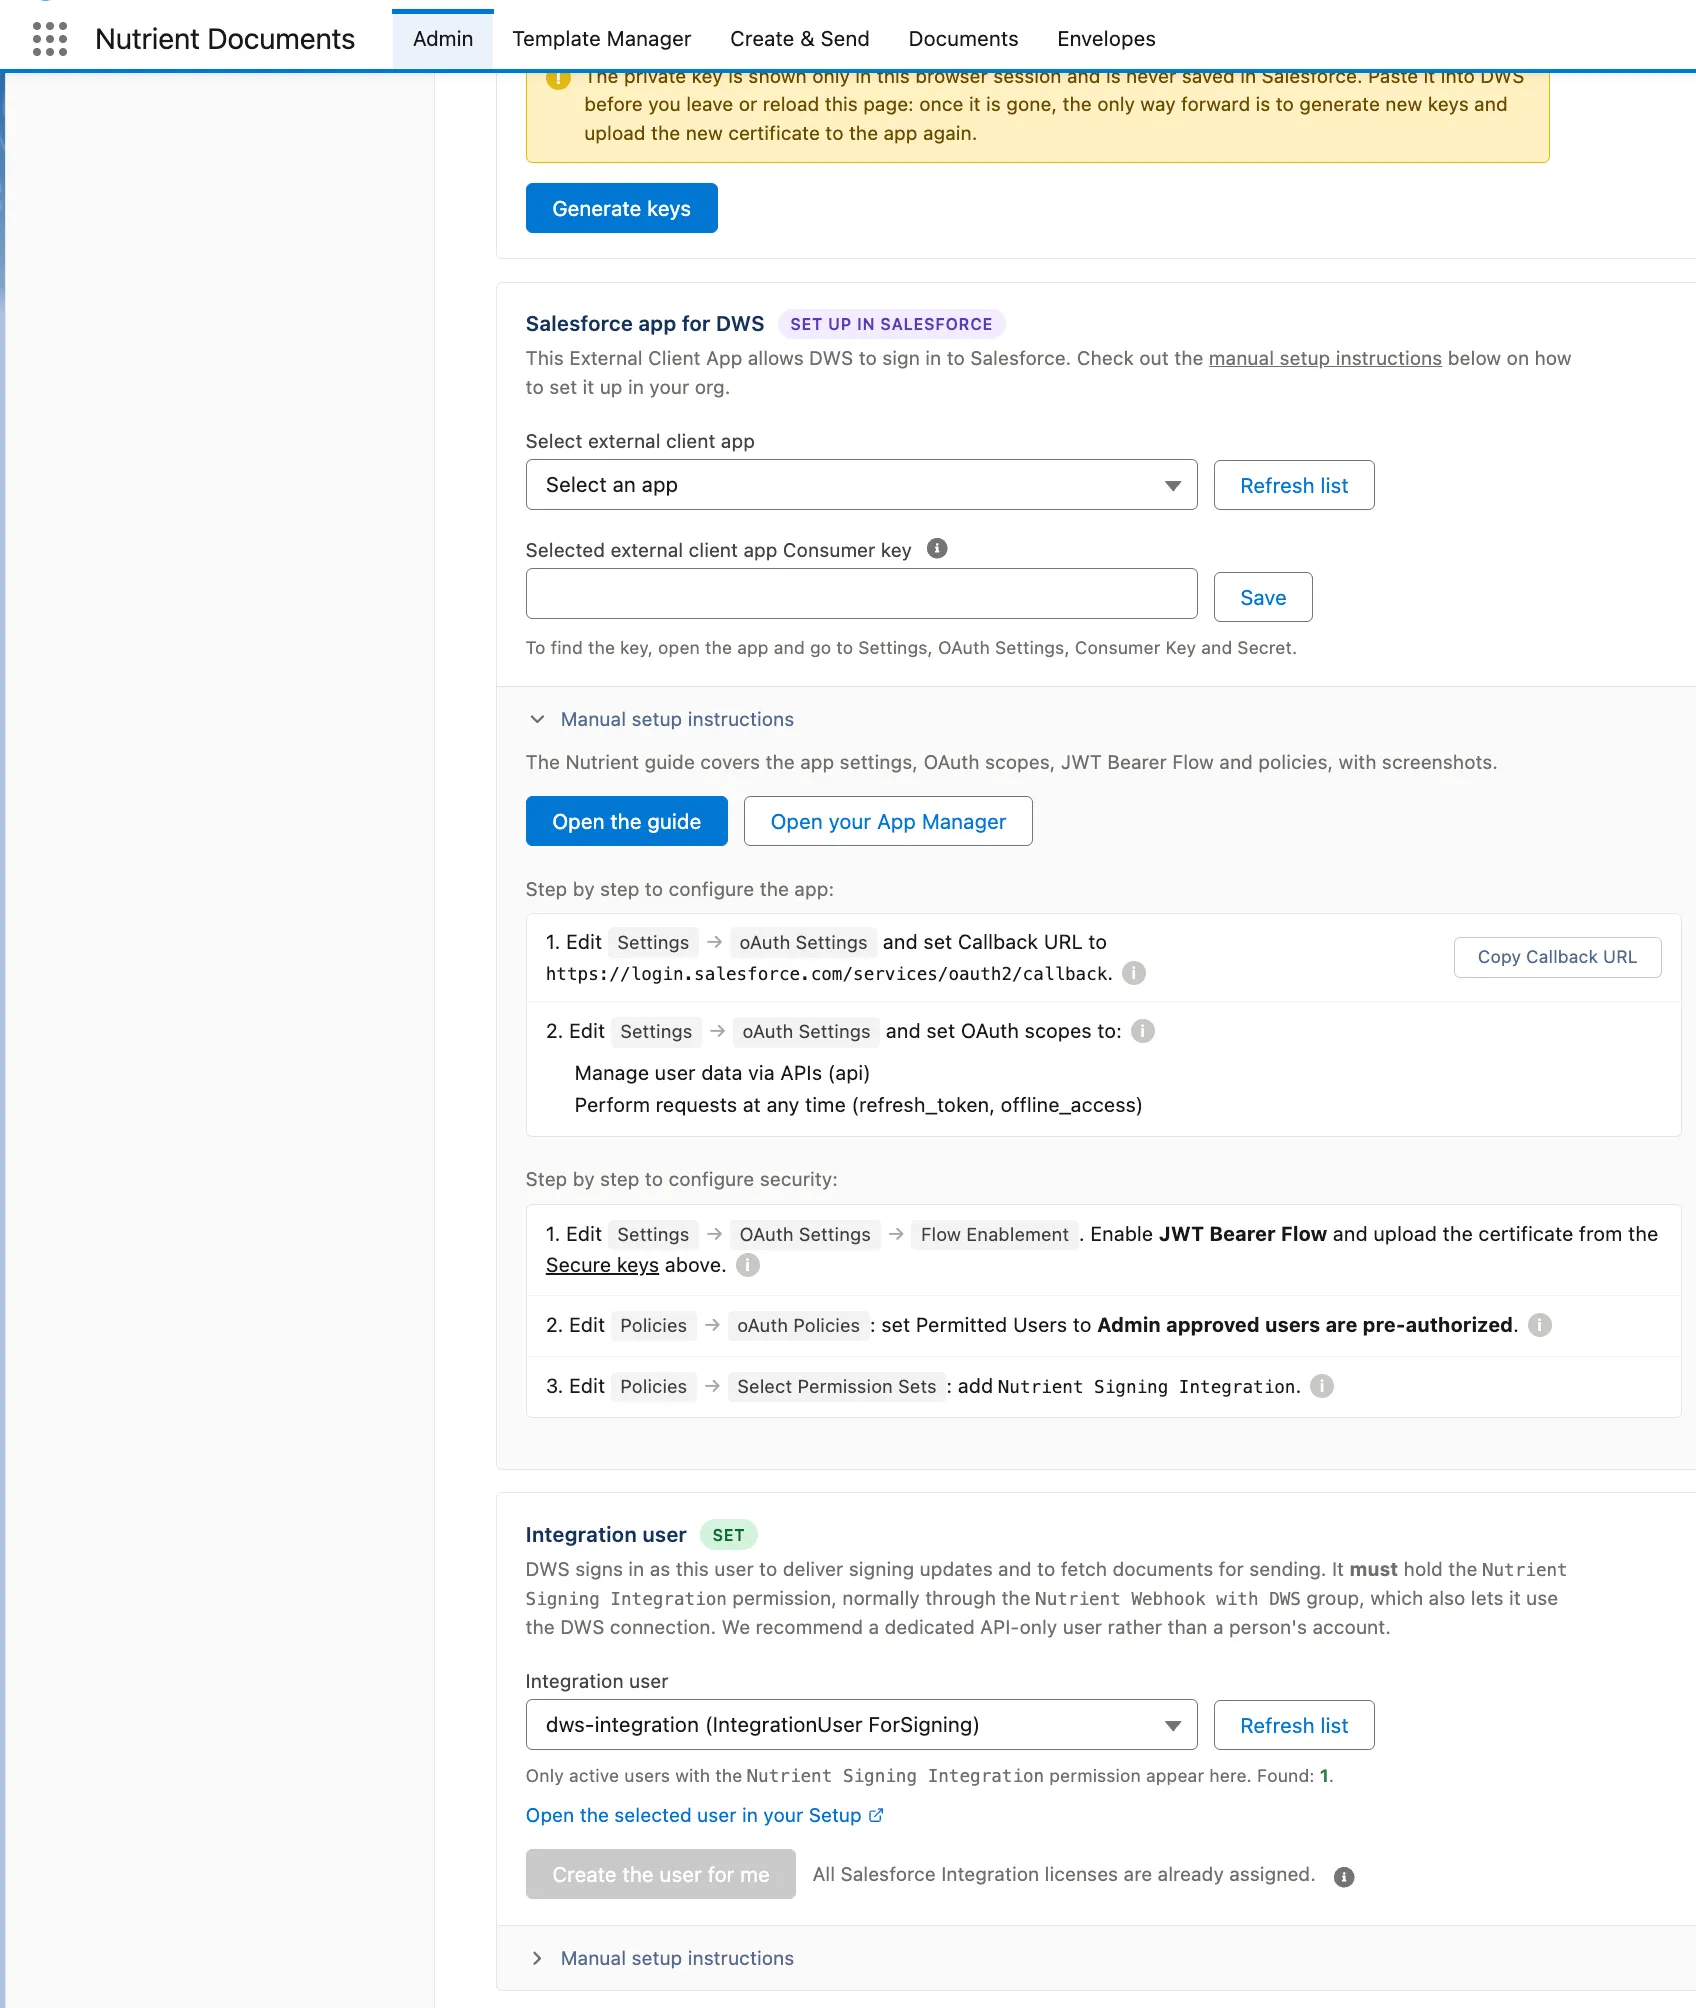
The wizard can’t create or fully inspect the External Client App for you. Create it manually in Salesforce Setup, then select it in the wizard.
- In the Salesforce app for DWS section, expand Manual setup instructions.
- Open the App Manager or External Client App Manager link from the wizard.
- Create an External Client App. Example name:
Nutrient DWS Signing. - Enable OAuth.
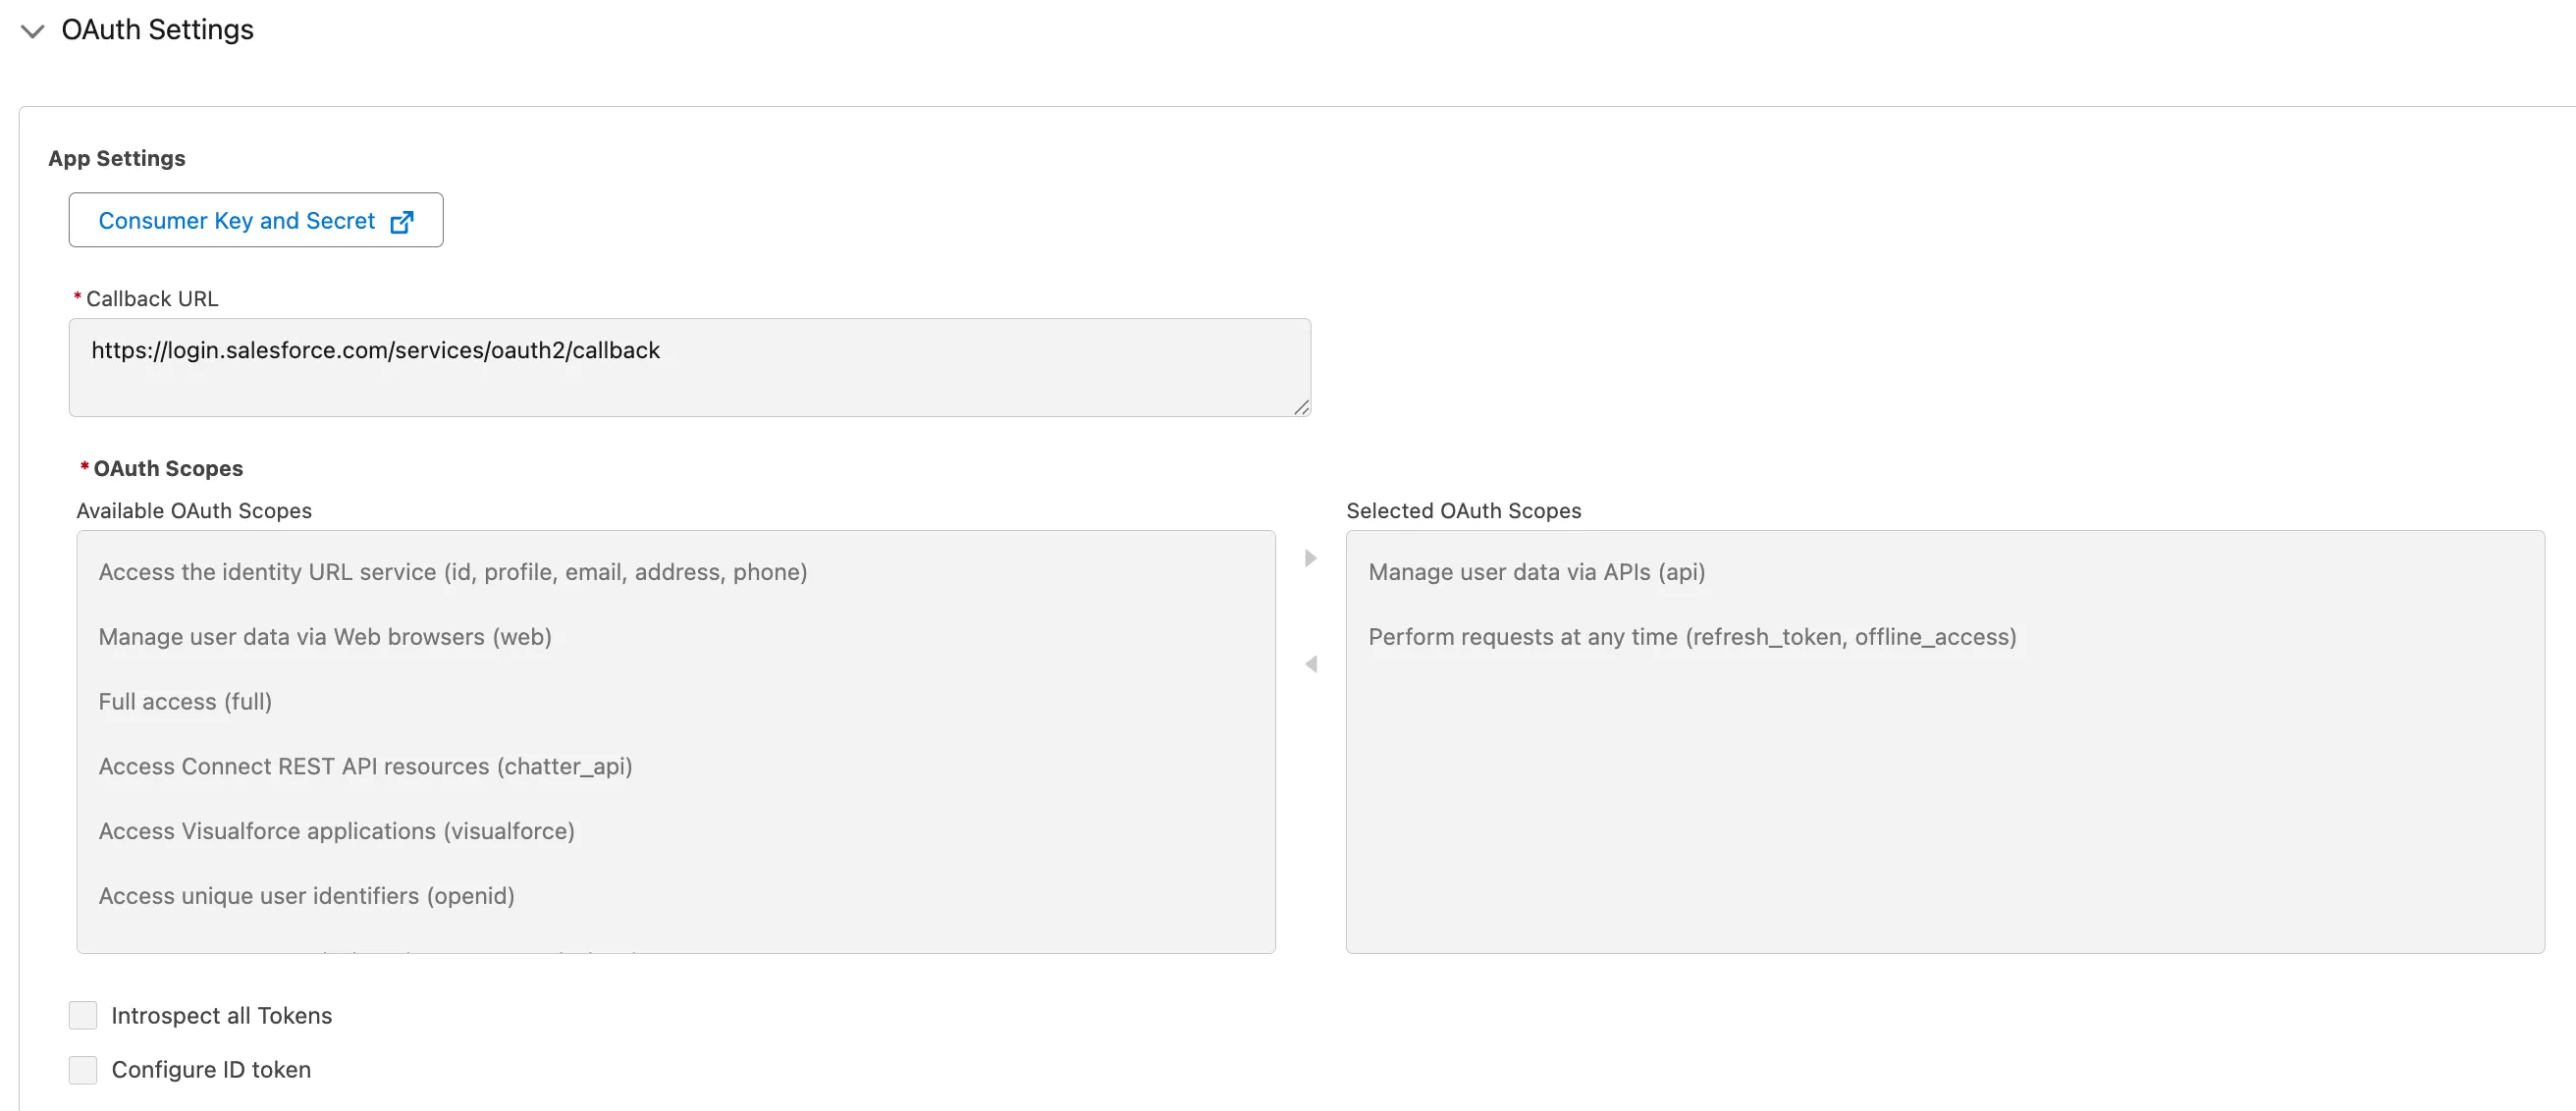
- Copy the callback URL from the wizard and add it to the app.
- Add these OAuth scopes:
Manage user data via APIs (api)Perform requests at any time (refresh_token, offline_access)
- Under flow settings, enable JWT Bearer Flow.
- Upload the certificate (
.crt) generated by the wizard. - In app policies, set Permitted Users to Admin approved users are pre-authorized.
- Add the
Nutrient_Signing_Integrationpermission set to the app policy. - Save.
The wizard asks you to confirm that the certificate was uploaded because the package can’t verify that part directly.
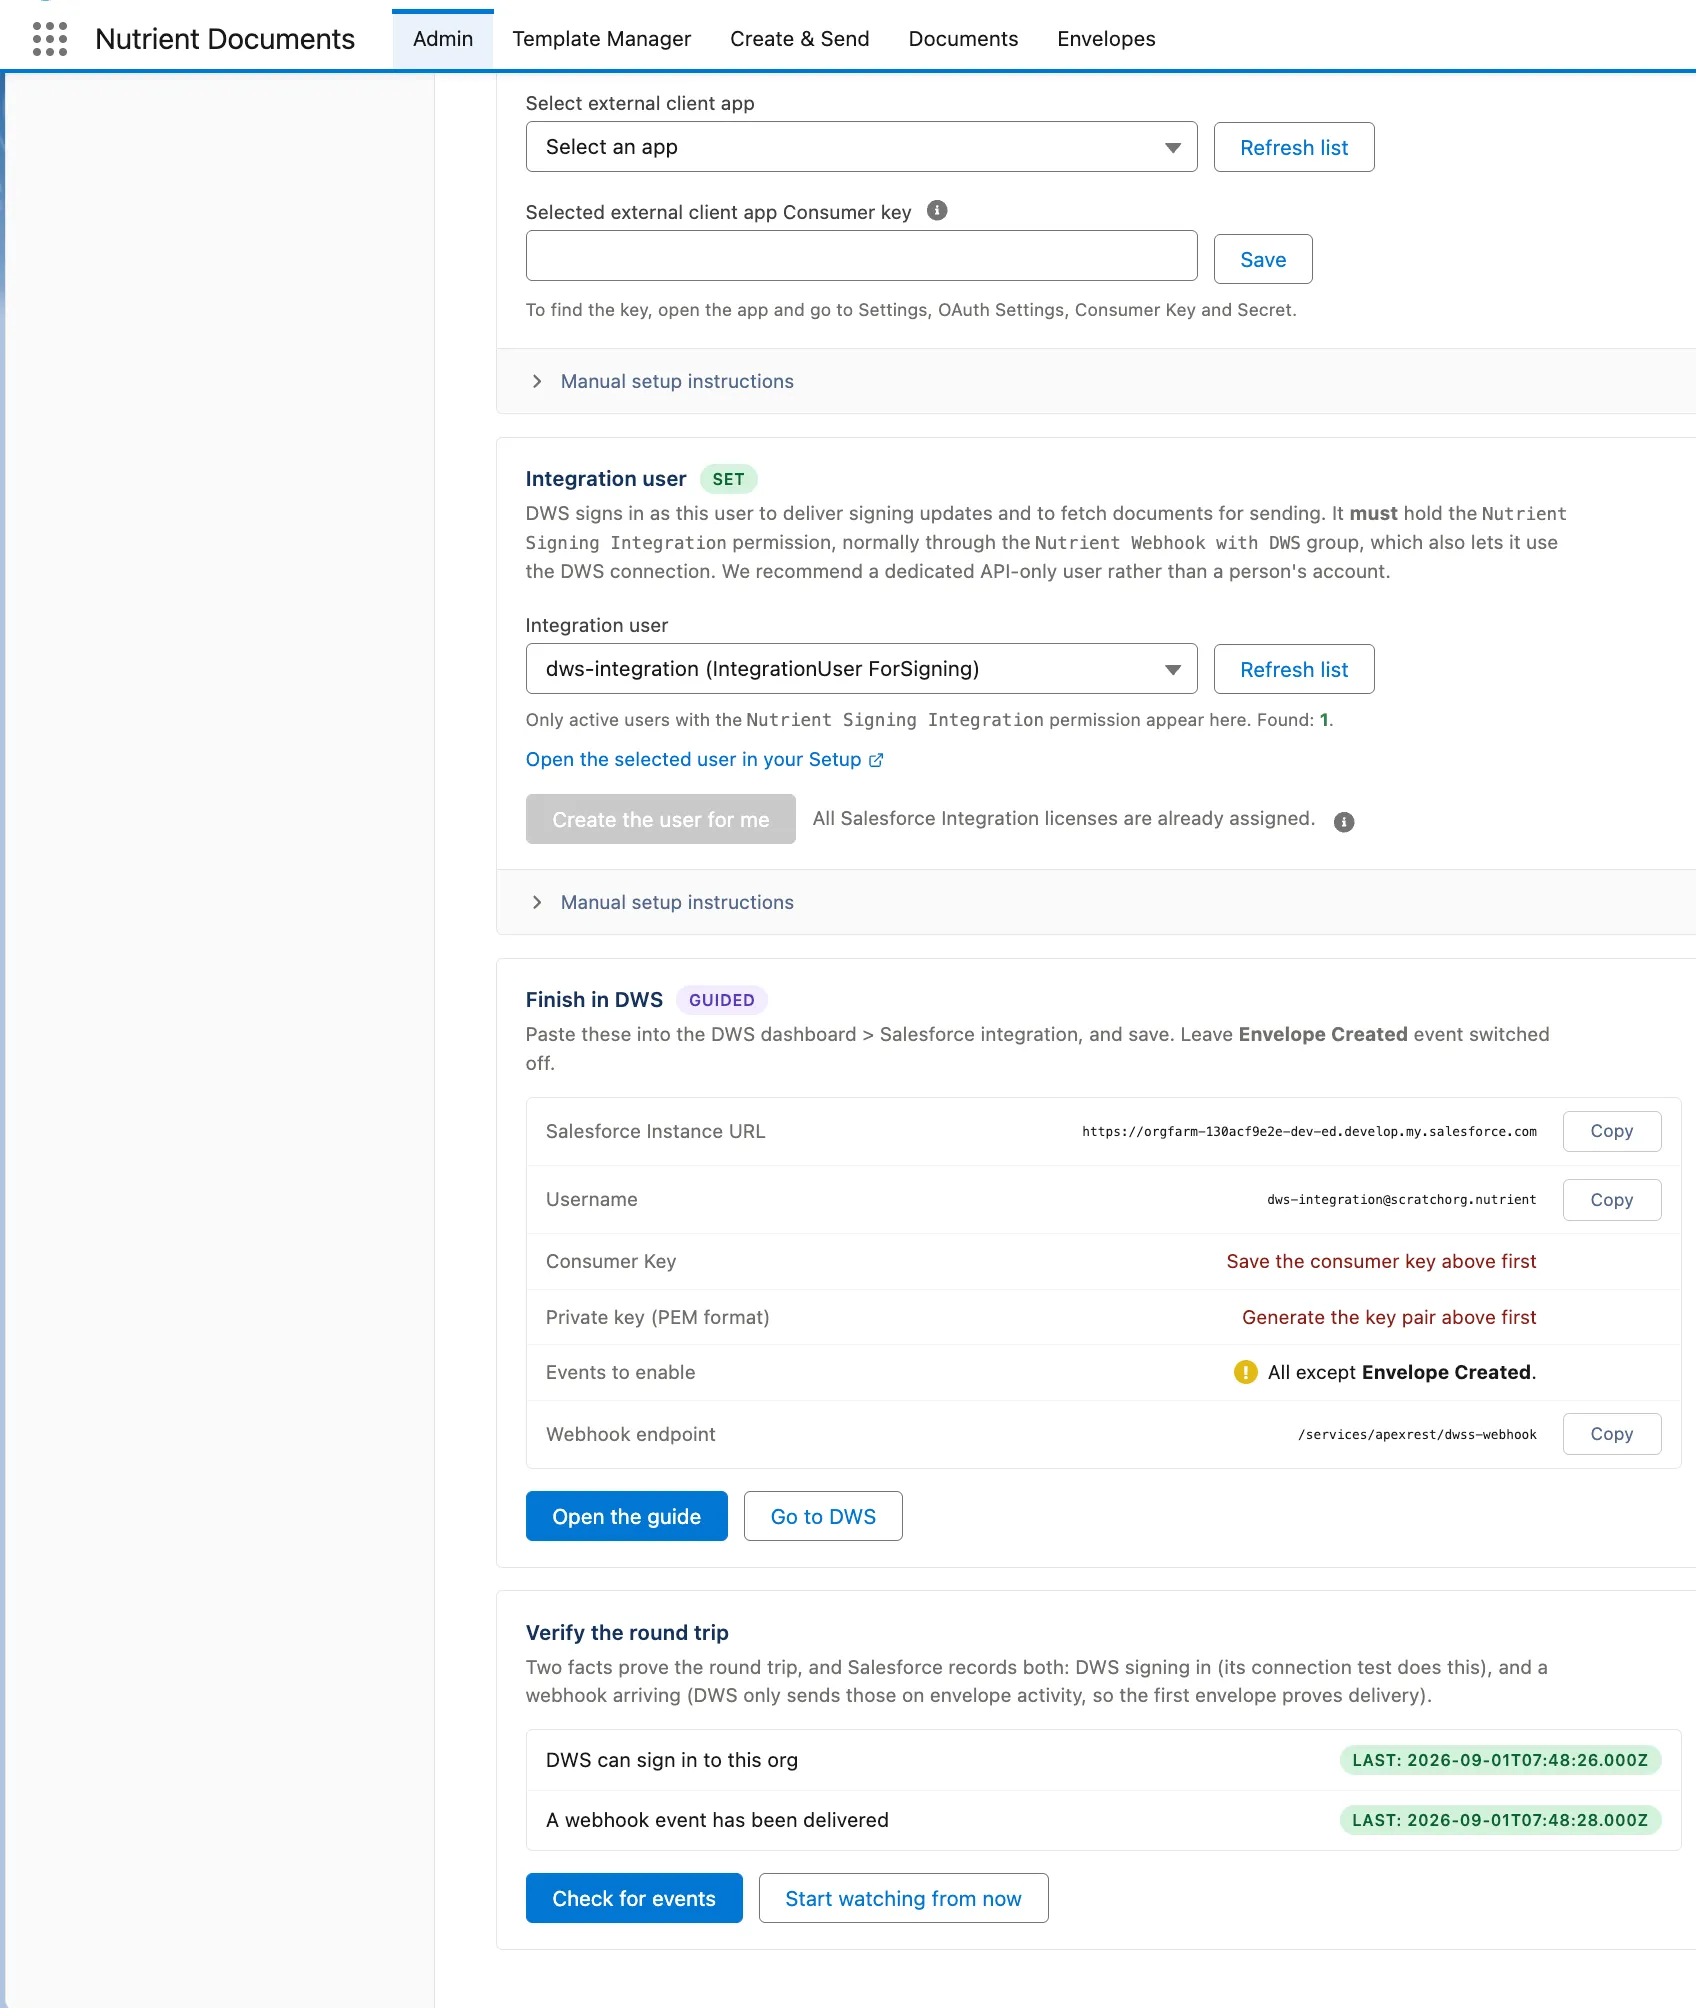
3. Save the consumer key
After you create the External Client App:
- Return to DWS Signing > Inbound.
- Click Refresh list.
- Select the app in Select external client app.
- Open the selected app in Salesforce Setup.
- Copy the Consumer Key from the app’s OAuth settings.
- Paste it into Selected external client app Consumer key.
- Click Save.
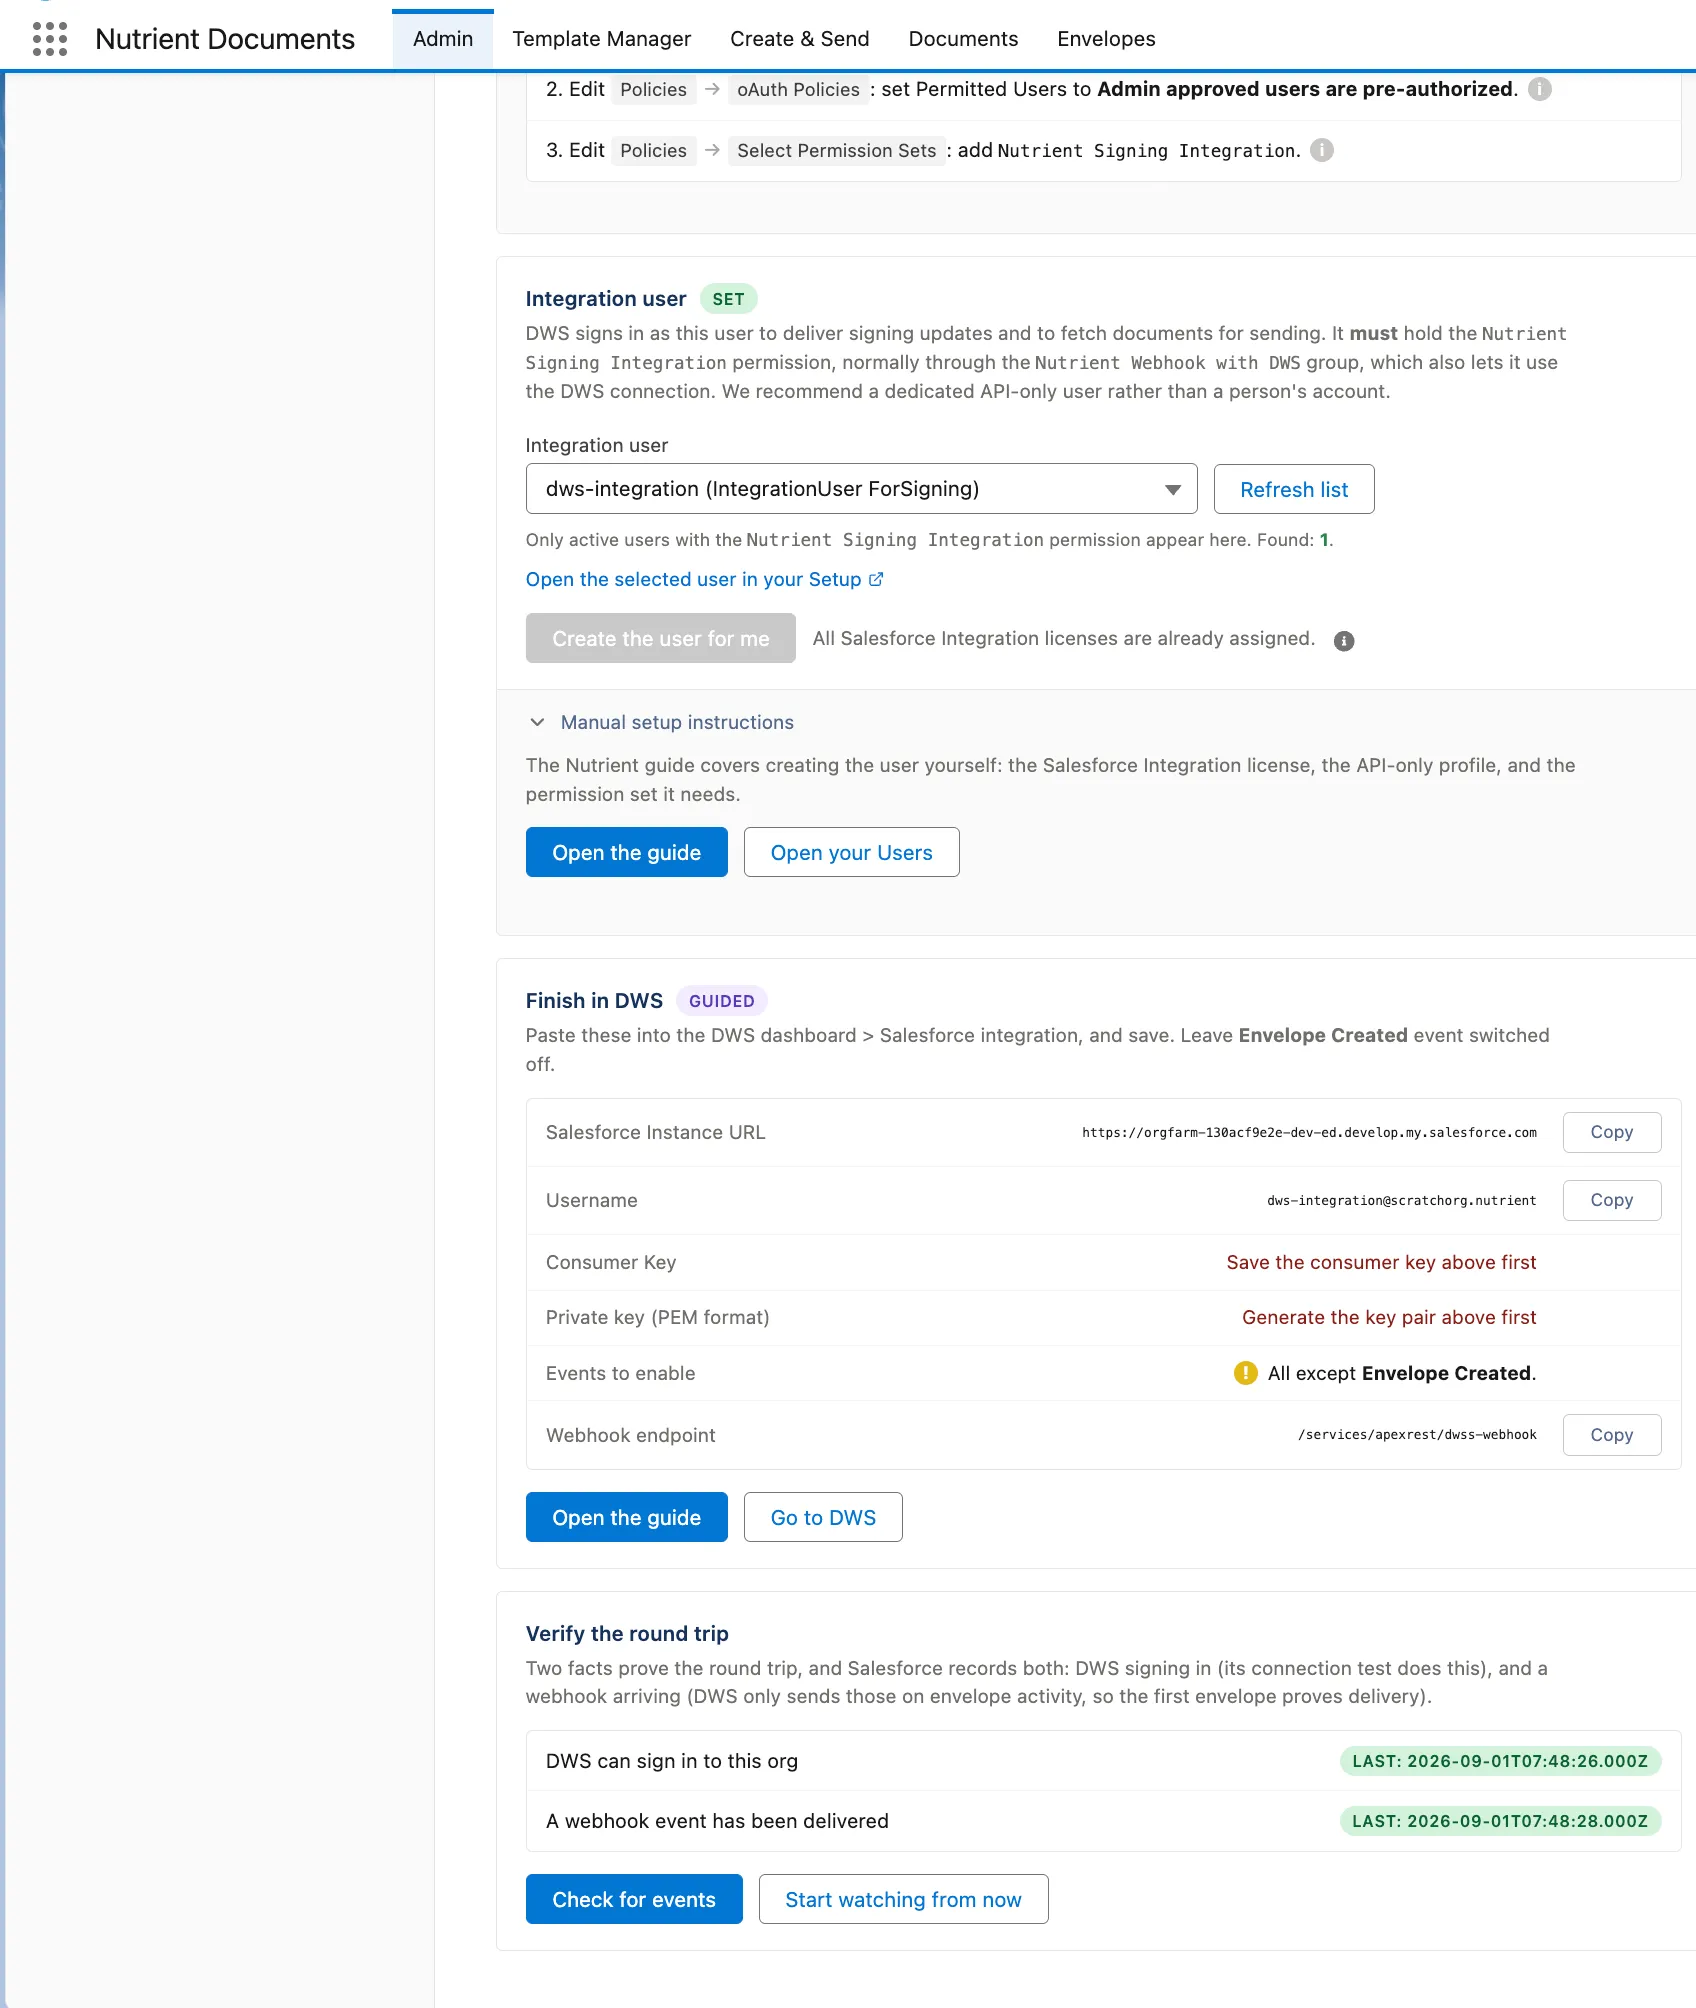
1. Prepare a dedicated integration user
DWS signs in as the integration user to deliver signing updates and fetch documents for sending.
In Integration user, choose one of these paths:
- To let the wizard create the user, click Create the user for me.
- To use an existing user, select it from Integration user.
The integration user should be a dedicated API-only user, not a Salesforce administrator or personal user account. It must be active and have the Nutrient_Signing_Integration permission, normally through the Nutrient Webhook with DWS permission set group.
4. Configure the webhook destination in the DWS Signer dashboard
In Finish in DWS, the wizard shows the values to paste into the DWS Signer dashboard.
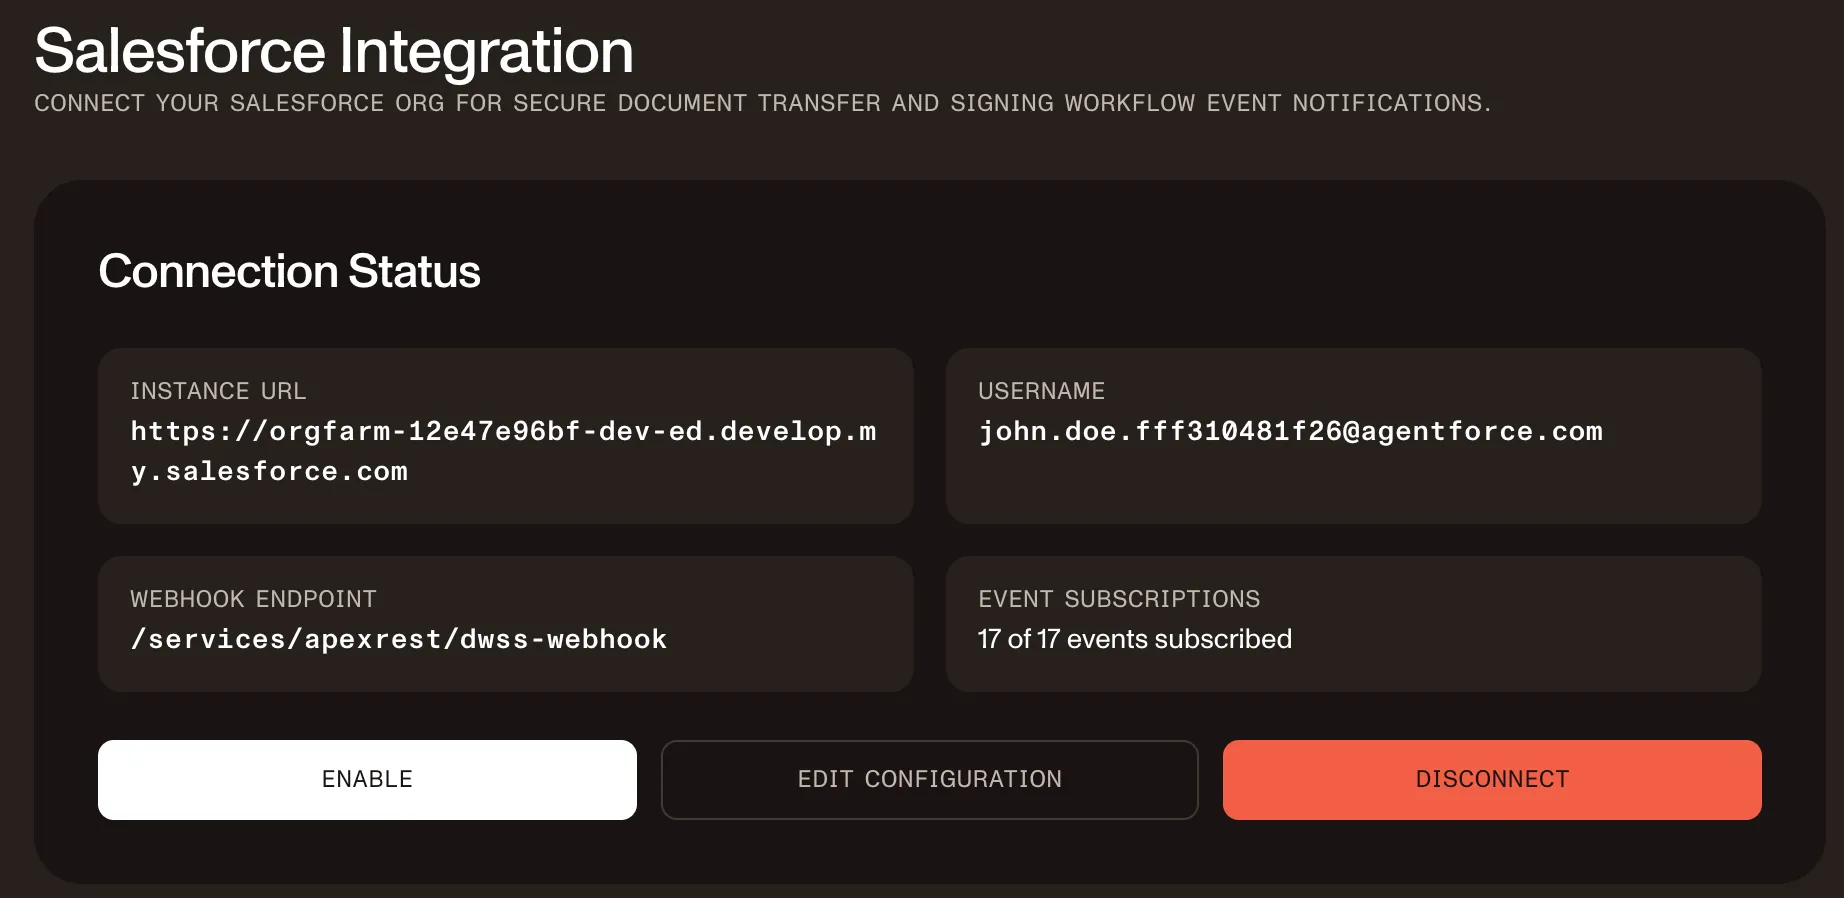
In the DWS Signer dashboard(opens in a new tab):
- Open Signer API > Salesforce.
- Click Configure or Edit configuration.
- Paste the values from the wizard:
- Salesforce instance URL
- Integration user username
- Consumer key
- Private key in PEM format
- Set the webhook endpoint to
/services/apexrest/dwss-webhook. - Enable all events except Envelope Created.
- Save or enable the configuration.
- Test the connection in DWS.
For the Salesforce instance URL, use the Salesforce My Domain URL (*.my.salesforce.com). Do not use the Lightning URL (*.lightning.force.com) or Setup URL (*.salesforce-setup.com).
Validate signing setup
After outbound and inbound setup are complete:
- Return to DWS Signing > Overview.
- Click Check now.
- Fix any listed issues.
- Send a test document for signing from Salesforce.
- Complete the signing session as the recipient.
- Return to DWS Signing > Overview and check again.
- Confirm that DWS sign-in and webhook event checks are passing.
The first webhook event check may not pass until you send a real test envelope and DWS sends an event back to Salesforce.
Configure a custom email domain in DWS
If your organization wants signer emails to come from your own domain, configure a verified custom email domain in the DWS Signer dashboard. This setup is optional; signing works without a custom email domain.
If the domain isn’t already enabled for signing link sharing, contact our Sales team with the domain you want to set up. Our team can configure the signing_link_sharing flag for that domain in DWS, and then you can continue with the email domain setup explained below.
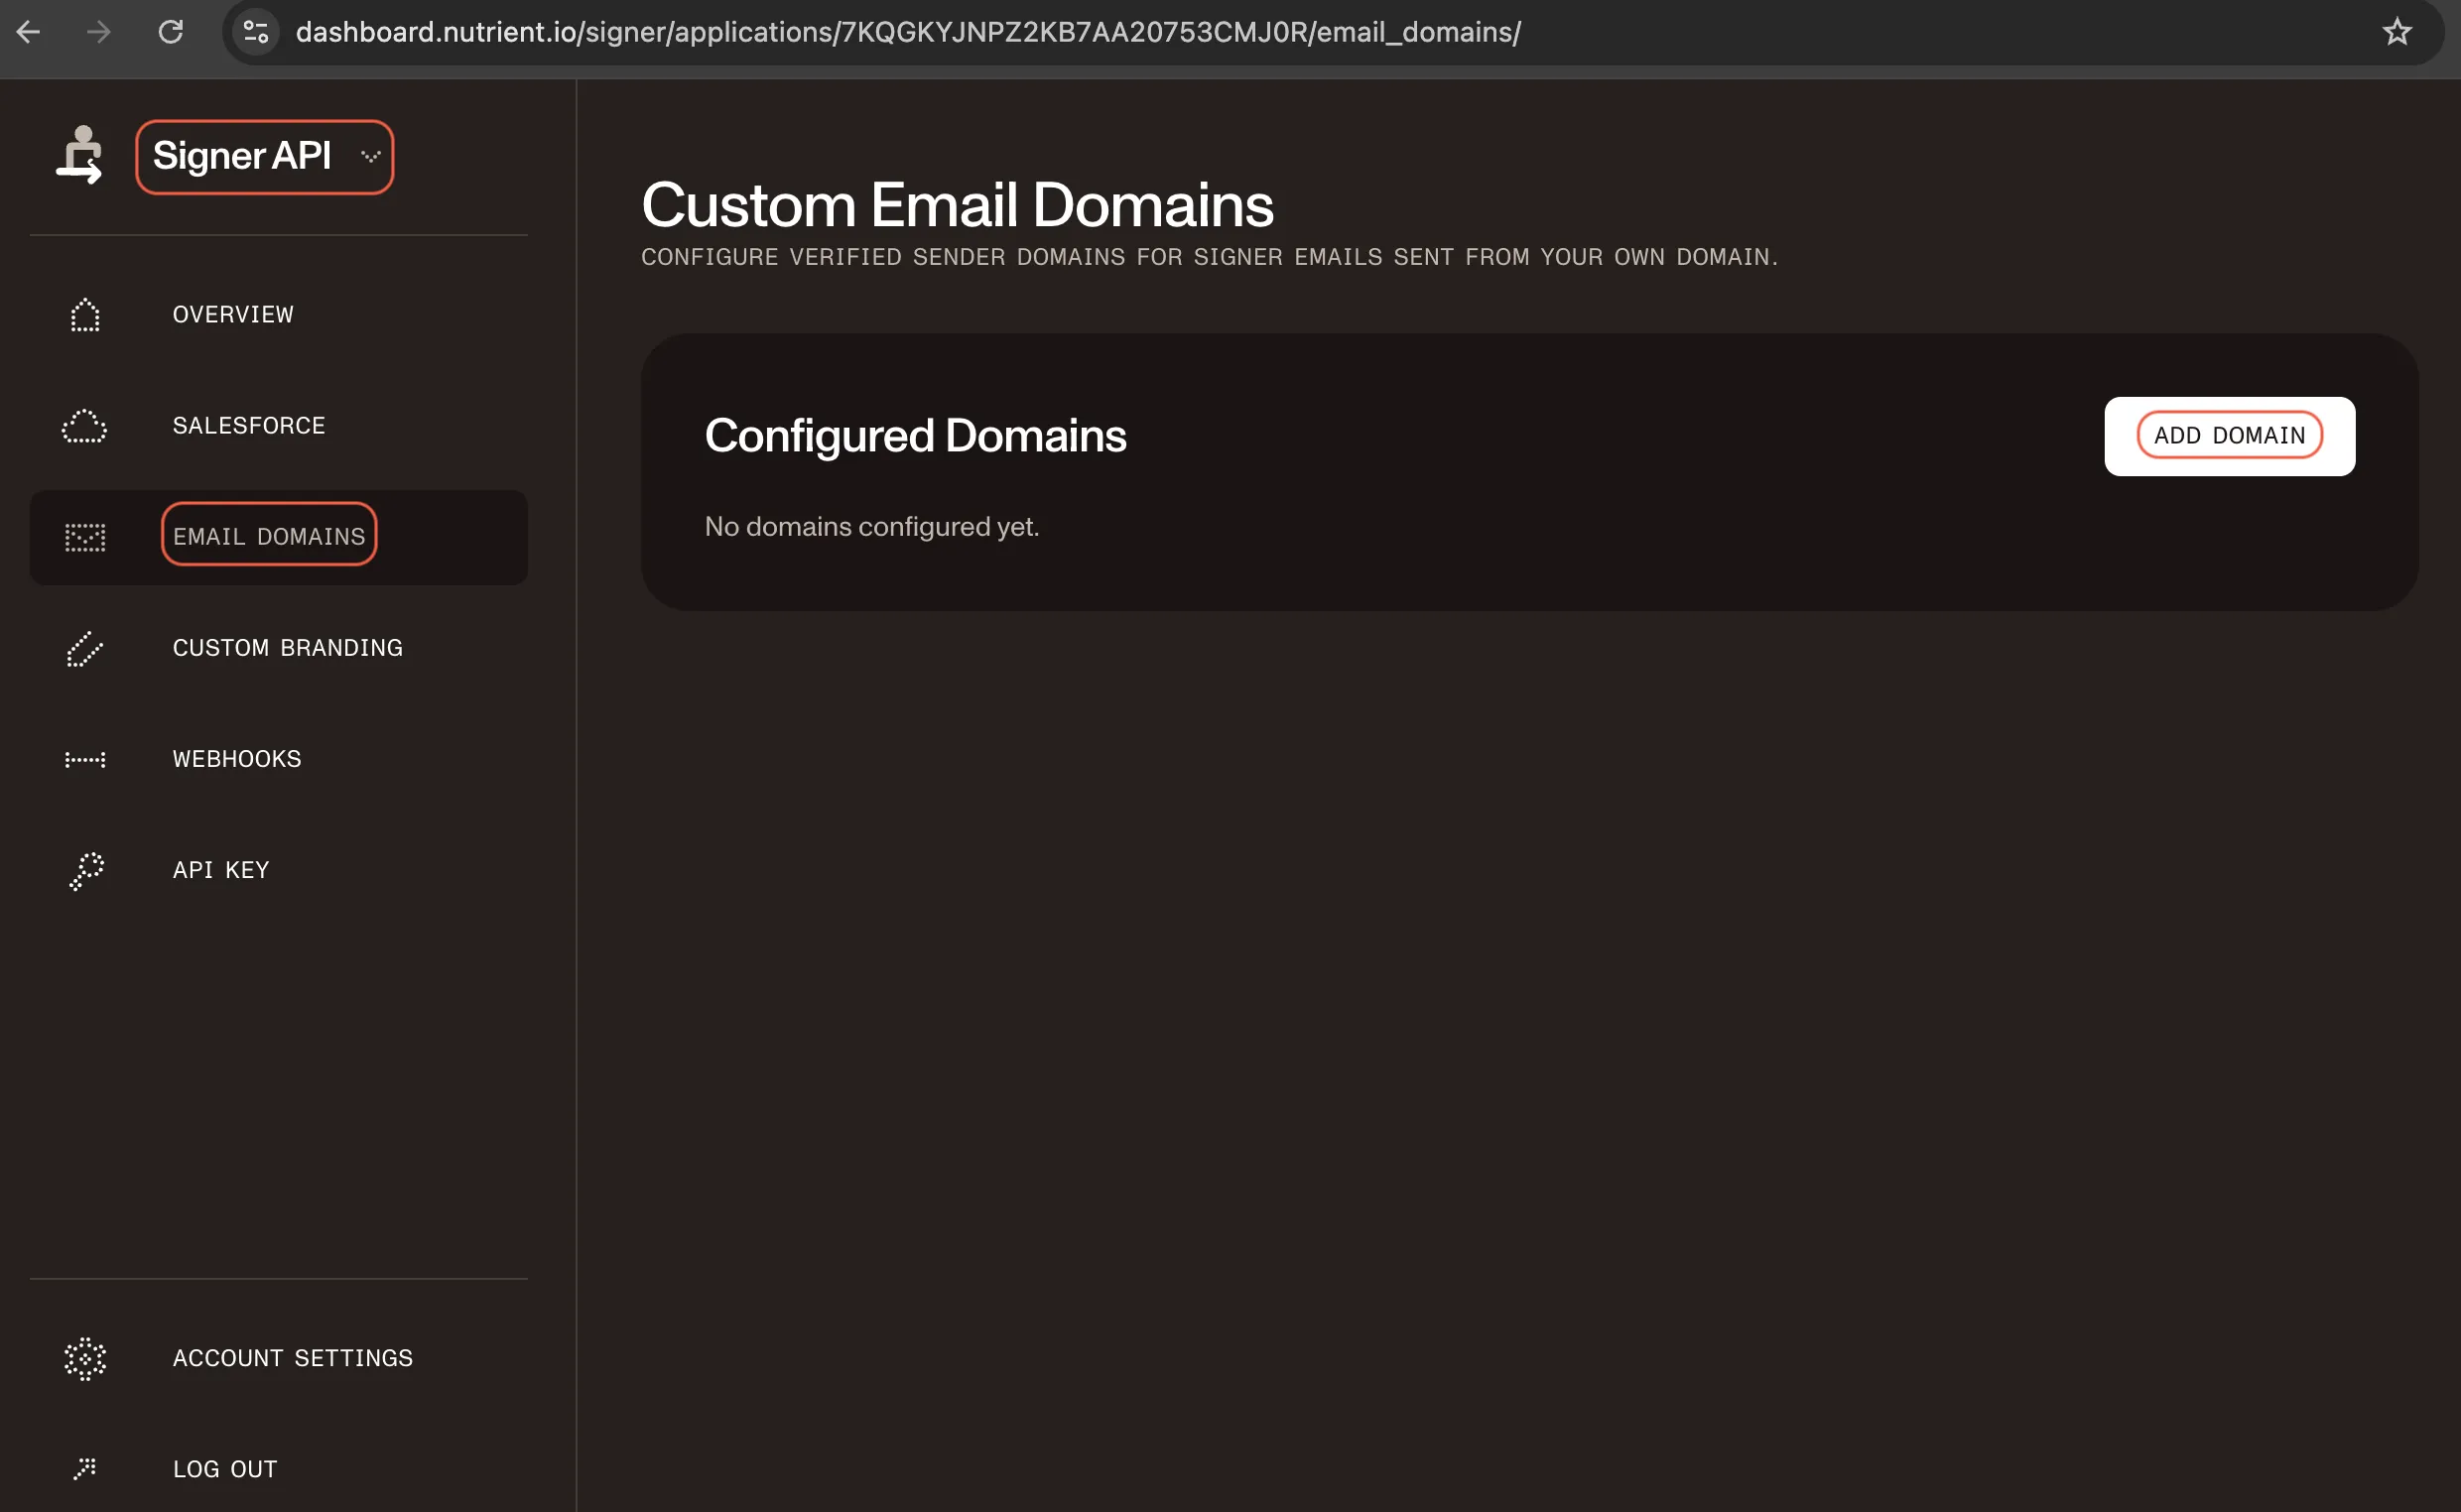
In the DWS Signer dashboard, click Email Domains in the left navigation panel and click Add Domain.
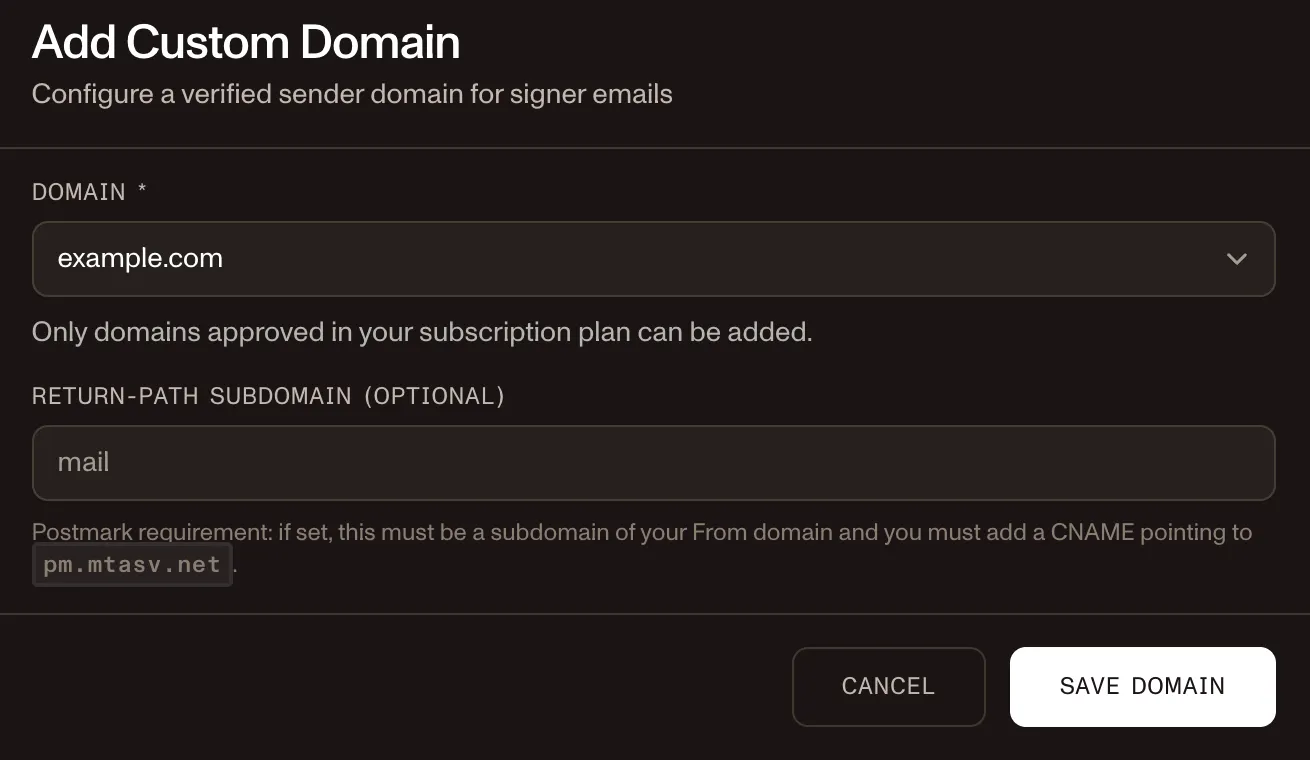
Select the Domain and, if needed, Return-Path Subdomain. Then click Save Domain.
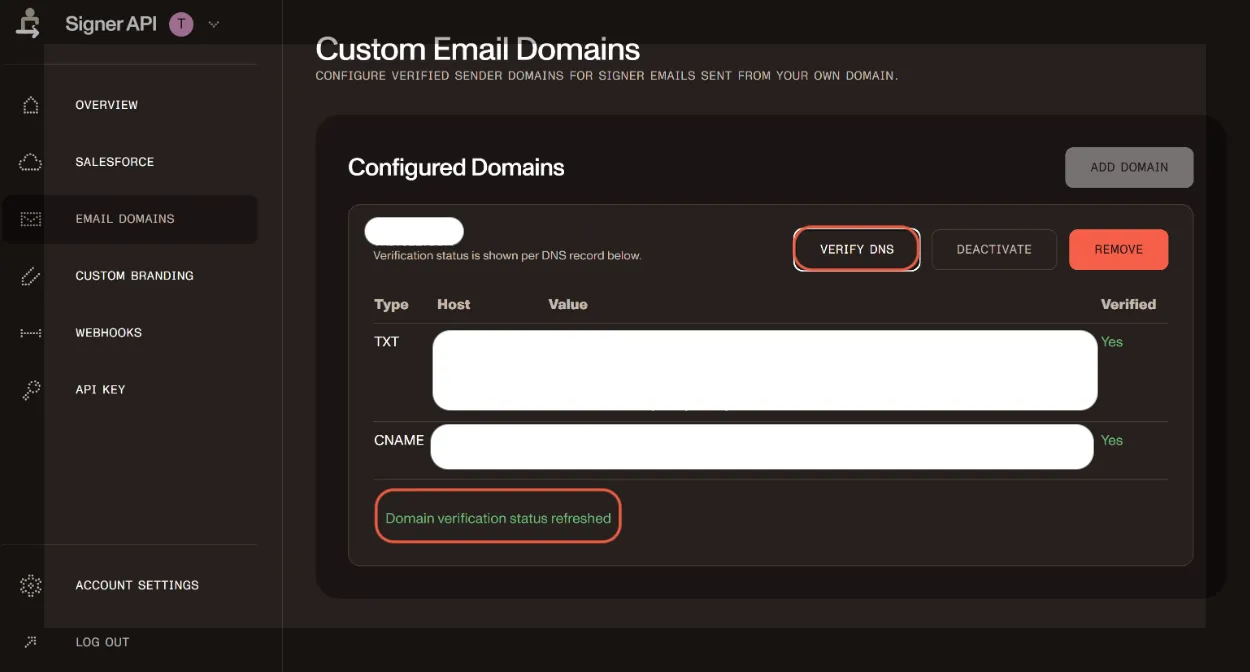
Open Cloudflare(opens in a new tab) or whichever DNS hosting service you use, and configure the respective host and value there.
Return to the DWS Signer dashboard and verify and activate the domain after DNS propagation.
The screenshot below is redacted to avoid exposing environment-specific DNS values.
Add signing widgets to record pages
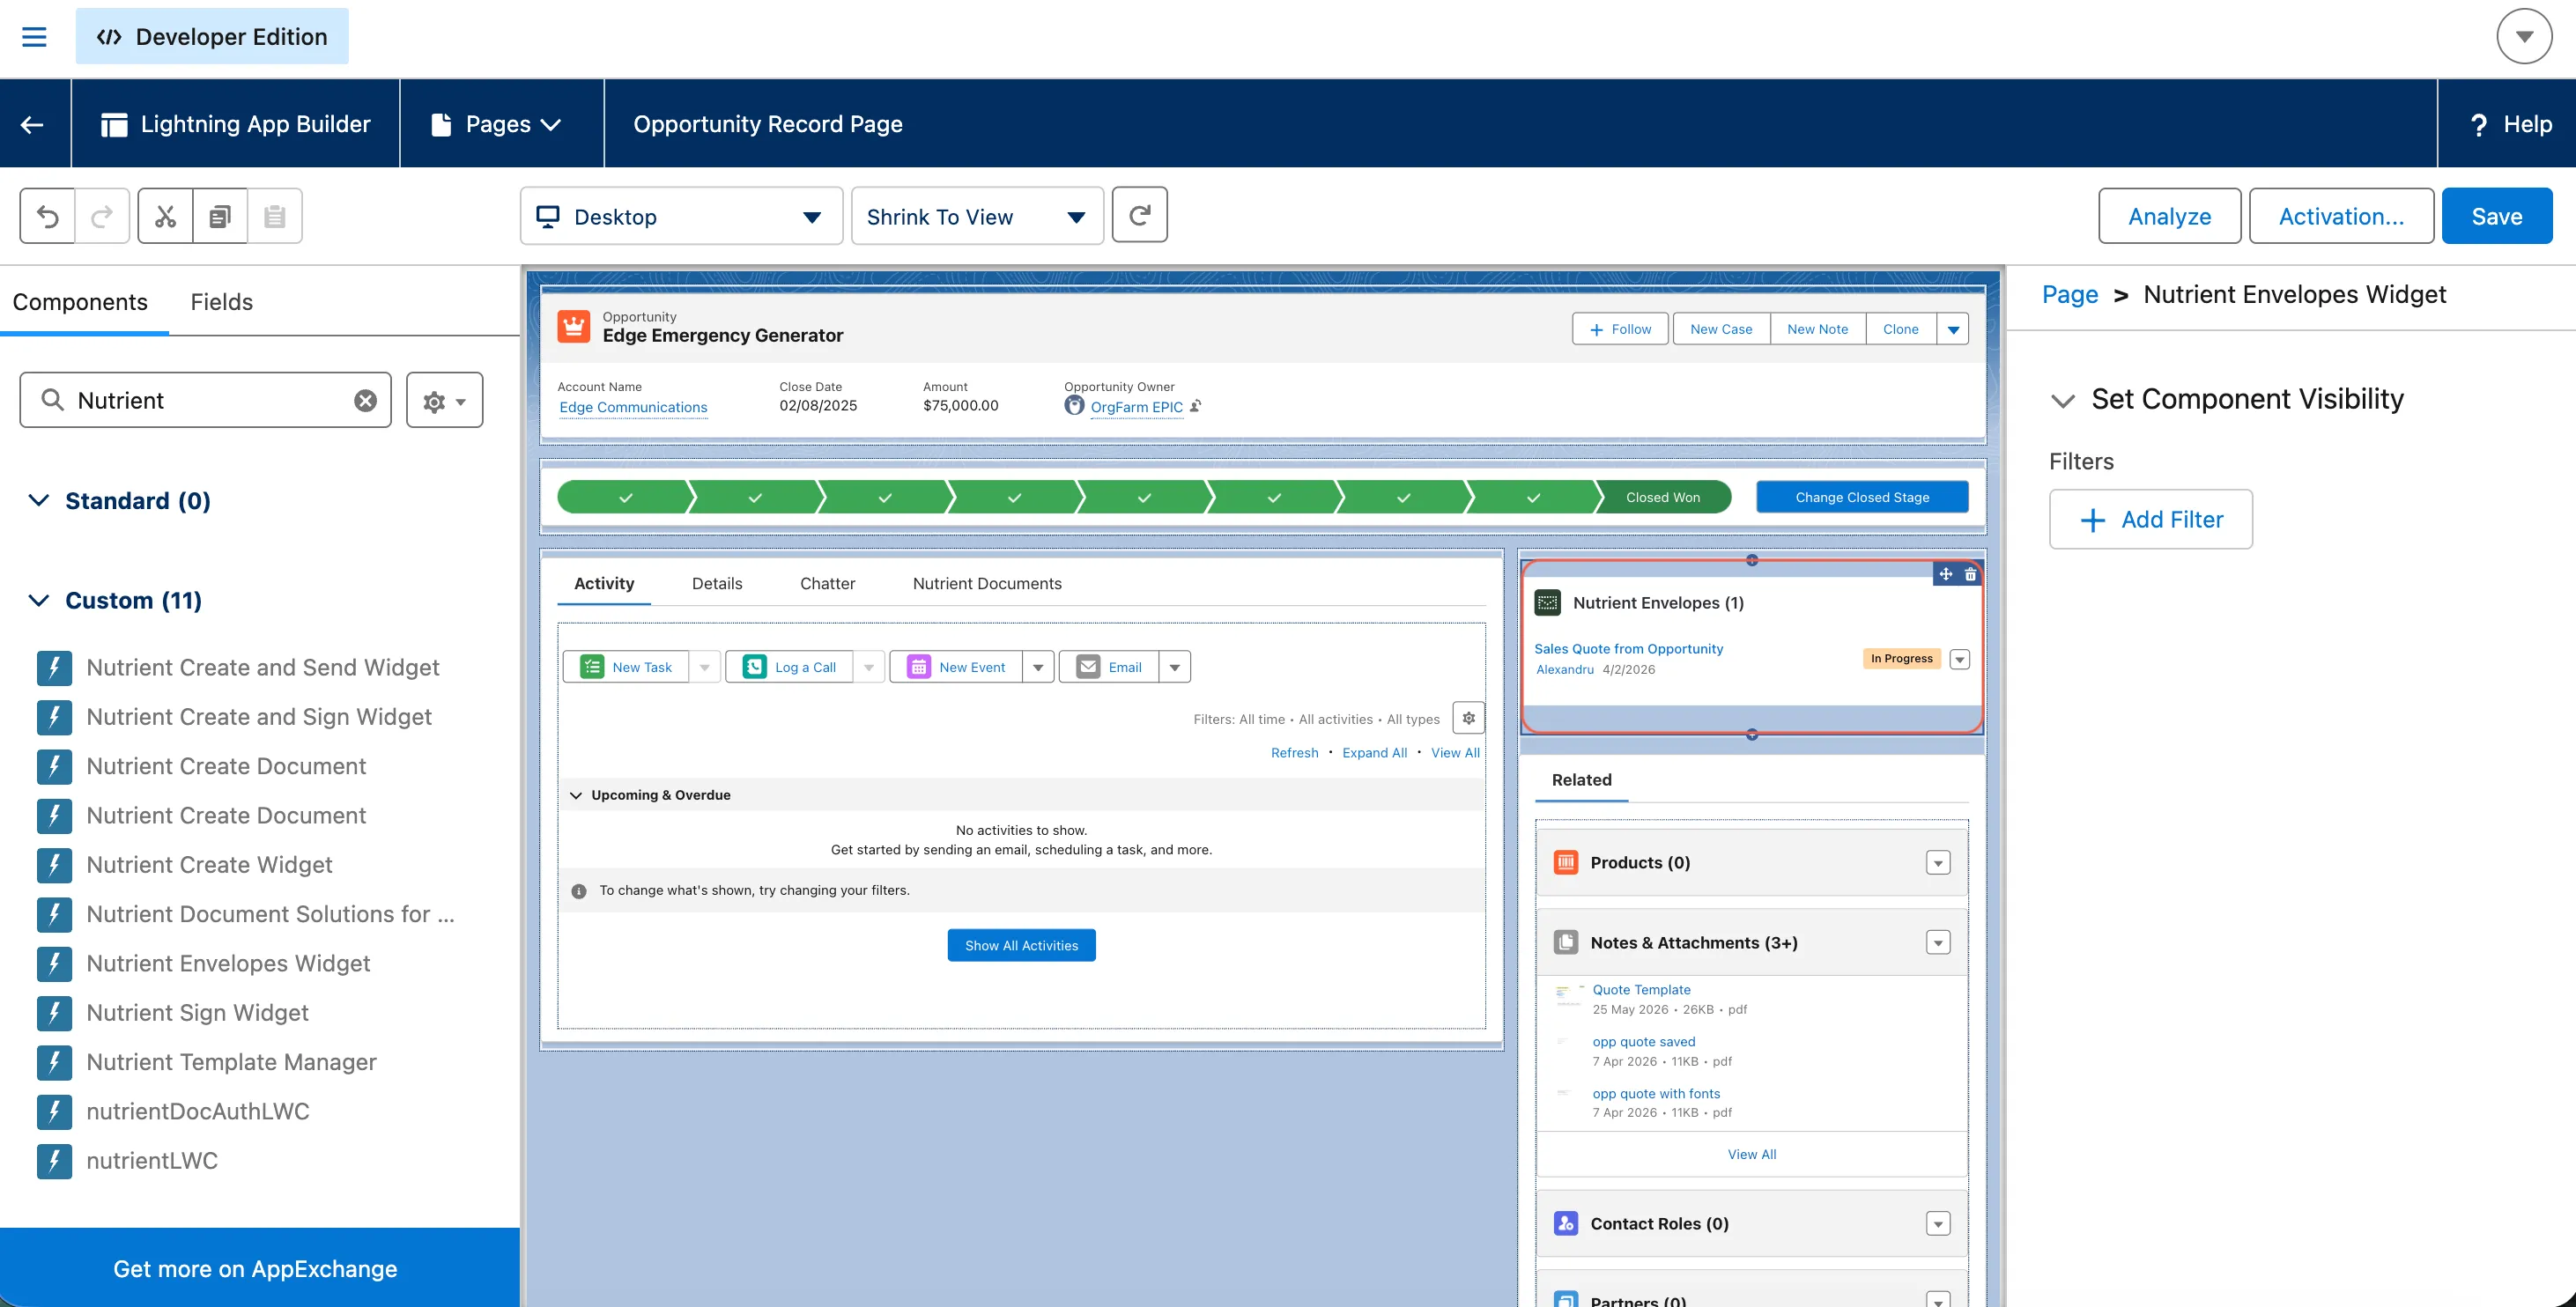
To let users start signing and track envelope status on Salesforce records, configure both signing-related widgets on the record page.
First, add the document creation widget that signing users use to start the flow. Refer to the set up document generation in Salesforce guide and use the Create and Send Document with Nutrient widget for users who send documents for signing.
Then add the signing status widget to each Salesforce record page where users should track signing progress.
- Open the target record page in Lightning App Builder.
- In the left component panel, find Nutrient Envelopes Widget.
- Drag the component to the area where you want envelope status and sync actions to appear.
- Optional: Add component visibility rules if only certain users or conditions should show the widget.
- Click Save, and then click Activate.
- Open a record and confirm that the widget loads correctly.
Troubleshooting
Start troubleshooting in Nutrient Admin > DWS Signing > Overview. Click Check now, expand any failed check, and use the provided fix link.
Outbound connection check fails
- Confirm the named credential points to
https://api.nutrient.io. - Confirm callouts are enabled on the named credential.
- Confirm Generate Authorization Header and Allow Formulas in HTTP Header are enabled.
- Confirm the DWS API key is stored on the external credential.
- Confirm the authorization header passes the API key as a bearer token.
Works for administrators but fails for regular users
- Regular users likely lack access to the selected DWS credential.
- In Outbound, click Check permissions.
- Assign affected users through Nutrient Signing with DWS or another group that includes signing permission and DWS credential access.
DWS can’t sign in to Salesforce
- Confirm the External Client App has JWT Bearer Flow enabled.
- Confirm the certificate uploaded to the app matches the private key pasted into DWS.
- Confirm the certificate hasn’t expired.
- Confirm the saved consumer key belongs to the selected External Client App.
- Confirm Permitted Users is set to Admin approved users are pre-authorized.
- Confirm the app policy includes
Nutrient_Signing_Integration.
Webhook events aren’t updating Salesforce
- Confirm the DWS webhook endpoint is
/services/apexrest/dwss-webhook. - Confirm all events except Envelope Created are enabled in DWS.
- Confirm the integration user is active and permissioned.
- Send a test envelope; webhook validation may require a real event after setup changes.
Send fails with salesforce_integration_not_found
- Confirm outbound setup is complete and the selected named credential maps to the active DWS tenant/environment.
- Run Overview > Check now and resolve DWS connection issues.
- If needed, ask the DWS team to enable Salesforce integration for your tenant/organization pairing.
Send fails with salesforce_download_failed
- Confirm inbound setup is complete.
- Confirm the integration user selected in the wizard is the same user configured in DWS.
- Confirm the integration user can use the DWS credential and has the required Nutrient signing integration permissions.
Security and operations recommendations
- Rotate DWS Signer API keys regularly.
- Rotate Salesforce JWT certificates before expiration.
- Use the wizard’s certificate expiration information when planning renewals.
- Keep webhook integration users dedicated and least-privileged.
- Retest DWS sign-in and webhook delivery after package upgrades, credential changes, or certificate rotation.
Related guide
If your team also needs end user document generation instructions, refer to create documents in Salesforce.