Getting started with AI Assistant and Nutrient Web SDK + Document Engine
AI Assistant provides Nutrient Web SDK with AI functionality. Using intelligent document processing (IDP) technology, AI Assistant enables users to query, summarize, translate, compare document text on the fly.
To set up a fully functional AI system, you’ll need two services and one library, all working in unison:
- Nutrient Web SDK — A document viewer in the browser that also exposes a user interface (UI) for the AI features.
- AI Assistant — A service to process the AI requests and process documents.
- Document Engine — A service that stores and serves documents to AI Assistant and Nutrient Web SDK.
This guide will walk you through the setup for AI Assistant and Document Engine so they can work in tandem. It’ll then walk you through a Node.js Nutrient Web SDK example to show how each service communicates to serve an AI example.
Prerequisites
AI Assistant is distributed as a Docker container. To run it on your computer, you need to install a Docker runtime distribution for your operating system.
Install and start Docker Desktop for Mac. Refer to the Docker website(opens in a new tab) for instructions.
Install and start Docker Desktop for Windows. Refer to the Docker website(opens in a new tab) for instructions.
Install and start Docker Engine. Refer to the Docker website(opens in a new tab) for instructions on how to install it for your Linux distribution.
After you install Docker, use these instructions(opens in a new tab) to install Docker Compose.
Obtaining an OpenAI API key
AI Assistant requires an API key from either of these LLM providers:
- OpenAI
- Azure OpenAI
This example will use OpenAI, but if you’d like to use Azure OpenAI, refer to the Azure OpenAI guide
If you don’t have an OpenAI key, create one by following the steps in the next section. Otherwise, skip to the Setting up AI Assistant section.
Creating an OpenAI account
To create an OpenAI account, sign up(opens in a new tab) to obtain an API key(opens in a new tab).
The OpenAI API has attained SOC 2 Type 2 compliance (see the official announcement(opens in a new tab)).
Save your API key somewhere safe, as you’ll need it in the Setting up AI Assistant step.
Setting up AI Assistant and Document Engine
AI Assistant works alongside Document Engine and requires a PostgreSQL database with the pgvector(opens in a new tab) extension to operate.
Copy the code snippet below and save it anywhere on your computer in a file called docker-compose.yml. Replace the <your-openai-api-key> placeholder with your OpenAI API key:
version: "3.8"
services:  ai-assistant:    image: pspdfkit/ai-assistant:2.0.2    environment:      OPENAI_API_KEY: <your-openai-api-key>      DE_URL: http://document_engine:5000      DE_API_AUTH_TOKEN: secret      PGUSER: db-user      PGPASSWORD: password      PGDATABASE: ai_assistant      PGHOST: db      PGPORT: 5432      API_AUTH_TOKEN: secret      JWT_PUBLIC_KEY: |        -----BEGIN PUBLIC KEY-----        MIIBIjANBgkqhkiG9w0BAQEFAAOCAQ8AMIIBCgKCAQEA2gzhmJ9TDanEzWdP1WG+        0Ecwbe7f3bv6e5UUpvcT5q68IQJKP47AQdBAnSlFVi4X9SaurbWoXdS6jpmPpk24        QvitzLNFphHdwjFBelTAOa6taZrSusoFvrtK9x5xsW4zzt/bkpUraNx82Z8MwLwr        t6HlY7dgO9+xBAabj4t1d2t+0HS8O/ed3CB6T2lj6S8AbLDSEFc9ScO6Uc1XJlSo        rgyJJSPCpNhSq3AubEZ1wMS1iEtgAzTPRDsQv50qWIbn634HLWxTP/UH6YNJBwzt        3O6q29kTtjXlMGXCvin37PyX4Jy1IiPFwJm45aWJGKSfVGMDojTJbuUtM+8P9Rrn        AwIDAQAB        -----END PUBLIC KEY-----      JWT_ALGORITHM: RS256      DASHBOARD_USERNAME: dashboard      DASHBOARD_PASSWORD: secret      SECRET_KEY_BASE: secret-key-base    ports:      - 4000:4000    depends_on:      document_engine:        condition: service_started      db:        condition: service_healthy
  document_engine:    image: pspdfkit/document-engine:1.14.0    environment:      PGUSER: db-user      PGPASSWORD: password      PGDATABASE: pspdfkit      PGHOST: db      PGPORT: 5432      API_AUTH_TOKEN: secret      SECRET_KEY_BASE: secret-key-base      JWT_PUBLIC_KEY: |        -----BEGIN PUBLIC KEY-----        MIIBIjANBgkqhkiG9w0BAQEFAAOCAQ8AMIIBCgKCAQEA2gzhmJ9TDanEzWdP1WG+        0Ecwbe7f3bv6e5UUpvcT5q68IQJKP47AQdBAnSlFVi4X9SaurbWoXdS6jpmPpk24        QvitzLNFphHdwjFBelTAOa6taZrSusoFvrtK9x5xsW4zzt/bkpUraNx82Z8MwLwr        t6HlY7dgO9+xBAabj4t1d2t+0HS8O/ed3CB6T2lj6S8AbLDSEFc9ScO6Uc1XJlSo        rgyJJSPCpNhSq3AubEZ1wMS1iEtgAzTPRDsQv50qWIbn634HLWxTP/UH6YNJBwzt        3O6q29kTtjXlMGXCvin37PyX4Jy1IiPFwJm45aWJGKSfVGMDojTJbuUtM+8P9Rrn        AwIDAQAB        -----END PUBLIC KEY-----      JWT_ALGORITHM: RS256      DASHBOARD_USERNAME: dashboard      DASHBOARD_PASSWORD: secret    ports:      - 5000:5000    depends_on:      - db  db:    image: pgvector/pgvector:pg16    healthcheck:      test: [ "CMD-SHELL", "pg_isready -U db-user" ]      interval: 3s      timeout: 3s      retries: 10    environment:      POSTGRES_USER: db-user      POSTGRES_PASSWORD: password      POSTGRES_DB: ai_assistant      POSTGRES_INITDB_ARGS: --data-checksums      PGDATA: /var/lib/postgresql/data/pgdata    volumes:      - pgdata:/var/lib/postgresql/data
volumes:  pgdata:
Starting AI Assistant
Now open a terminal emulator.
Use the terminal emulator integrated with your code editor or IDE. Alternatively, you can use Terminal.app or iTerm2(opens in a new tab).
Use your code editor’s integrated terminal or PowerShell(opens in a new tab).
Use the terminal emulator integrated with your code editor or IDE, or one bundled with your desktop environment.
Go to the directory where you saved the docker-compose.yml file:
cd <path-to-directory-with-docker-compose-yml>Run the following:
docker-compose upThis command might take a while to run, depending on your internet connection speed. Wait until you see the following message in the terminal:
ai_assistant | info: AI Assistant startedAI Assistant is now up and running! Upload a document you can chat with.
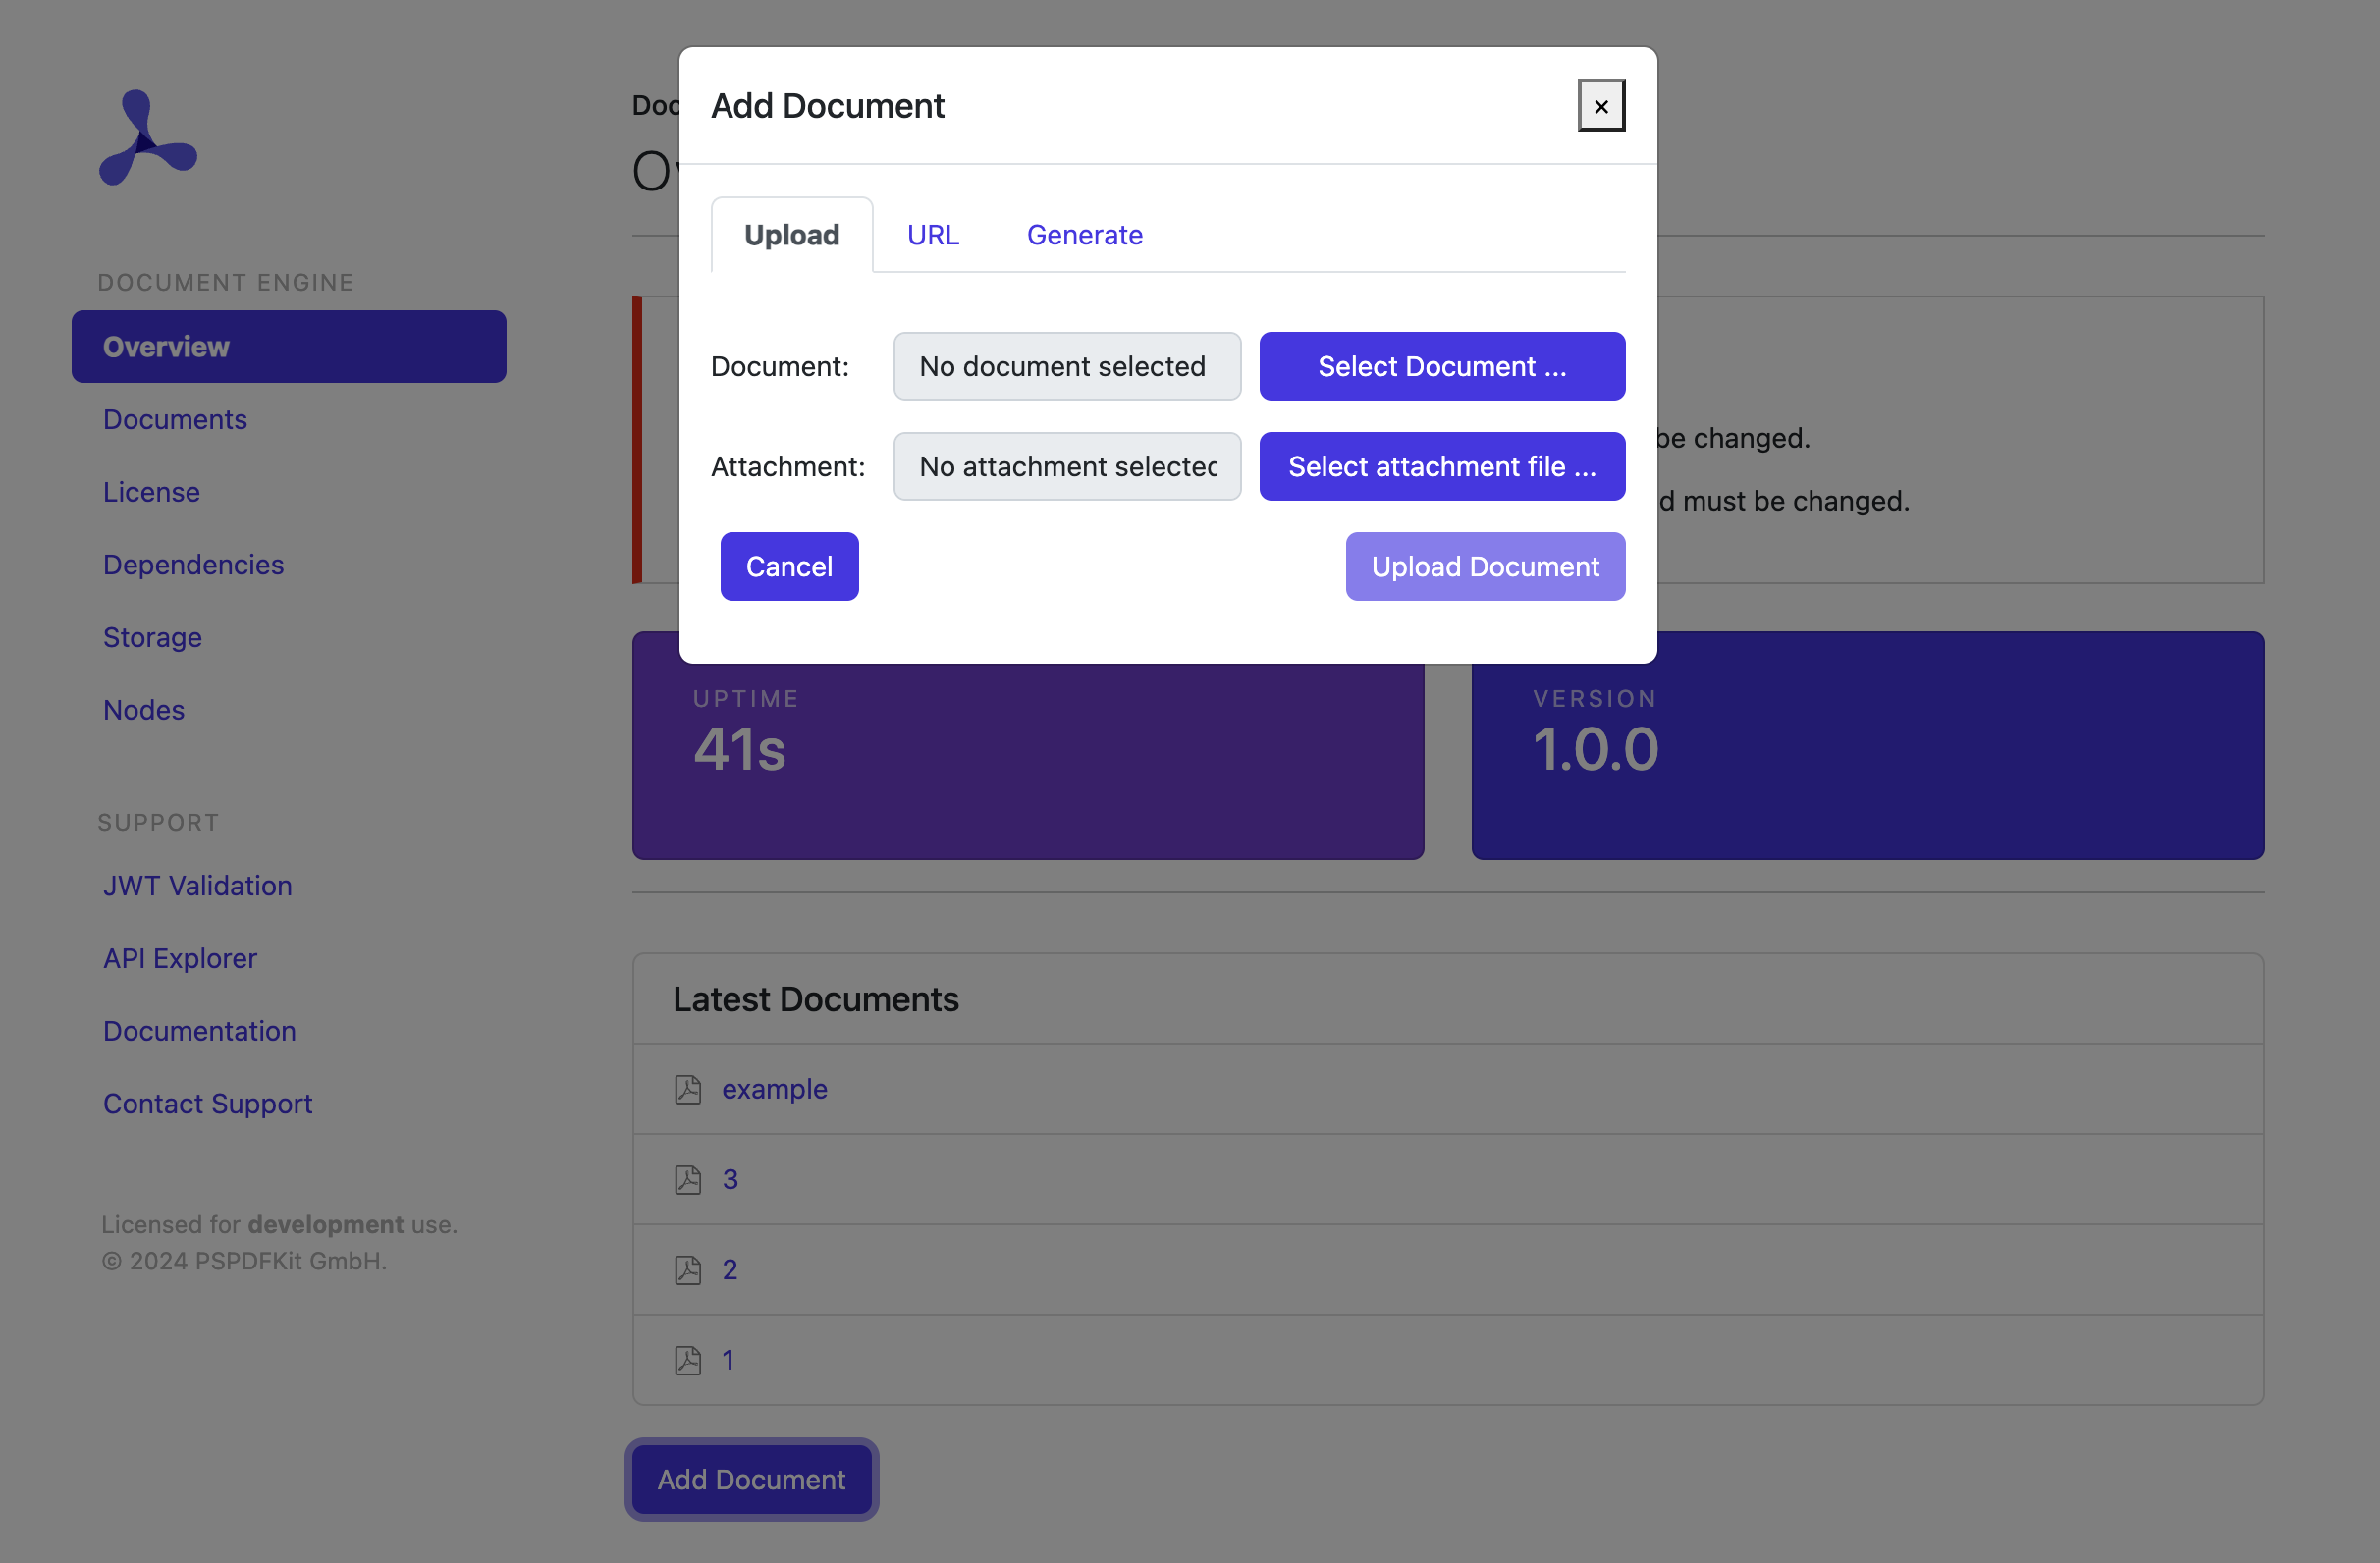
Uploading a document to Document Engine
With Document Engine running, visit http://localhost:5000/dashboard and authenticate using dashboard for the username and secret for the password. Choose Add Document and upload the document you want to work with.
Once the document is uploaded, visit http://localhost:5000/dashboard/documents to see the list of available documents. Each document is identified by an ID. Take note of the ID of the document you just uploaded, as you’ll need it shortly.
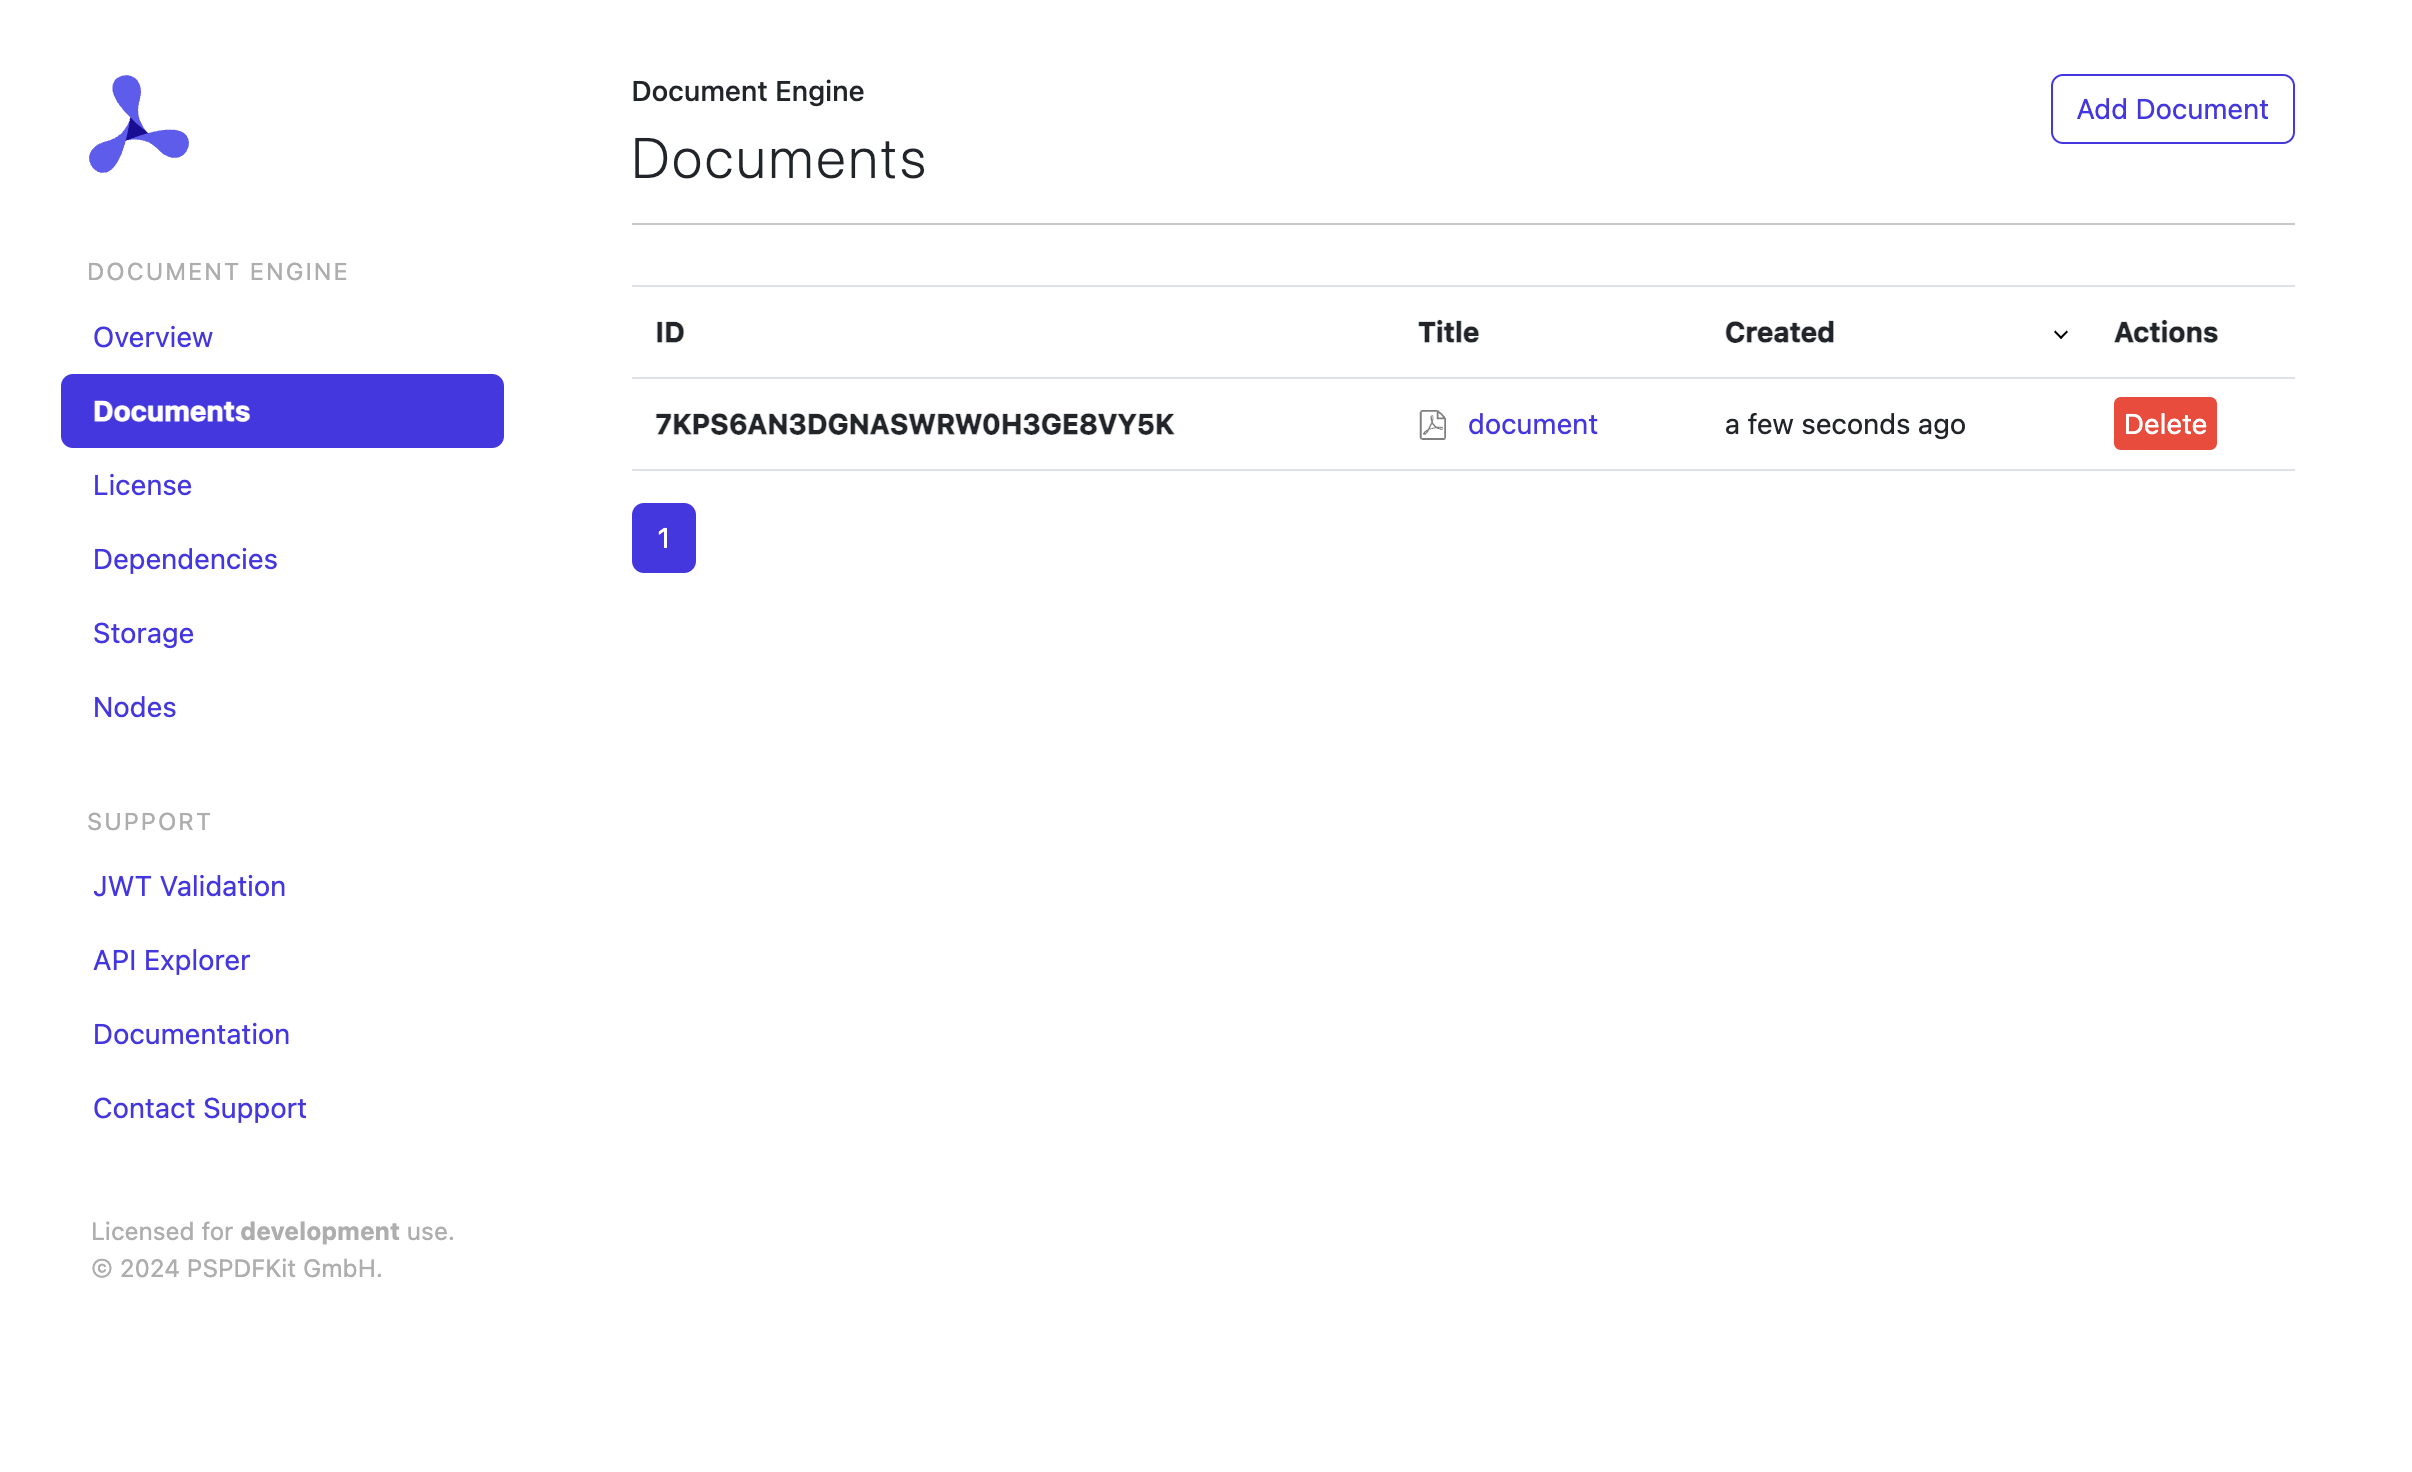
The ID will look similar to 7KPS8X13JRB2G841X4V7EQ3T2J.
Setting up Nutrient Web SDK
Follow the below instructions to set up Nutrient Web SDK viewer with AI Assistant.
Installing Node.js
If you haven’t installed Node.js, head to the official guides(opens in a new tab) and follow the instructions. By the end of the installation process, you should be able to run the following command:
node --versionThe output should be something like v14. You can ignore any subsequent number.
Generating the application
You’ll use Express(opens in a new tab), one of the most common Node.js web frameworks. To create a new Express application, you can use the official generator.
Run:
npx express-generator pspdfkit_example --view=ejsThis command will generate a project structure and instruct you on the steps to follow to install dependencies and start the project.
Once you’ve followed all the steps, you should be able to visit http://localhost:3000 to confirm the application is working as expected.
Adding a page to view the document
You need to create a page that will show a document stored inside Document Engine.
You’ll want this page to be available at http://localhost:3000/documents/:id, where the document ID is the ID automatically assigned by Document Engine when uploading a document.
To achieve this, create a new route to display a document and mount it in the application.
Create the document’s route in
./routes/documents.js:var express = require("express");var router = express.Router();router.get("/:documentId", function (req, res, next) {res.render("documents/show", { documentId: req.params.documentId });});module.exports = router;Inside the route, retrieve the ID captured by the routing logic and assign it to a
documentIdvariable you can refer to in the view.Create a corresponding view with some minimal HTML that prints the document ID:
<h1>Show document <%%= documentId %></h1>Mount the new route in the application in
./app.js:var indexRouter = require('./routes/index');var usersRouter = require('./routes/users');var documentsRouter = require("./routes/documents");// ...// rest of the file// ...app.use('/', indexRouter);app.use('/users', usersRouter);app.use("/documents", documentsRouter);
Stop and restart the Express server.
You can now visit http://localhost:3000/documents/:id, replacing :id with the ID of the document you uploaded to the Document Engine dashboard.
The page should contain the text Show document, followed by your document ID.
Creating a JSON Web Token (JWT)
Nutrient requires the use of JWTs to authenticate and authorize a viewer session against Document Engine.
To create JWTs, install the jsonwebtoken dependency:
npm install --save jsonwebtokenStop and restart the Express server.
Working with JWTs requires a private and public key pair. The private key is used by the Express application, while the public key is used by Document Engine.
The public key has already been configured in the Document Engine docker-compose.yml file via the JWT_PUBLIC_KEY environment variable.
To configure the private key, create a config/pspdfkit/jwt.pem file with the following contents:
-----BEGIN RSA PRIVATE KEY-----MIIEpQIBAAKCAQEA2gzhmJ9TDanEzWdP1WG+0Ecwbe7f3bv6e5UUpvcT5q68IQJKP47AQdBAnSlFVi4X9SaurbWoXdS6jpmPpk24QvitzLNFphHdwjFBelTAOa6taZrSusoFvrtK9x5xsW4zzt/bkpUraNx82Z8MwLwrt6HlY7dgO9+xBAabj4t1d2t+0HS8O/ed3CB6T2lj6S8AbLDSEFc9ScO6Uc1XJlSorgyJJSPCpNhSq3AubEZ1wMS1iEtgAzTPRDsQv50qWIbn634HLWxTP/UH6YNJBwzt3O6q29kTtjXlMGXCvin37PyX4Jy1IiPFwJm45aWJGKSfVGMDojTJbuUtM+8P9RrnAwIDAQABAoIBAQDSKxhGw0qKINhQIwQP5+bDWdqUG2orjsQf2dHOHNhRwJoUNuDZ4f3tcYzV7rGmH0d4Q5CaXj2qMyCd0eVjpgW0h3z9kM3RA+d7BX7XKlkdQABliZUT9SUUcfIPvohXPKEzBRHed2kf6WVtXKAuJTD+Dk3LjzRygWldOAE4mnLeZjU61kxPYriynyre+44Gpsgy37Tj25MAmVCYFlotr/1WZx6bg3HIyFRGxnoJ1zU1MkGxwS4IsrQwOpWEHBiD5nvo54hF5I00NHj/ccz+MwpgGdjyl02IGCy1fF+Q5SYyH86DG52Mgn8VI9dseGmanLGcgNvrdJFILoJRSZW7gQoBAoGBAP+D6ZmRF7EqPNMypEHQ5qHHDMvil3mhNQJyIC5rhhl/nn063wnmzhg96109hVh4zUAj3Rmjb9WqPiW7KBMJJdnEPjmZ/NOXKmgjs2BF+c8oiLQyTQmlxB7LnptvBDi8MnEd3uemfxNuZc+2siuSzgditshNru8xPG2Sn99JC271AoGBANp2xj5EfdlqNLd11paLOtJ7dfREgc+8FxQCiKSxbaOlVXNk0DW1w4+zLnFohj2m/wRrbBIzSL+eufoQ9y4BT/AA+ln4qxOpC0isOGK5SxwIjB6OHhCuP8L3anj1IFYM+NX0Xr1/qdZHKulgbS49cq+TDpB74WyKLLnsvQFyINMXAoGABR5+cp4ujFUdTNnp4out4zXasscCY+Rv7HGe5W8wC5i78yRXzZn7LQ8ohQCziDc7XXqadmYI2o4DmrvqLJ91S6yb1omYQCD6L4XvlREx1Q2p13pegr/4cul/bvvFaOGUXSHNEnUKfLgsgAHYBfl1+T3oDZFI3O/ulv9mBpIvEXUCgYEApeRnqcUM49o4ac/7wZm8czT5XyHeiUbFJ5a8+IMbRJc6CkRVr1N1S1u/OrMqrQpwwIRqLm/vIEOB6hiT+sVYVGIJueSQ1H8baHYO4zjdhk4fSNyWjAgltwF2Qp+xjGaRVrcYckHNUD/+n/VvMxvKSPUcrC7GAUvzpsPUypJFxsUCgYEA6GuP6M2zIhCYYeB2iLRD4ZHw92RfjikaYmB0++T0y2TVrStlzXHlc8H6tJWNchtHH30nfLCj9WIMb/cODpm/DrzlSigHffo3+5XUpD/2nSrcFKESw4Xsa4GXoAxqU44w4Mckg2E19b2MrcNkV9eWAyTACbEO4oFcZcSZOCKj8Fw=-----END RSA PRIVATE KEY-----Update ./routes/documents.js to read the private key so that it can be used to sign JWTs and pass them to the view.
In the claims, pass the document ID, the set of permissions you want to have, and an expiry of one hour:
var express = require("express");var router = express.Router();var fs = require("fs");var path = require("path");var jwt = require("jsonwebtoken");var jwtKey = fs.readFileSync(  path.resolve(__dirname, "../config/pspdfkit/jwt.pem"));
router.get("/:documentId", function (req, res, next) {  var jwt = prepareJwt(req.params.documentId);  res.render("documents/show", { documentId: req.params.documentId });  res.render("documents/show", { documentId: req.params.documentId, jwt: jwt });});
var prepareJwt = function (documentId) {  var claims = {    document_id: documentId,    permissions: ["read-document", "write", "download"],  };
  return jwt.sign(claims, jwtKey, {    algorithm: "RS256",    expiresIn: 60 * 60, // 1hr, this will set the `exp` claim for us.    allowInsecureKeySizes: true,  });};
module.exports = router;
The encoded JWT is then assigned to the jwt variable, which can be referenced in the view in ./views/documents/show.ejs:
<h1>Show document <%%= documentId %></h1><h1>JWT <%%= jwt %></h1>Stop and restart the Express server, and then refresh the page. You’ll now see a fairly long token printed on the page.
Loading an existing document
Update the view to load the SDK, passing the document ID and the JWT in ./views/documents/show.ejs:
<script src="https://cdn.cloud.nutrient.io/pspdfkit-web@1.12.0/pspdfkit.js"></script><h1>Show document <%%= documentId %></h1><h1>JWT <%%= jwt %></h1><!-- 2. Element where PSPDFKit will be mounted. --><div id="pspdfkit" style="width: 100%; max-width: 800px; height: 480px;"></div><!-- 3. Initialize PSPDFKit. --><script> PSPDFKit.load({ serverUrl: "http://localhost:5000/", container: "#pspdfkit", documentId: "<%%= documentId %>", authPayload: { jwt: "<%%= jwt %>" }, instant: true }) .then(function(instance) { console.log("PSPDFKit loaded", instance); }) .catch(function(error) { console.error(error.message); });</script>Refresh the page, and you’ll see the Nutrient Web SDK viewer showing the document you just uploaded. If you annotate the document and refresh the page, all changes will be automatically persisted.
Configuring AI Assistant in Nutrient Web SDK
To configure Nutrient Web SDK to use AI Assistant:
- Generate a JSON Web Token (JWT) on the backend for AI Assistant communication
- Pass the AI Assistant configuration to
PSPDFKit.load().
Create the AI Assistant JWT:
var express = require("express");var router = express.Router();var fs = require("fs");var path = require("path");var jwt = require("jsonwebtoken");var jwtKey = fs.readFileSync(path.resolve(__dirname, "../config/pspdfkit/jwt.pem"));router.get("/:documentId", function (req, res, next) {var jwt = prepareJwt(req.params.documentId);var aiJwt = prepareAIAssistantJwt(req.params.documentId);res.render("documents/show", { documentId: req.params.documentId, jwt: jwt });res.render("documents/show", { documentId: req.params.documentId, jwt: jwt, aiJwt: aiJwt });});var prepareJwt = function (documentId) {var claims = {document_id: documentId,permissions: ["read-document", "write", "download"],};return jwt.sign(claims, jwtKey, {algorithm: "RS256",expiresIn: 3 * 24 * 60 * 60, // 3 daysallowInsecureKeySizes: true,});};const prepareAIAssistantJwt = function (documentId) {var claims = {document_ids: [documentId],};return jwt.sign(claims, jwtKey, {algorithm: "RS256",expiresIn: 60 * 60, // 1hr, this will set the `exp` claim for us.allowInsecureKeySizes: true,});}module.exports = router;Pass the
aiAssistantconfiguration and show a toolbar item -./views/documents/show.ejs+<script src="https://cdn.cloud.nutrient.io/pspdfkit-web@1.12.0/pspdfkit.js"></script><h1>JWT <%%= jwt %></h1><!-- 2. Element where PSPDFKit will be mounted. --><div id="pspdfkit" style="width: 100%; max-width: 800px; height: 480px;"></div><!-- 3. Initialize PSPDFKit. --><script>PSPDFKit.load({serverUrl: "http://localhost:5000/",container: "#pspdfkit",documentId: "<%%= documentId %>",authPayload: { jwt: "<%%= jwt %>" },- instant: false,+ instant: false,+ toolbarItems: [...PSPDFKit.defaultToolbarItems, { type: "ai-assistant" }],+ aiAssistant: {+ sessionId: "my-random-session-id",+ jwt: "<%%= aiJwt %>",+ backendUrl: 'http://localhost:4000/',+ },}).then(function(instance) {console.log("PSPDFKit loaded", instance);}).catch(function(error) {console.error(error.message);});</script>
Refresh the page, and you’ll see the Nutrient Web SDK viewer with a new AI toolbar button. Click that button and the chat dialog will open and the document processing mechanism will begin. Once the spinner has stopped spinning, you’ll be able to interact with AI Assistant!