Solving font fidelity issues in Word documents
Table of contents

Have you ever opened a Word document on a different computer, only to find that it suddenly looks… off? Maybe the text shifted, spacing broke, or the whole vibe just felt wrong. Don’t worry, it’s not just you. This is a surprisingly common problem, and it often comes down to one hidden culprit: fonts.
This post will break down why Word documents can look different across systems, what font fidelity really means, and how you can take control — whether you’re the file’s author, or you’re just trying to view it as intended. It’ll also show how Nutrient .NET SDK can help solve these issues with smart font detection and embedding.
Why Word documents break across computers
Microsoft Word documents, especially in the DOCX/OpenXML format, are designed for easy editing and collaboration, but not necessarily perfect visual consistency. When you create a document, it uses the fonts installed on your system. But when someone else opens that same file on their system, Word may have to substitute the fonts if the originals aren’t available. That’s when things can shift — sometimes drastically.
How to improve the chances it will look the same everywhere
If you want your Word document to look exactly the same — fonts and all — when opened on another machine, you need to embed the fonts within the DOCX file.
How to embed fonts in Word
If you’re the originator of the file, the DOCX file format allows embedding the fonts that were used to improve the compatibility and fidelity of the file. To do this, follow the instructions outlined below.
- Go to File > Options > Save.
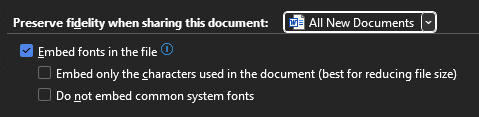
- Under Preserve fidelity when sharing this document, check the following:
- Embed fonts in the file — This embeds the fonts used in the file, allowing other editors/converters to map the intended document fonts, even if they aren’t available on the system where the file is opened.
- Embed only the characters used in the document — Optional. This will embed only the used characters, but it’ll prevent editing the document with the same font. It’s better left unchecked if you intend to edit the document with the font on a different computer.
- Do not embed common system fonts – Optional. Nutrient .NET SDK should handle those fonts and provide very close substitutions when the fonts aren’t available. However, for maximum compatibility, and if the rendering fidelity needs to be very precise, unchecking this option is advisable.
Even common system fonts can be substituted slightly depending on platform and version. Embedding them gives you peace of mind.
Prefer code? Use Nutrient .NET SDK
You can also embed fonts programmatically using Nutrient .NET SDK, which gives you finer control. This has been available since version 14.3.5.
How to know what fonts are missing
Say you’re working with a document you didn’t create that renders strangely and you don’t know what fonts it’s trying to use. You can use Nutrient .NET SDK to diagnose the issue.
Step 1 — Detect missing fonts
Nutrient .NET SDK can scan the document and list both the fonts used and which ones are missing on your current system.
Using the SaveDocumentFontsInfo method of GdPictureDocumentConverter will export a file listing all the fonts the documents requires and the fonts available on the system:
using GdPictureDocumentConverter converter = new GdPictureDocumentConverter();converter.LoadFromFile(@"input.docx");converter.SaveDocumentFontsInfo(@"output_fontInfo.xml", false);The resulting XML will tell you exactly which fonts the document expects (e.g. FreeSans, Cambria), and whether or not they’re available on your system.
Download the input file, which requests FreeSans fonts, with Cambria as an alternative font. Download the output file, which shows that FreeSans fonts are missing.
Step 2 — Fix the issue
There are two ways to resolve the issue of missing fonts.
Option 1: Install the missing fonts
Once you know what fonts are missing, the simplest fix is to install them on your system. After that, the document should render properly and can be converted/exported accurately.
Option 2: Embed the fonts in the document for future use
Want to make sure the file works for everyone down the line? You can embed the fonts directly into the DOCX using Nutrient .NET SDK — even if you weren’t the original author.
Using the EmbedFontInDocx method of GdPictureDocumentUtilities will embed the font you provide into a DOCX document:
GdPictureDocumentUtilities.EmbedFontInDocx( @"input_docx_missing_font.docx", @"output_docx_embedded_font.docx", @"FreeSans", @"input_font_FreeSansBoldOblique.otf",This improves long-term compatibility, especially for archiving, sharing with clients, or converting files to PDF or other formats.
The big picture: Fonts matter more than you think
Fonts are invisible until they’re missing — and then they can ruin the whole look of your document. Whether you’re a developer building a document pipeline, or just someone trying to share a polished Word file with a team, understanding font fidelity is essential.
The good news? With tools like font embedding and Nutrient .NET SDK, you’re no longer at the mercy of someone else’s system settings.
Ready to take control of your document rendering?
To learn more about how Nutrient .NET SDK can help ensure reliable, high-fidelity Word document processing across systems, platforms, and formats, refer to our guides, start a free trial, or contact Support.
While font embedding and detection are currently available through Nutrient .NET SDK, we’re actively exploring support for additional platforms. If you’re using a different environment and would like to see this capability added, please contact Sales — we’d love to hear from you.