Streamline document conversion with quick jobs
“Quick Jobs” can be defined and run interactively which provides a convenient method for testing the product’s capabilities and running simple jobs. The job definitions can be saved to the Job Manager for scheduling and further refinement.
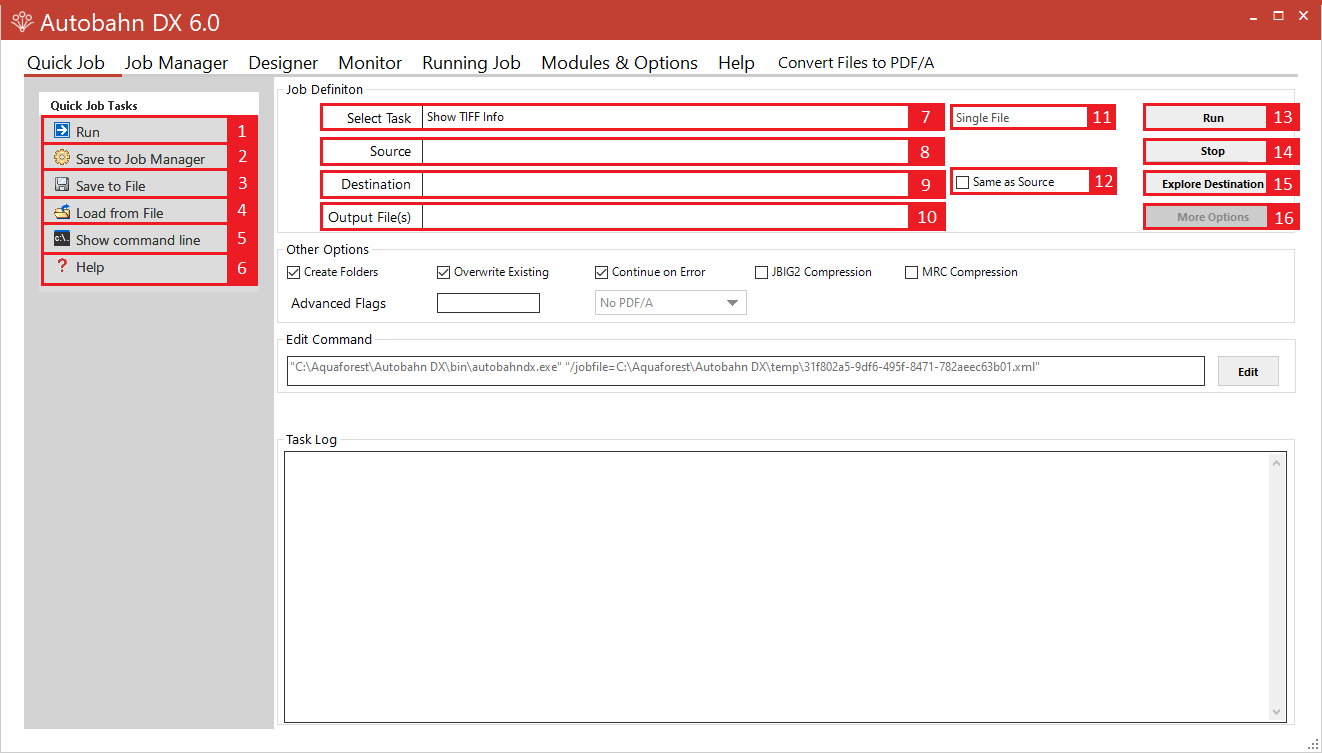
- Run: Runs the job using the current Quick Job definition.
- Save to Job Manager: Creates a new job in the Document Automation Server (DAS) job manager using the current Quick Job definition.
- Save to File: Save the current Quick Job definition to an XML file.
- Load from File: Loads a Quick Job definition from an XML file.
- Show Command Line: Shows the command line equivalent of the current Quick Job definition (Requires Server license).
- Help: Clicking this Button will take you to the Help Tab.
- Select Task: This defines which task is to be run and may be one of:
- Convert a TIFF file to PDF
- OCR an Image-Only PDF File
- Convert any file to PDF
- Set PDF Properties
- Merge TIFF Files
- Merge TIFF Files to PDF
- Split a TIFF File
- Show Information for a TIFF File
- Split PDF
- Merge PDF
- Convert a PDF file to TIFF
- Extract Text from PDF
- Convert Any File to Searchable PDF
- TIFF/PDF Barcode
- Source: The source file or directory.
- Destination: The location where the generated TIFF or PDF file(s) will be placed. This can be set to be the same as the source location.
- Output File(s): Target file template, which can include
%FILENAME(original filename without the extension) and%DIRNAME(directory name of the original file). - Source Type: Use this Combo Box to choose if you want to process a file, folder or a tree.
- Same as Source: Check this box to set the target directory to be the same value as the source directory.
- Run: Runs the current job. Job output will appear in the “task log section of the screen”.
- Stop: Halts processing of the currently running job.
- Explore Destination: Launches Windows Explorer using the destination as the starting point.
- More Options: This launches a set of property sheets which can be used to set properties of the generated PDF files, such as security and metadata values.
OCR options section
| Screen Field/Button | Description |
|---|---|
| Searchable PDF | PDFs generated from TIFF files include searchable hidden text recognized by DAS’s OCR Engine. |
| OCR to Text File (Professional Edition Only) Other Options (Deskew, Autorotate, Despeckle) | Create a separate text file of text recognized by DAS’s OCR Engine. See the Standard Engine section for further explanation of the OCR options. |
OCR PDF options section
| Screen Field/Button | Description |
|---|---|
| Image Method | This allows control over the method used to extract images from PDF files for OCR processing when using the “OCR an Image-Only PDF”. The options are: - Auto: DAS will select the most appropriate method. This will be “Convert to TIFF” for image-only PDFs and “Native” otherwise. - Convert to TIFF: The PDF is rasterized using a conversion to TIFF. - Native: This method places the OCRed text directly into a copy of the original PDF rather than creating an entirely new PDF. Note:- Methods other than “Native” change the non-image parts of the PDF to image + text. - As the “Native” method does not make any changes to the images in the PDF file, it is not compatible with the JBIG2 or MRC compression, PDF/A compliance option. If these features are required, then it is recommended that the “Convert to TIFF” setting is used in the PDF OCR image extraction method. |
| Non-Image PDFs | This allows control over the treatment of non-image PDFs, i.e. PDFs that have some text in them as well as images. The options are: - OCR: The document will be OCRed using the image method defined by “Image Method”. - Raise Error: The task will terminate with an error. If “On Error Continue” is set this then behaves as Skip. This is the default. - Skip: The document will not be processed. - Pass Through: The file will not be processed, but a copy of the document will be made and named as if the processing had occurred. - DPI: Image PDFs are converted to TIFF for OCR processing. This dropdown allows the DPI for the converted TIFF to be specified. If left on “Auto” the DPI will be determined from the original images in the PDF file. - Retain Bookmarks: Bookmarks from the original PDF are copied to the searchable result PDF. - Retain Metadata: Metadata from the original PDF are copied to the searchable result PDF. |
PDF to TIFF options section
| Screen Field/Button | Description |
|---|---|
| TIFF Compression | For black & white documents “Group 4” should be selected. For color, “LZW” should be used. |
| TIFF Resolution | This specifies the DPI resolution. |
Split options section
| Screen Field/Button | Description |
|---|---|
| Split Type | Split the file into: - Single pages - Ranges (See below) - Repeating ranges (See below) |
| Page Ranges | Set of page ranges separated by commas that define which pages from the original should be extracted. The following types of page ranges are allowed: - 1: Specifies a single page - 1-3: Specifies a range of pages |
| Repeating Range | Apply the page range to each set of Page Ranges within the document. For example, if 2-4 is specified for page ranges, and 4 is specified as the repeating range, then the range is re-applied every 4 pages.Hence the file is split such that the first output file contains pages 2-4 from the original document; the second contains pages 6-8 and so on. |
Other options section
| Screen Field/Button | Description |
|---|---|
| Create Directories (where required) | If checked, when processing a tree, subdirectories will be created in the target directory tree when required. |
| Continue on Error | When checked, folder and tree processing jobs will continue even if there is an error processing the individual file. |
| - PDF/A-1b - PDF/A-2b - PDF/A-3b | Processes the output PDF file to ensure it is compliant with ISO 19005 / PDF/A-1b, PDF/A-2b or PDF/A-3b, See the PDF to PDFA Job for more details. |
| JBIG2 Compression | If this option is chosen, bitonal images in the output PDF will be compressed used JBIG2 compression rather than the default of Group 4. This will result in smaller files for PDFs with black and white images. |
| MRC Compression | This enables Mixed Raster Compression which can dramatically reduce the output size of PDFs comprising color scans. Note that this option cannot be used in conjunction with the “Native” Image Method for OCRing PDFs as the Native method does not adjust the images within the PDF. |
| Advanced Flags | Additional TIFF Junction advanced command-line flags may be entered here. See Advanced Flags for more details. |
Barcode options
| Screen Field/Button | Description |
|---|---|
| Output File(s) With Barcode | The output file path template where the split files will be saved. - %VALUE%: Replaced by the barcode value found.- %INDEX%: Replaced by the current split index.- %FILENAME: Replaced by the file name. |
| Output File(s) No Barcode | The renaming template to use for page ranges where no barcodes were identified. Allowed templates: - %INDEX%: Replaced by the current split index.,- %FILENAME: Replaced by the filename of the source file. |
| Barcode Operation | - Split By Barcode: Choose this option to split the TIFF/PDF file by Barcode. - Rename By Barcode: Choose this option to rename the TIFF/PDF file based on Barcode. |
| Barcode Formats | Various reading options for barcode types. Other barcode types exist and can be set manually. Reach out to our support team for more details. - Codabar – Default, All, All 1D - Code128 – Default, All, All 1D. - Code25 – Default, All, All 1D., - Code39 – Default, All, All 1D. - EAN13 – Default, All, All 1D. - EAN8 – Default, All, All 1D. - QRCode – All 2D. - UPCA – Default, All, All 1D. - Selected – Only searches for the barcode types selected below. |
| Split Mode | Various Options for splitting Files by Barcode. - Barcode on First Page - Barcode on Last Page - Remove Barcode Page |
| Metadata Name | The name of the metadata field you want to add to the output file |
| Metadata Value | The value of the metadata field you want to add to the output file. |
| Deskew Mode | Controls how the toolkit handles documents that are skewed or rotated. - 0 – Compatibility mode, no skew, aligned. - 1 – No skew, barcode must be aligned with page. - 2 – Skew, aligned. - 3– Skew, aligned, two different skew angles can be read. - 4 – Skew, can be unaligned, three skew angles allowed. - 5 – Skew, unaligned, four skew angles allowed. - 6 – Skew, unaligned, five or more skew angles allowed. |
| Skew Tolerance | Only has effect if Deskew Mode is set to 0. Controls the maximum angle from horizontal or vertical at which a barcode will be recognized. - 0 – up to 5 degrees. - 1 – 13 degrees. - 2 – 21 degrees. - 3 – 29 degrees. - 4 – 37 degrees. - 5 – 45 degrees. |
| Noise Reduction | Runs the image through a noise reduction filter before scanning for barcodes, removing marks that are unlikely to be part of a barcode. A larger value removes larger marks but may destroy barcode information. A typical value for noise reduction is 10. |
| Despeckle | If noise reduction is nonzero, setting this property will remove white speckles from inside barcodes, and remove black marks in the spaces between bars. |
| Error Correction | Attempts to correct Code 39 barcodes if able. |
| Max Length | Max length of the barcode output. |
| Min Length | Min length of the barcode output. |
| Min Separation | Minimum distance between two barcodes with the same value and alignment to be considered separate values. |
| Multiple Read | Read the entire page for barcode values. If false, the reader will stop after the first barcode is found. |
| Page No | Specifies the page to read the barcode from. A value of 0 will scan every page for barcodes. |
| Pattern | A regular expression to compare barcodes to. Only barcodes that match this pattern will be returned. |
| Pref Occurrence | As the barcode reader scans, it assigns scores to barcode reader candidates. After the scan, only candidates above this score are reported. |
| Quiet Zone Size | On a scan line, the barcode reader ignores parts of the line not preceded by a number of white pixels specified by QuietZoneSize. A value of 0 calculates a zone 1/10th of the image resolution. |
| Report Unread Barcodes | A mask that controls the reporting of unsuccessfully decoded barcodes. Has the following limitations: - Maximum of 1 unread barcode per page - No unread barcodes reported on pages with a barcode successfully read - Linear Barcodes must contain at least 40 black bars - 2D barcodes only reported if they reach and fail the error correction stage of decoding - Any large series of parallel lines will be reported as an unread linear barcode - All unread barcodes are reported as type UNREAD with value UNREAD - The appropriate 2D type must be enabled to detect unread barcodes of that type - If linear barcode types are disabled, barcodes of that type may still be reported as unread Mask values - 1 = Linear Barcodes - 2 = Datamatrix - 4 = QR-Code - 8 = PDF-417 |
| Rotate by 45 if no barcode | Reader will rotate by 45° and rescan if no barcode found. |
| Scan Direction | A mask that controls all the directions the reader will scan for barcodes. Mask values: - 1 = Left to Right. - 2 = Top to Bottom. - 4 = Right to Left. - 8 = Bottom to Top. |
| Show Check Digit | When true, the barcode check digit is included in the returned value, if the barcode type contains a check digit. |
| Timeout | The maximum time in milliseconds that the barcode reader will allow for scanning a page in the document. |
| Use Over-Sampling | When true, the reader samples 3 lines at a time, taking the average pixel value. Useful against image speckles. |
| Left, Top, Width, Height | Sets the rectangle zone that will be searched for a barcode. If a value is not set, the whole page will be scanned. |
| DPI | DPI of Tiff image generated from PDF files. These images are then scanned for barcodes. |
| BPP | BPP of Tiff image generated from PDF files. The images are then scanned for barcodes. |
| TIFF Compression | Type of compression used when converting PDF input to Tiff, before scanning for barcodes |
| Advanced Flags | This enables advanced flags to be used, even if there is no direct equivalent in autobahndx.exe. |
Task log section
| Screen Field/Button | Description |
|---|---|
| Command | This is the operating system command that is used to run the job. It can be edited after using the “Edit” button, although there is normally no need for this. |
| Task Output | The output of the job appears here. |
Next steps
See the following guides for information on: