Next.js PDF viewer with React-PDF and Nutrient SDK
Table of contents
Building a PDF viewer in a Next.js(opens in a new tab) application can be tricky due to server-side rendering (SSR) constraints. This tutorial will walk through two solutions:
- Using React-PDF(opens in a new tab), a lightweight open source library built on PDF.js.
- Using Nutrient Web SDK, an enterprise-ready PDF viewer with powerful features like annotation, redaction, and form filling.
You’ll learn how to set up each approach to avoid hydration errors, ensure fast client-side rendering, and deliver a seamless viewing experience.
What is a Next.js PDF viewer?
A Next.js PDF viewer enables users to display and interact with PDF documents directly within a web browser — without needing to download the file or use third-party PDF applications. Since Next.js supports server-side rendering, integrating a PDF viewer requires careful handling to avoid hydration mismatches. A client-side viewer ensures compatibility and performance by loading the PDF only after the page has mounted on the client.
How to build a PDF viewer in Next.js with React-PDF
By the end of this tutorial, you’ll have a PDF viewer with:
- Page navigation (Previous/Next buttons)
- A page counter display
- Responsive design
- Error handling for missing files
- Loading states
- Complete Next.js compatibility
Prerequisites
Before starting, ensure you have:
- Node.js (version 20 or later)
- Basic knowledge of React and Next.js
- A text editor or IDE (VS Code recommended)
Setting up your Next.js project
If you don’t yet have a Next.js project, follow these steps to create one.
Option 1 — Create a new Next.js project
npx create-next-app@latest my-pdf-viewercd my-pdf-viewerWhen prompted, choose the following options:
- Would you like to use TypeScript? → No
- Would you like to use ESLint? → Yes
- Would you like to use Tailwind CSS? → No (you’ll use inline styles)
- Would you like to use
src/directory? → Yes - Would you like to use App Router? → Yes
- Would you like to use Turbopack for
next dev? Yes - Would you like to customize the default import alias? → No
Option 2 — Add to an existing project
If you already have a Next.js project, make sure it’s using App Router (Next.js 13+). You can check this by looking for an app directory in your project root.
Verify your setup
Start your development server to make sure everything is working:
npm run devVisit http://localhost:3000 to see the default Next.js page.
The challenge with React-PDF and Next.js
React-PDF relies on browser APIs that aren’t available during server-side rendering. This causes the infamous “DOMMatrix is not defined” error. You’ll solve this by creating a client-side-only PDF viewer using dynamic imports and proper component structure.
Step 1 — Install dependencies
Navigate to your project directory and install the required package:
npm install react-pdfStep 2 — Project structure
Create the following file structure in your Next.js project:
src/├── components/│ ├── PDFViewerClient.js│ └── PDFViewer.js├── app/│ └── page.js├── next.config.js└── public/ └── document.pdfStep 3 — Create the PDF viewer client component
This component contains the actual PDF viewing logic and react-pdf imports:
"use client";import { useState } from "react";import { Document, Page, pdfjs } from "react-pdf";import "react-pdf/dist/Page/TextLayer.css";import "react-pdf/dist/Page/AnnotationLayer.css";
pdfjs.GlobalWorkerOptions.workerSrc = new URL(  "pdfjs-dist/build/pdf.worker.min.mjs",  import.meta.url,).toString();const PDFViewerClient = () => {  const [numPages, setNumPages] = useState(null);  const [pageNumber, setPageNumber] = useState(1);
  const onDocumentLoadSuccess = ({ numPages }) => {    setNumPages(numPages);  };
  const goToPrevPage = () =>    setPageNumber(pageNumber - 1 <= 1 ? 1 : pageNumber - 1);
  const goToNextPage = () =>    setPageNumber(pageNumber + 1 >= numPages ? numPages : pageNumber + 1);
  return (    <div style={{ padding: "2rem" }}>      <nav        style={{          marginBottom: "1rem",          display: "flex",          gap: "1rem",          alignItems: "center",        }}      >        <button          onClick={goToPrevPage}          disabled={pageNumber <= 1}          style={{            padding: "0.5rem 1rem",            backgroundColor: pageNumber <= 1 ? "#ccc" : "#007bff",            color: "white",            border: "none",            borderRadius: "4px",            cursor: pageNumber <= 1 ? "not-allowed" : "pointer",          }}        >          Prev        </button>        <button          onClick={goToNextPage}          disabled={pageNumber >= numPages}          style={{            padding: "0.5rem 1rem",            backgroundColor: pageNumber >= numPages ? "#ccc" : "#007bff",            color: "white",            border: "none",            borderRadius: "4px",            cursor: pageNumber >= numPages ? "not-allowed" : "pointer",          }}        >          Next        </button>        <p style={{ margin: 0, fontWeight: "bold", color: "#333" }}>          Page {pageNumber} of {numPages || "..."}        </p>      </nav>
      <div        style={{          border: "1px solid #ccc",          borderRadius: "4px",          overflow: "hidden",          display: "flex",          justifyContent: "center",        }}      >        <Document          file="/example.pdf"          onLoadSuccess={onDocumentLoadSuccess}          loading={            <div style={{ padding: "2rem", textAlign: "center" }}>              Loading PDF...            </div>          }          error={            <div              style={{                padding: "2rem",                textAlign: "center",                color: "red",              }}            >              Failed to load PDF. Please make sure the file exists in the public              folder.            </div>          }        >          <Page            pageNumber={pageNumber}            renderTextLayer={true}            renderAnnotationLayer={true}            width={800}          />        </Document>      </div>    </div>  );};
export default PDFViewerClient;
Step 4 — Create the PDF viewer wrapper
This wrapper ensures the PDF viewer only renders on the client side:
"use client";import dynamic from "next/dynamic";
// Dynamically import the PDF viewer client component.const PDFViewerClient = dynamic(() => import("./PDFViewerClient"), {  ssr: false,  loading: () => (    <div      style={{        padding: "2rem",        textAlign: "center",        fontSize: "1.2rem",        color: "#333",      }}    >      Loading PDF Viewer...    </div>  ),});
const PDFViewer = () => {  return <PDFViewerClient />;};export default PDFViewer;
The dynamic() function from Next.js loads components only on the client side, preventing SSR issues.
Step 5 — Create the main page component
"use client";import PDFViewer from "../components/PDFViewer";
export default function Home() {  return (    <div style={{ minHeight: "100vh", backgroundColor: "#f5f5f5" }}>      <div        style={{          maxWidth: "1200px",          margin: "0 auto",          padding: "2rem",          backgroundColor: "white",          minHeight: "100vh",        }}      >        <h1          style={{            textAlign: "center",            marginBottom: "2rem",            color: "#333",          }}        >          PDF Viewer        </h1>        <PDFViewer />      </div>    </div>  );}
Step 6 — Configure Next.js
Update your next.config.js file to handle canvas-related issues:
/** @type {import('next').NextConfig} */const nextConfig = {  webpack: (config) => {    config.resolve.alias = {      ...config.resolve.alias,      canvas: false,    };
    config.resolve.fallback = {      ...config.resolve.fallback,      canvas: false,    };
    return config;  },};
module.exports = nextConfig;
Step 7 — Add your PDF file
Place your PDF file in the public folder and name it example.pdf. You can download a sample PDF or use any PDF file you have.
Step 8 — Run your application
Start your Next.js development server:
npm run devVisit http://localhost:3000 to see your PDF viewer in action!
How it works
This solution uses a three-layer approach to avoid SSR issues:
- PDFViewerClient.js — Contains the actual React-PDF components and logic.
- PDFViewer.js — A wrapper that ensures client-side-only rendering using
useEffectand dynamic imports. - page.js — The main page component that uses the PDF viewer.
Customization options
Changing the PDF file
To use a different PDF file:
- Place your PDF in the
publicfolder - Update the
fileprop in theDocumentcomponent:
<Document file="/your-pdf-file.pdf" // ... other props>Styling
You can customize the appearance by modifying the inline styles or by using CSS modules, Tailwind CSS, or styled components.
Adding more features
Consider adding these features:
- Zoom in/out functionality
- Page input field for direct navigation
- Download button
- Print functionality
- Thumbnail view
- Search functionality
Troubleshooting
Common issues:
- “DOMMatrix is not defined” — This solution prevents this error by avoiding SSR.
- PDF not loading — Ensure your PDF file is in the
publicfolder and the path is correct - Worker errors — The unpkg CDN should handle worker loading automatically.
Performance considerations
- Large PDF files may take longer to load
- Consider implementing lazy loading for multipage documents
- Use the
widthprop on thePagecomponent to control rendering size - Consider showing only one page at a time for better performance
Looking for more advanced features?
While React-PDF is a great starting point for basic PDF rendering in a Next.js app, it doesn’t include higher-level capabilities like annotations, redactions, form filling, or real-time collaboration. If you’re building a more complex document workflow or need production-grade performance with a polished UI, it’s worth exploring Nutrient Web SDK.
The next section walks you through setting up Nutrient’s fully featured PDF viewer in Next.js, designed specifically to handle enterprise use cases with ease.
Nutrient Next.js PDF viewer
We offer a commercial Next.js PDF viewer library designed for teams that need advanced document capabilities out of the box. It’s easy to integrate, fully client side, and built to scale with enterprise requirements.
- A prebuilt and polished UI for an improved user experience
- 15+ prebuilt annotation tools to enable document collaboration
- Support for more file types with client-side PDF, MS Office, and image viewing
- Dedicated support from engineers to speed up integration
Example of our Next.js PDF viewer
To demo our Next.js PDF viewer, upload a PDF, JPG, PNG, or TIFF file by clicking Open Document under the Standalone option (if you don’t see this option, select Choose Example from the dropdown). Once your document is displayed in the viewer, try drawing freehand, adding a note, or applying a crop or an eSignature.
Step 1 — Set up your Next.js project
Start by creating a fresh Next.js app:
npx create-next-app@latest nutrient-pdf-viewercd nutrient-pdf-viewerUse the default settings when prompted.
Step 2 — Install the Nutrient SDK
Install the viewer package using npm:
npm i @nutrient-sdk/viewerpnpm add @nutrient-sdk/vieweryarn add @nutrient-sdk/viewerThis command installs the SDK locally, enabling access to the viewer distribution files.
Step 3 — Copy the SDK assets
To run Nutrient in the browser, you need to expose the SDK assets publicly. Copy the required files into your project’s public directory:
cp -R ./node_modules/@nutrient-sdk/viewer/dist/ public/nutrient-viewerYou should see a new folder structure like this:
/public /nutrient-viewer nutrient-viewer.js nutrient-viewer-lib/To automate this in development and production builds, modify package.json:
"scripts": { "copy-assets": "cp -R ./node_modules/@nutrient-sdk/viewer/dist/ public/nutrient-viewer", "dev": "npm run copy-assets && next dev", "build": "npm run copy-assets && next build"}Add public/nutrient-viewer/ to your .gitignore file to avoid committing binaries.
Step 4 — Add a PDF file
Place a sample file like document.pdf in your public directory. You can use our demo document as an example:
/public document.pdfStep 5 — Load the PDF viewer
Before you write code, here’s how it works:
- Global script injection — Nutrient uses global variables, so you need to load the SDK script before any UI renders.
- Client-side rendering — The viewer must be initialized in a React component with
useEffectso that it only loads in the browser. - Cleanup — The viewer should be properly unloaded to avoid memory leaks.
The following section provides a step-by-step implementation.
1. Register the viewer script in the layout
Edit app/layout.tsx:
import Script from "next/script";
export default function RootLayout({ children }) {  return (    <html lang="en">      <head>        <Script          src="/nutrient-viewer/nutrient-viewer.js"          strategy="beforeInteractive"        />      </head>      <body>{children}</body>    </html>  );}
This ensures the SDK is loaded before your page component executes.
2. Add the PDF viewer component
In app/page.tsx or app/page.js, render the viewer dynamically on the client:
"use client";import { useEffect, useRef } from "react";
export default function Viewer() {  const containerRef = useRef(null);
  useEffect(() => {    const container = containerRef.current;    const { NutrientViewer } = window;
    if (container && NutrientViewer) {      NutrientViewer.load({        container,        document: "/document.pdf",      });    }
    return () => {      NutrientViewer?.unload(container);    };  }, []);
  return <div ref={containerRef} style={{ width: "100%", height: "100vh" }} />;}
Make sure document.pdf exists and matches the file path exactly.
3. Configure webpack to exclude bundling
In next.config.mjs, prevent webpack from bundling the SDK into your app:
/** @type {import('next').NextConfig} */const nextConfig = {  webpack(config, { isServer }) {    if (!isServer) {      config.externals = config.externals || [];      config.externals.push({        "@nutrient-sdk/viewer": "@nutrient-sdk/viewer",      });    }    return config;  },  turbopack: {    resolveAlias: {      "@nutrient-sdk/viewer": "@nutrient-sdk/viewer",    },  },};
export default nextConfig;
Step 6 — Start the development server
Run your project:
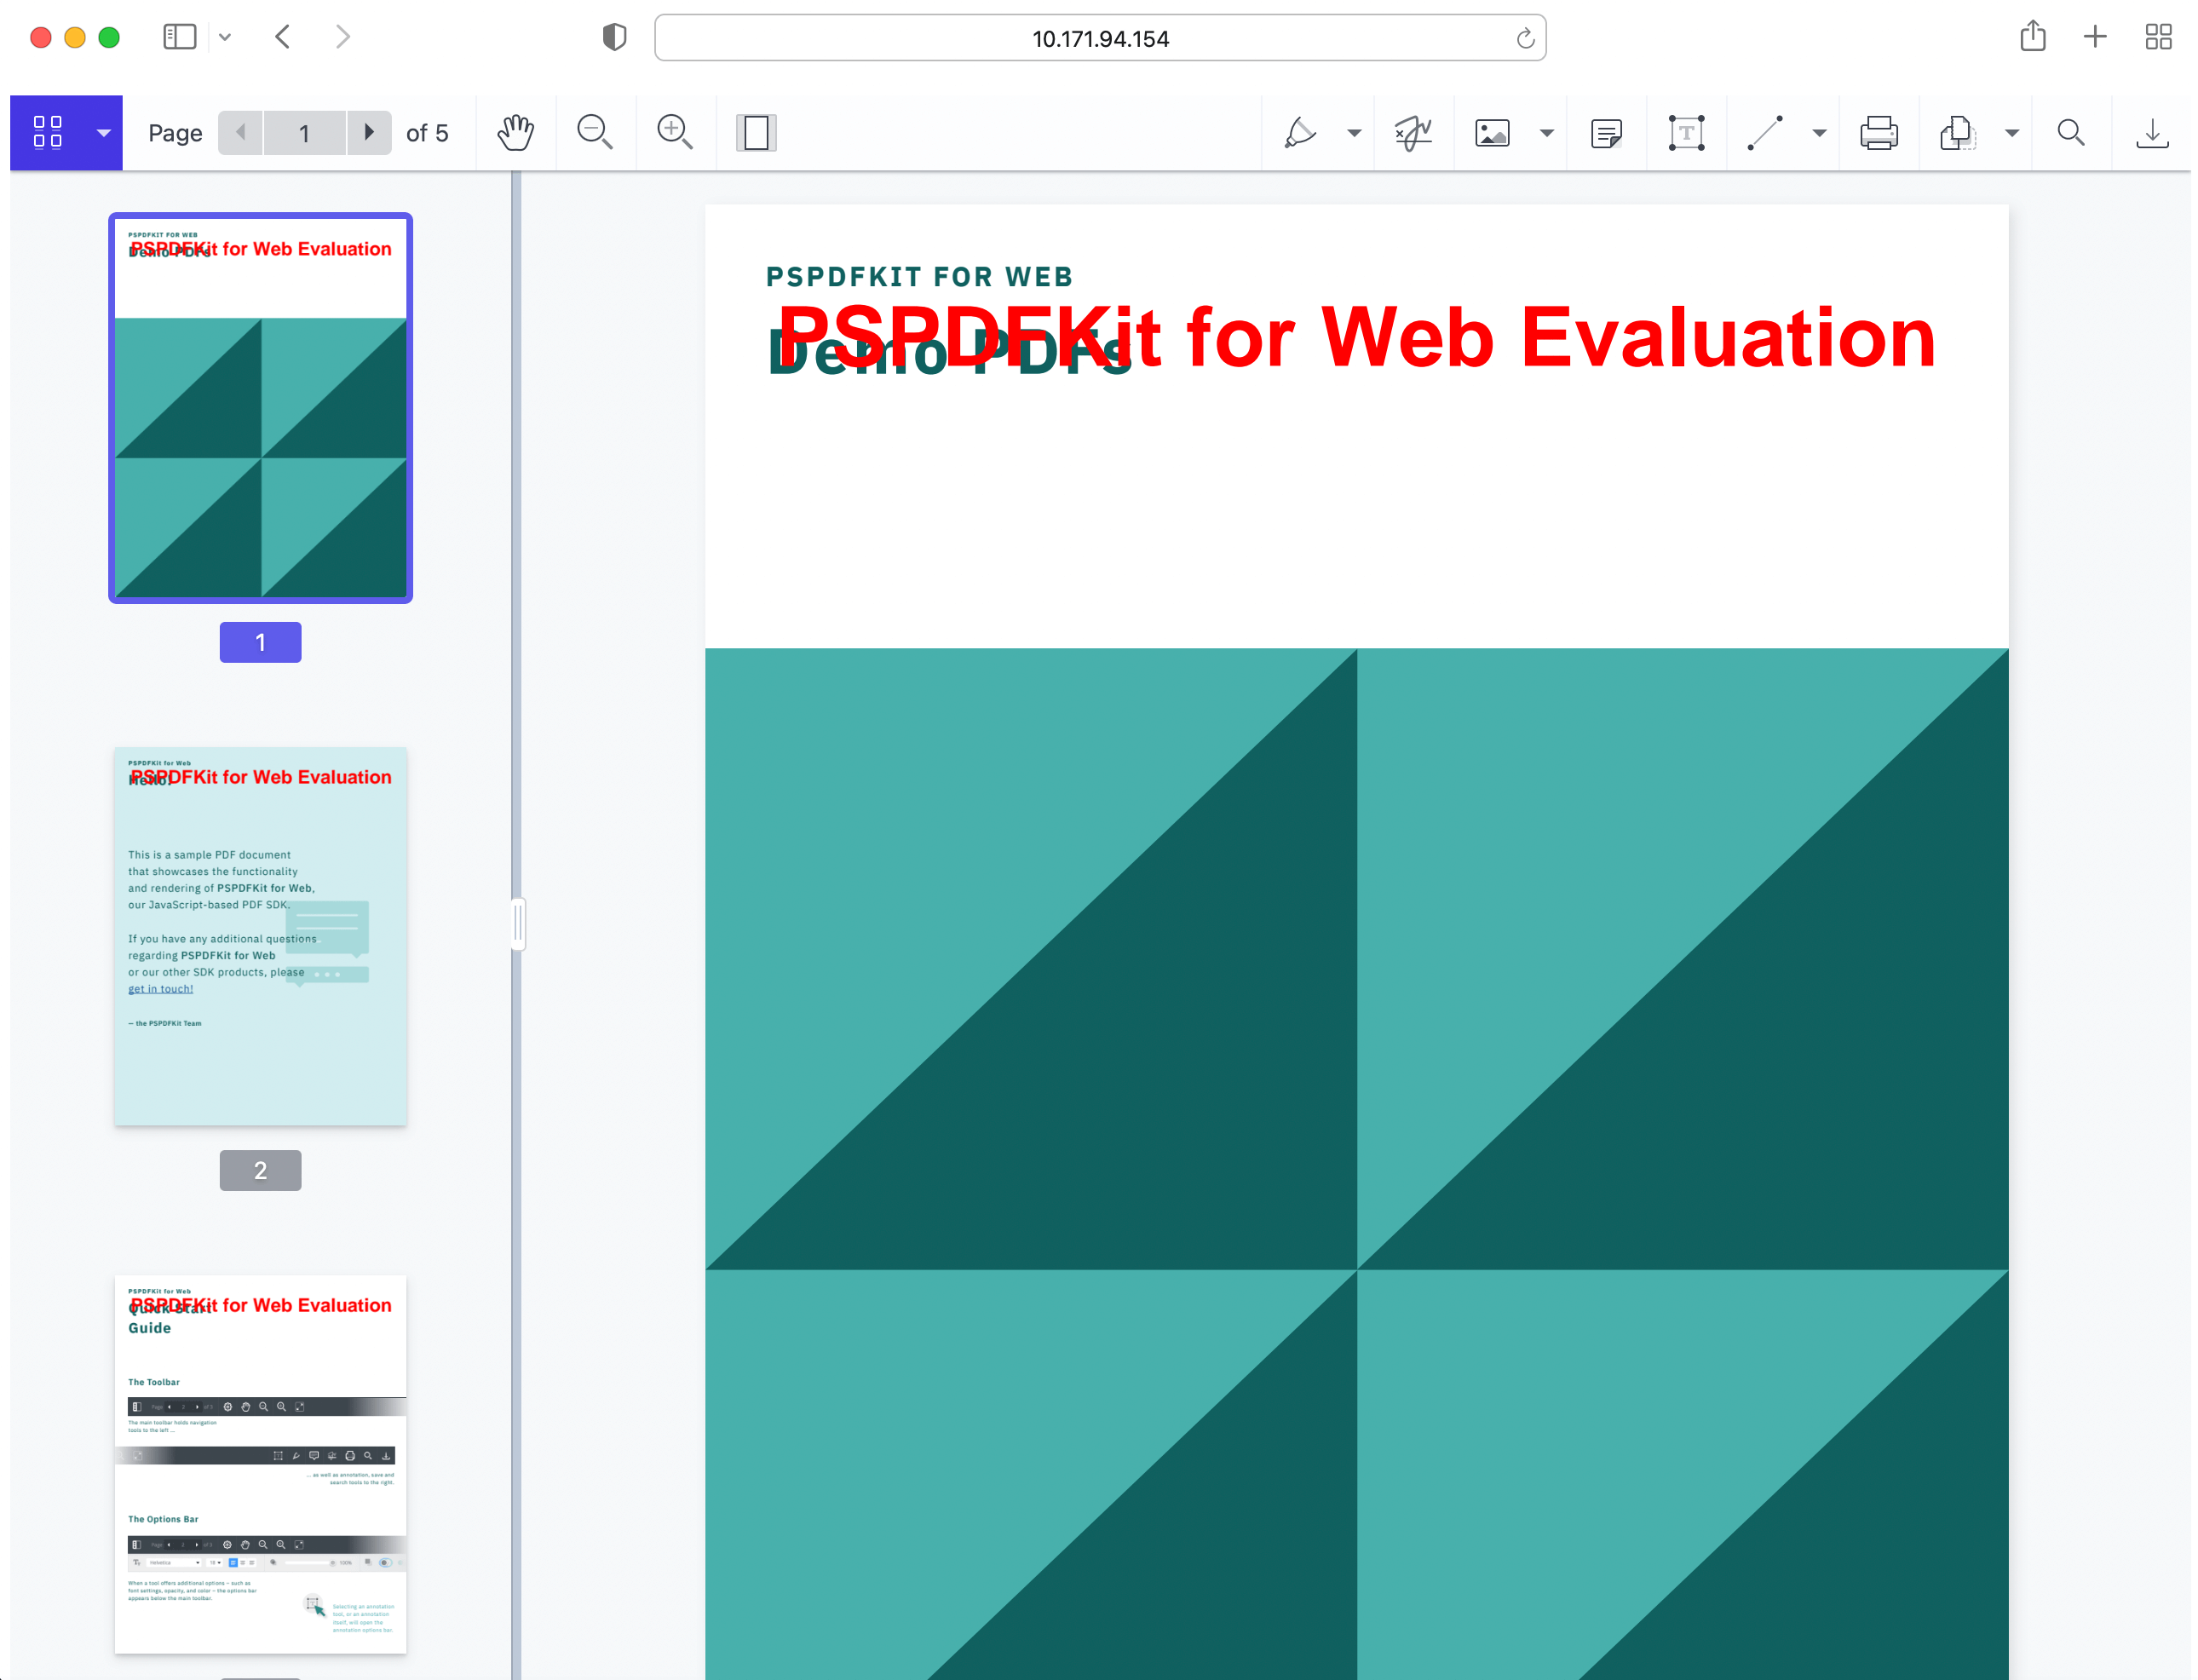
npm run devNavigate to http://localhost:3000/ in your browser. You’ll see all the features you expect from a PDF viewer are present by default.
Adding even more capabilities
Once you’ve deployed your viewer, you can start customizing it to meet your specific requirements or easily add more capabilities. To help you get started, here are some of our most popular Next.js guides:
- Adding annotations
- Editing documents
- Filling PDF forms
- Adding signatures to documents
- Real-time collaboration
- Redaction
- UI customization
Conclusion
Building a PDF viewer in Next.js requires thoughtful handling of server-side rendering constraints. In this tutorial, your learned about two powerful approaches:
- React-PDF(opens in a new tab) — An open source library that’s ideal for lightweight PDF viewing with basic features and minimal setup.
- Nutrient Web SDK — A full-featured, production-ready solution designed for complex use cases like annotation, redaction, form filling, and document collaboration.
Both tools enable client-side rendering that avoids hydration mismatches and ensures smooth PDF loading inside your Next.js app. If you’re building a personal project or prototype, React-PDF may be all you need. But if you’re deploying a scalable, user-facing app that demands advanced features, performance, and cross-document support, Nutrient Web SDK offers a flexible and professional-grade foundation.
You can also deploy our vanilla JavaScript PDF viewer or use one of our many web framework deployment options like React.js, Vue.js, jQuery, and Angular.
To see a list of all web frameworks, start your free trial. Or, launch our demo to see our viewer in action.
FAQ
Nutrient Web SDK is a browser-based JavaScript library that allows you to render, annotate, redact, and sign PDF and image files using WebAssembly for high performance and full client-side operation.
Yes. While it excels at PDF rendering, it also supports Microsoft Office files (like DOCX, XLSX) and image formats (JPG, PNG, TIFF), making it suitable for a wide range of document workflows.
Absolutely. Nutrient Web SDK is a commercial-grade, enterprise-ready solution with robust rendering performance, advanced document tools, and dedicated support for integration.
To avoid bundling the SDK, load it via a global <script> tag and mark it as an external dependency in your Next.js next.config.js. This keeps your app lightweight and reduces build size.
Yes. The viewer runs entirely in the browser. As long as your PDF or document is accessible via the /public folder or a public URL, the viewer works without any backend services.
React-PDF is an open source React library that renders PDFs using Mozilla’s PDF.js. It’s great for basic use cases where you need lightweight, client-only PDF viewing in React or Next.js.
Yes — but only when rendered on the client. Since React-PDF relies on browser APIs like canvas, it must be dynamically imported with ssr: false to prevent server-side rendering errors.
While React-PDF is ideal for simple use cases, it doesn’t support advanced features like annotations, redactions, or form filling. It’s also less performant for large or multipage PDFs.
Use React-PDF for lightweight, open source needs and simple viewers. Choose Nutrient Web SDK if you need production-grade tools, advanced features, and support for multiple file formats.
[Adding annotations](/guides/web/annotations/nextjs/