


Generate PDFs in Salesforce with Lightning Web Components and jsPDF
Table of contents

Build a Lightning web component that generates PDFs using jsPDF. This works for basic documents, but it has limitations with complex layouts and large files. For production workflows, see Document Solutions for Salesforce.
This tutorial shows you how to create a Lightning web component that uses the jsPDF(opens in a new tab) library to generate PDF documents in Salesforce. You’ll also learn the limitations of client-side PDF generation and when to consider alternatives.
Prerequisites
- A Salesforce developer account(opens in a new tab)
- Visual Studio Code(opens in a new tab) installed on your computer
- The Salesforce command-line interface (CLI)(opens in a new tab)
Document Solutions for Salesforce
Document Solutions for Salesforce is Nutrient’s low-code platform for document workflows. It’s 100 percent native to Salesforce (built with LWC and Apex) and includes:
- Template creation with merge fields, conditions, and loops
- One-click document generation from any record
- WYSIWYG editing with PDF and DOCX export
- Legally binding eSignatures with audit trails
- Salesforce Flow integration for automation
With Document Solutions for Salesforce, data never leaves your organization. Start a free trial or contact Sales.
Step 1 — Setting up your development environment
- Open Visual Studio Code on your computer.
- Log in to your Salesforce developer account by pressing Control-Shift-P (on Windows) or Command-Shift-P (on macOS). Then, select SFDX: Authorize an Org > Project Default and press Enter. This action will redirect you to log in to your Salesforce organization.
Step 2 — Creating a new Lightning web component
- In Visual Studio Code, open the Command Palette using Control-Shift-P (on Windows) or Command-Shift-P (on macOS).
- Type SFDX and select SFDX: Create Lightning Web Component (not SFDX: Create Lightning Component).
- Enter PdfGenerator as the name of the new component.
- Press Enter to accept the default path,
force-app/main/default/lwc. - Press Enter again.
Step 3 — Designing the component
- Open the
pdfGenerator.htmlfile and add the following content:
<template> <div> <h1>PDF Generator</h1> <lightning-button label="Generate PDF" onclick="{handleGeneratePDF}" ></lightning-button> </div></template>Step 4 — Including a PDF generation library
Static resources play a crucial role in Salesforce development by allowing you to upload and reference external files, such as JavaScript libraries and stylesheets, within your Salesforce organization. Since Lightning web components operate within a secure context and have limitations on how external resources are loaded, using static resources is the recommended approach to bring in third-party libraries.
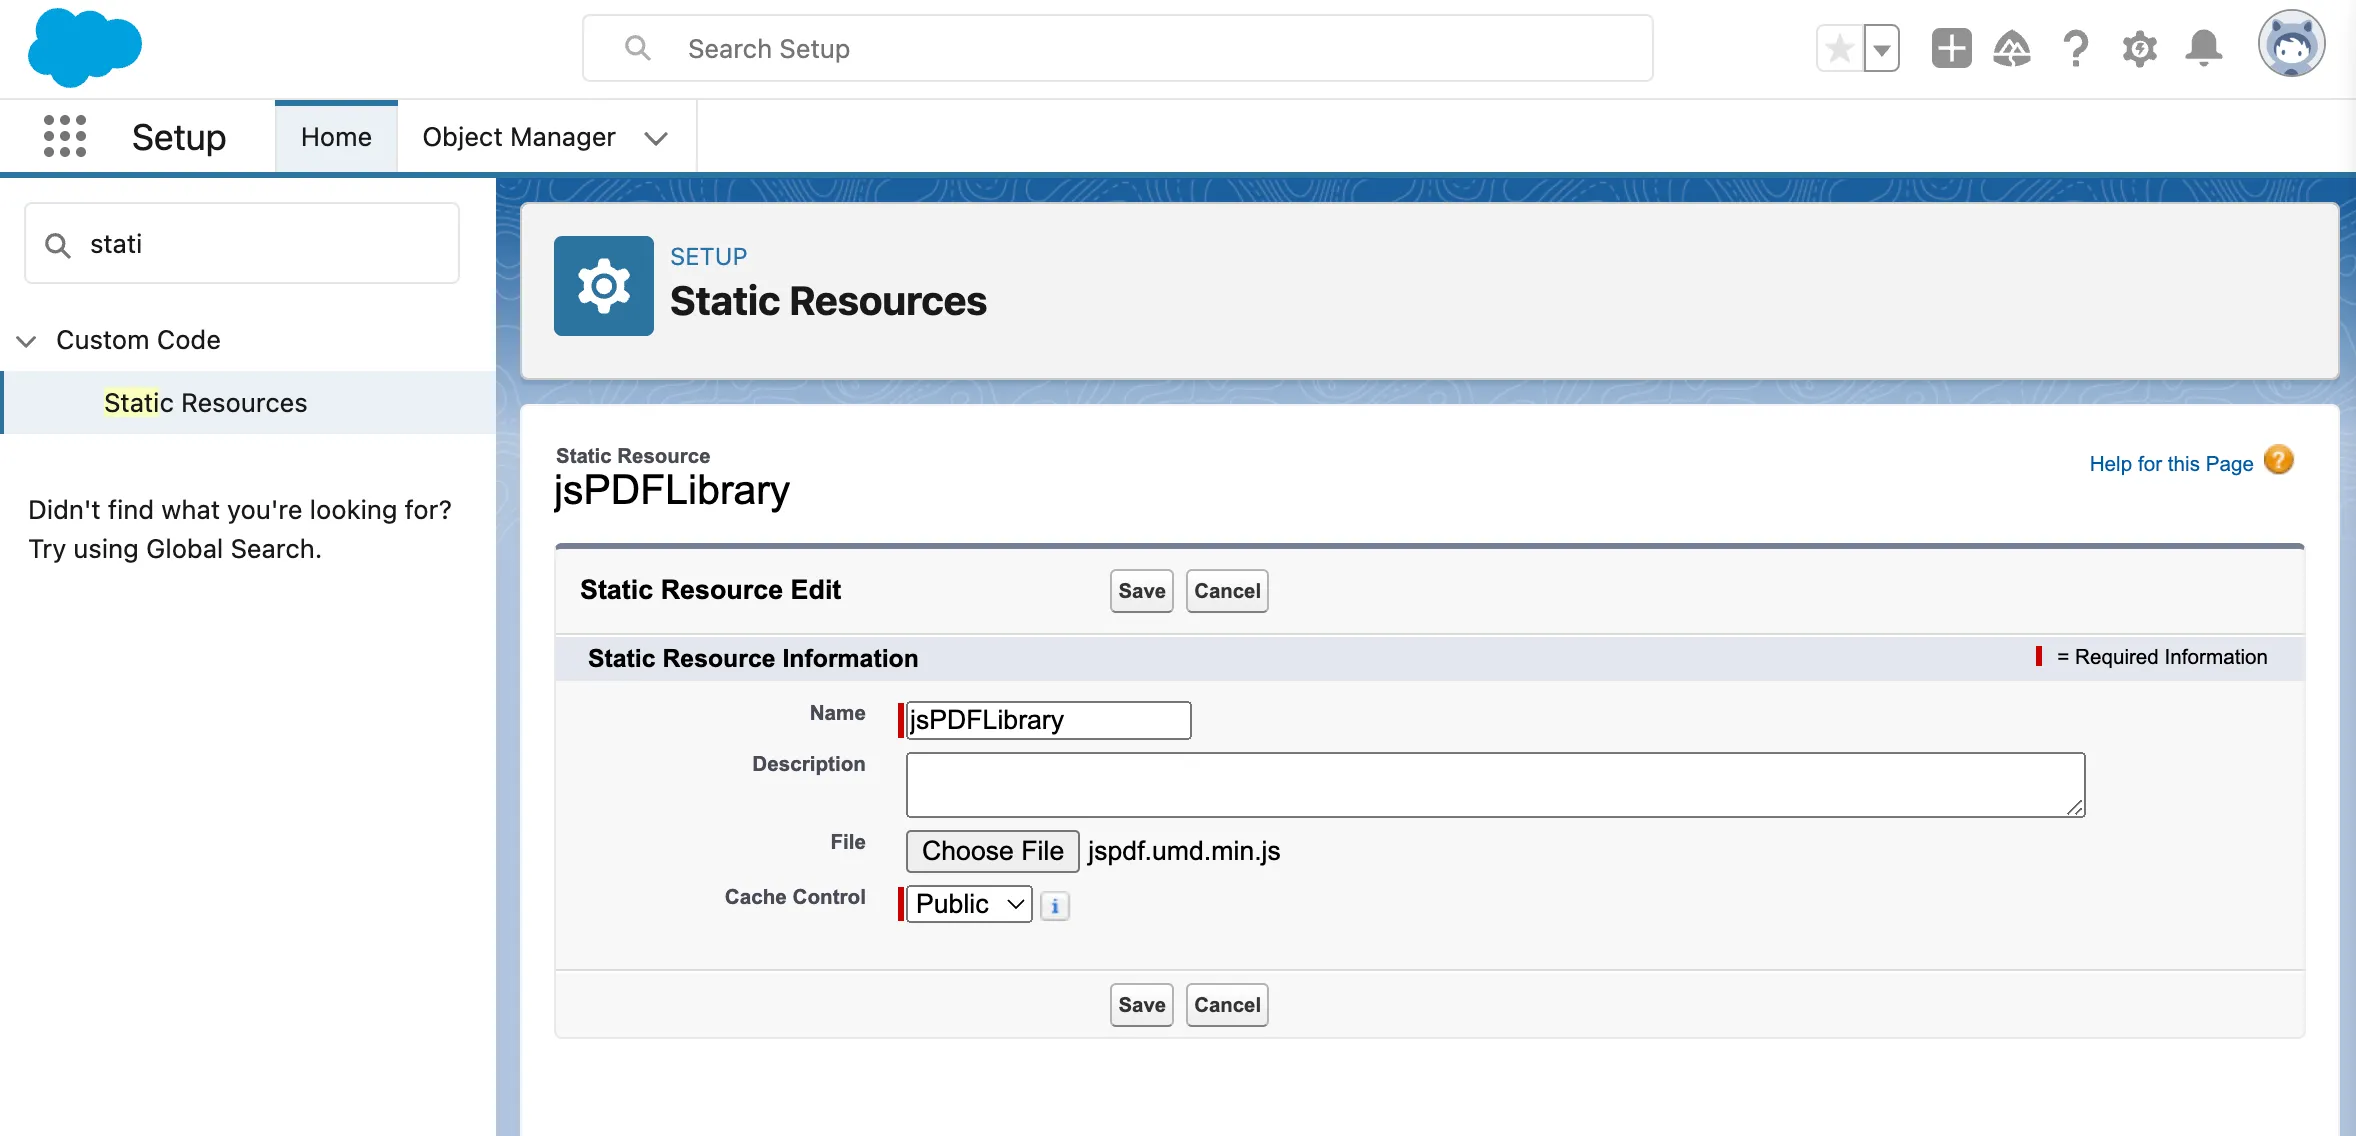
To generate a PDF, you’ll need a PDF generation library. One popular choice is jsPDF(opens in a new tab). Create a static resource in Salesforce to hold the jsPDF library.
- Log in to your Salesforce developer account.
- Click App Launcher (grid icon) and search for Static Resources.
- Click Static Resources to access the Static Resources page.
- Click New.
- Enter a name for the static resource. Name it something like
jsPDFLibrary. - Leave the Cache Control field set to Public.
- Choose the Upload File option and select the
jspdf.umd.min.jsfile(opens in a new tab) in thenode_modules/jspdf/distfolder. This is the jsPDF library you want to upload. Double-check that the name of the static resource you uploaded is exactlyjspdf.umd.min.js, as the name is case-sensitive. - Click Save.
Step 5 — Implementing PDF generation logic
Open the pdfGenerator.js file and replace its contents with the following code. This loads the jsPDF library as a static resource and implements the PDF generation logic:
import { LightningElement } from 'lwc';import { loadScript } from 'lightning/platformResourceLoader';import JS_PDF from '@salesforce/resourceUrl/jsPDFLibrary';
export default class PdfGenerator extends LightningElement {  jsPDFInitialized = false;
  renderedCallback() {    if (!this.jsPDFInitialized) {      this.jsPDFInitialized = true;      loadScript(this, JS_PDF)        .then(() => {          console.log('jsPDF library loaded successfully');        })        .catch((error) => {          console.error('Error loading jsPDF library', error);        });    }  }
  handleGeneratePDF() {    if (this.jsPDFInitialized) {      // Make sure to correctly reference the loaded jsPDF library.      const doc = new window.jspdf.jsPDF();
      // Add content to the PDF.      doc.text('Hello PDF!', 10, 10);
      // Save the PDF.      doc.save('generated_pdf.pdf');    } else {      console.error('jsPDF library not initialized');    }  }}
Next, open the pdfGenerator.js-meta.xml file and replace its contents with the following configuration to expose the component on Lightning pages:
<?xml version="1.0" encoding="UTF-8"?><LightningComponentBundle xmlns="http://soap.sforce.com/2006/04/metadata"> <apiVersion>58.0</apiVersion> <isExposed>true</isExposed> <targets> <target>lightning__AppPage</target> <target>lightning__RecordPage</target> <target>lightning__HomePage</target> </targets></LightningComponentBundle>Step 6 — Pushing changes to your organization
- Press Control-Shift-P (on Windows) or Command-Shift-P (on macOS) to open the Command Palette.
- Type SFDX and select SFDX: Deploy This Source to Org.
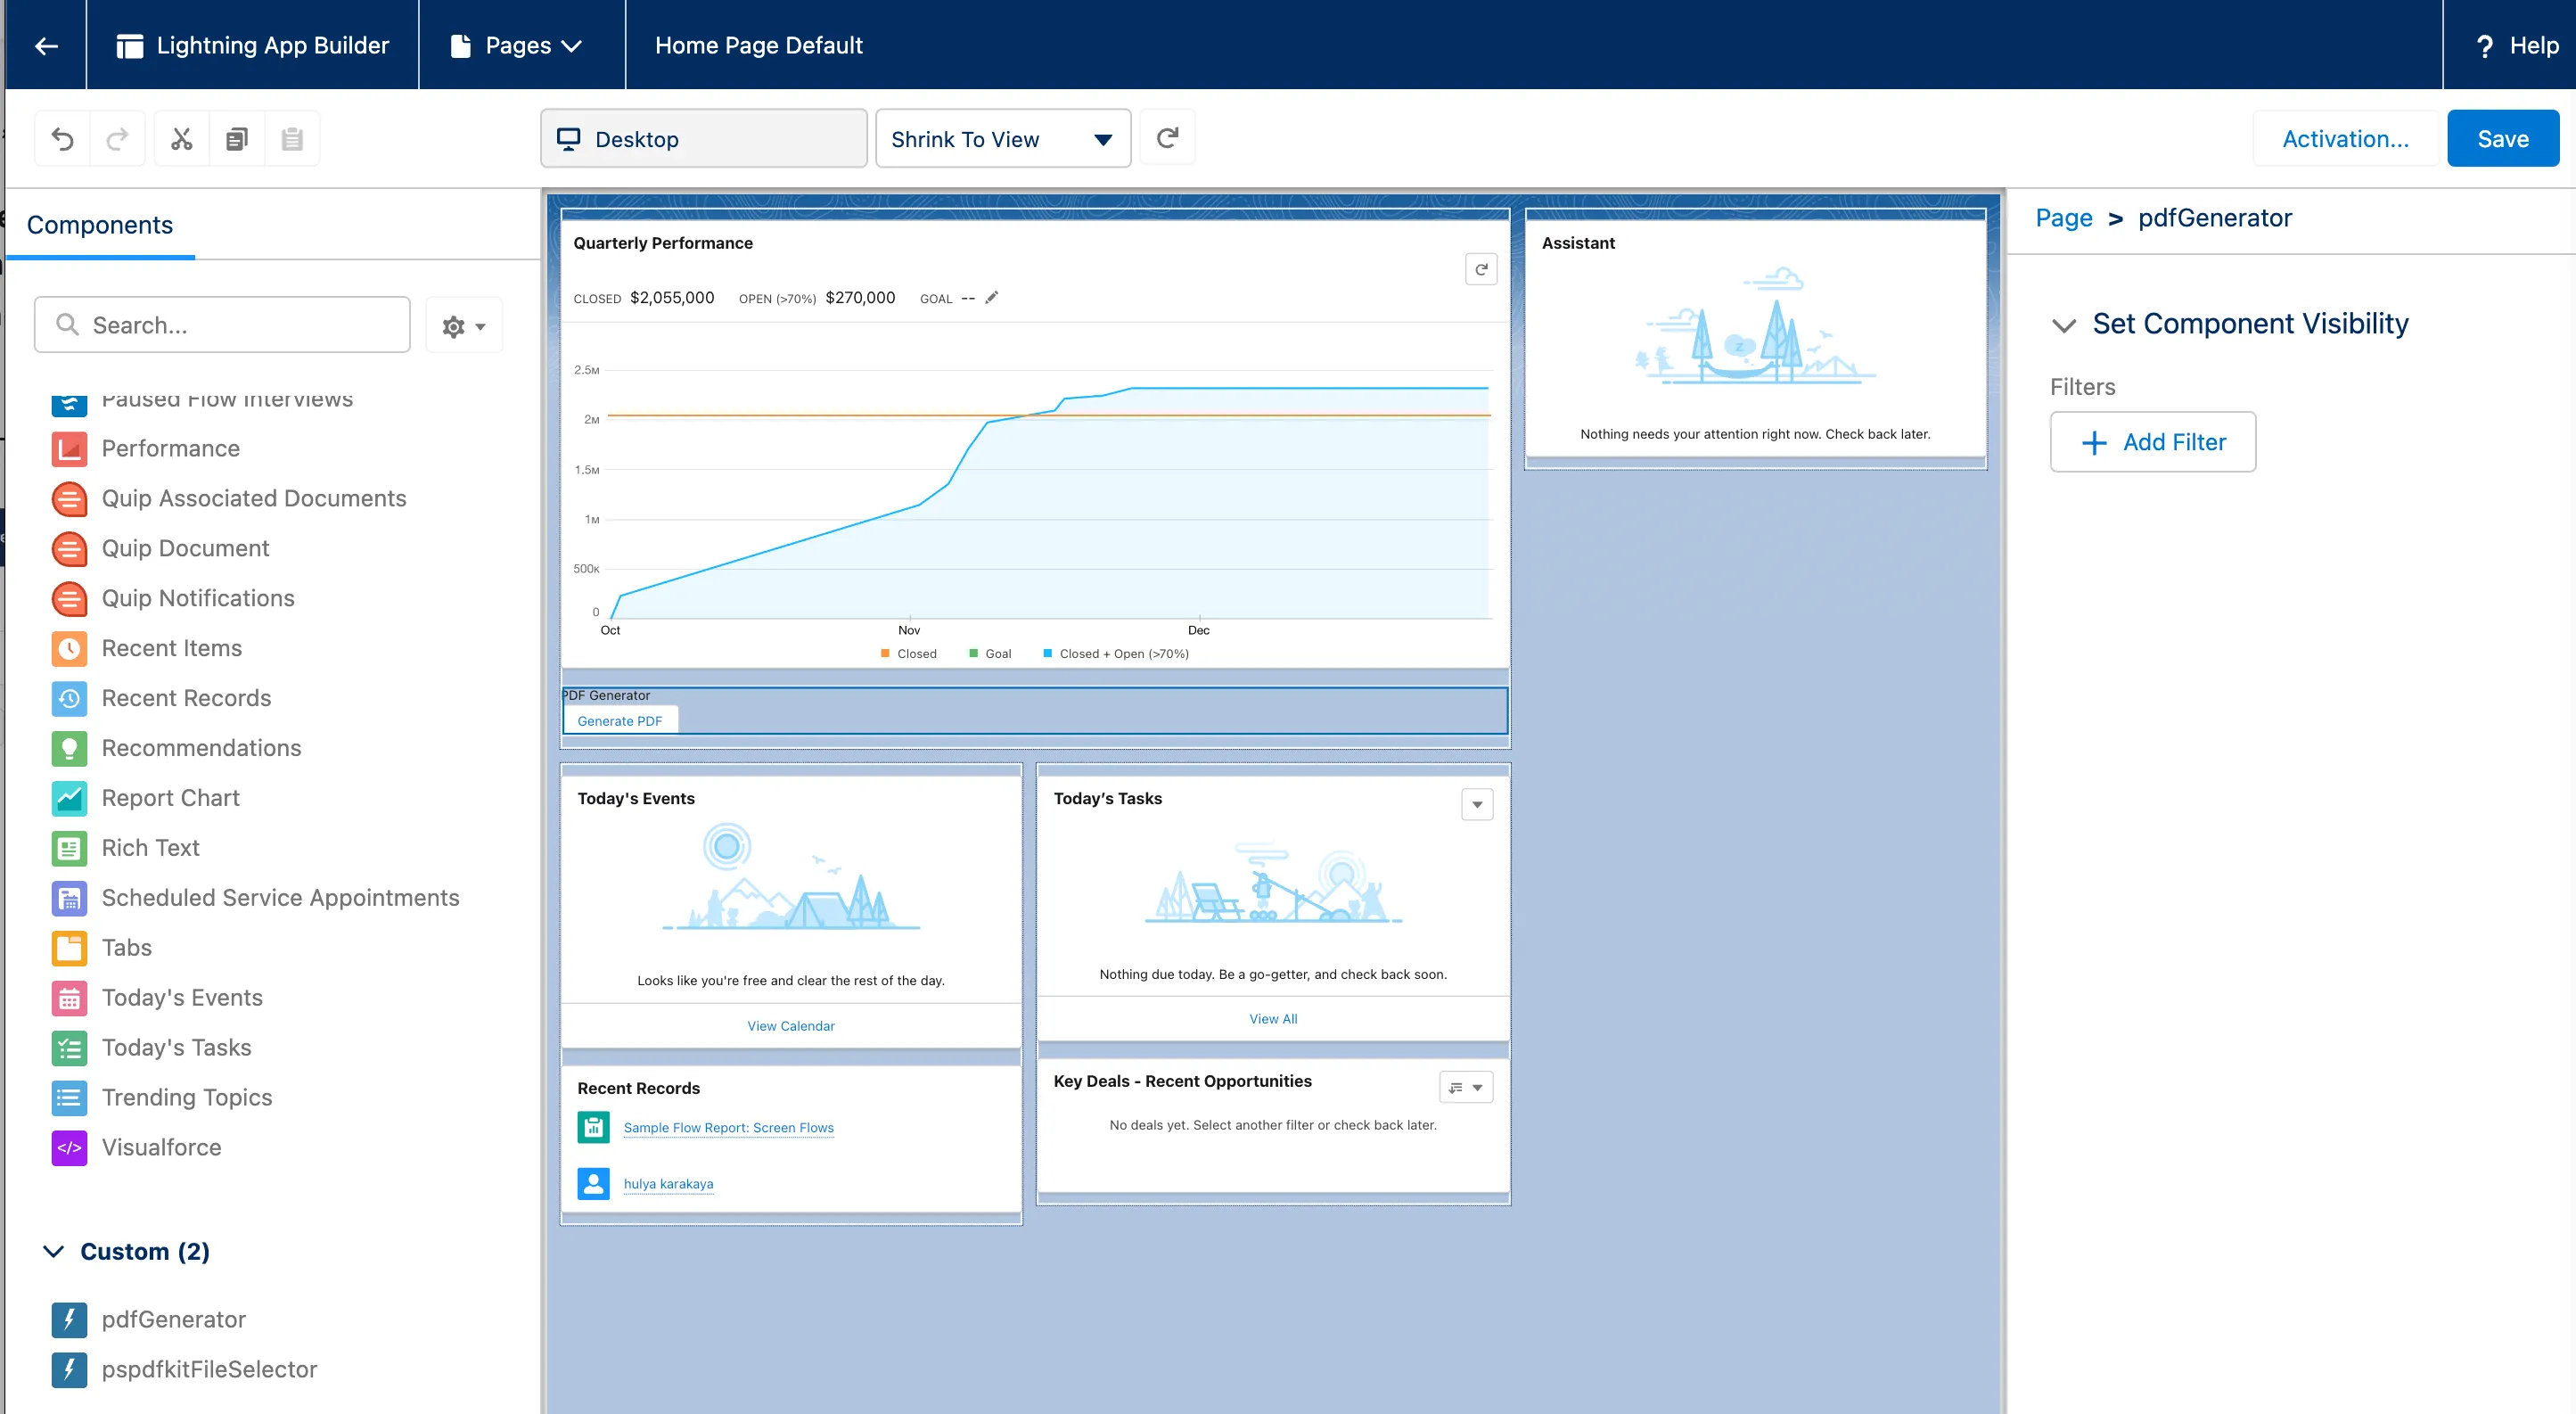
Step 7 — Verify the component in your organization
- Open your Salesforce organization.
- Click App Launcher (grid icon) and search for Sales.
- Click the setup gear icon, and then select Edit Page.
- Drag the
pdfGeneratorcomponent from the custom section to the page. - Save the page.
- Click Generate PDF to create a PDF document.
Once testing is complete, deploy your Lightning web component to production and customize it for your Salesforce application.
Limitations of PDF generation using jsPDF and LWC
- Client-side processing — jsPDF generates PDFs on the client side, which could impact performance for complex or large PDFs.
- Styling and layout — jsPDF is suited for basic PDFs; complex styling and layouts might require additional effort.
- Advanced features — Advanced elements like complex tables, interactive forms, or intricate charts may require extra handling.
For a no-code alternative that avoids these limitations, see Salesforce document generation.
Conclusion
You now have a working Lightning web component that generates PDFs using jsPDF. This approach works for simple documents but struggles with complex layouts, large files, and advanced features like forms.
For production use, consider Document Solutions for Salesforce or server-side PDF generation. Start a free trial or contact Sales.
FAQ
To generate PDFs in Salesforce using Lightning Web Components (LWC), you can use the jsPDF library. First, create a Lightning web component and include the jsPDF library as a static resource in Salesforce. Then, implement the PDF generation logic in the component’s JavaScript file to create and download the PDF.
jsPDF generates PDFs on the client side, which may impact performance for complex or large documents. It’s best suited for basic PDFs — complex styling, layouts, and advanced features like interactive forms may require extra handling. For a more complete solution, see Document Solutions for Salesforce or Salesforce document generation for a no-code alternative.
Document Solutions for Salesforce is Nutrient’s low-code platform for document workflows. It provides template creation, one-click document generation, WYSIWYG editing, and legally binding eSignatures — all native to Salesforce without custom code.
After creating and testing your Lightning web component in your Salesforce developer environment, use the Salesforce CLI or Visual Studio Code to deploy your changes to the production environment. Ensure that the component is properly configured and tested before deployment.