Integrate Nutrient React Native dependency into Android and iOS applications
This guide walks you through the steps necessary to integrate Nutrient React Native dependency into your Android or iOS application. By the end, you’ll be able to present a PDF document in the default Nutrient user interface (UI).
Requirements
Install the following required packages depending on your platform (Android or iOS):
The Nutrient React Native dependency is installed from npmjs.com by running
yarn add @nutrient-sdk/react-nativein your project directory ornpm install @nutrient-sdk/react-nativeif you’re using npm.
- A development environment(opens in a new tab) for running React Native projects using the React Native CLI (not the Expo CLI)
- The latest stable version of Android Studio(opens in a new tab)
- The Android NDK(opens in a new tab)
- An Android Virtual Device(opens in a new tab) or a hardware device
- The latest stable version of Xcode(opens in a new tab)
- The latest stable version of CocoaPods(opens in a new tab). If you don’t already have CocoaPods installed, follow the CocoaPods installation(opens in a new tab) guide to install CocoaPods on your Mac. You can check your version of CocoaPods with
pod --version.
Creating a new project
If you already have an existing React Native project that runs on both Android and iOS using the latest version of React Native, skip to the Installation step. Otherwise, create a new one by following the steps below:
In the terminal, change the current working directory to where you’ll save your project. This example uses the
pdffolder created in the home directory:Terminal window mkdir ~/pdfcd ~/pdfTerminal window cd /d %userprofile%mkdir pdfcd pdfCreate the React Native project by running the following command:
Terminal window npx @react-native-community/cli init NutrientDemo
Installing the Nutrient dependency
Open the terminal app and change the location of the current working directory inside your project:
Terminal window cd path/to/YourProjectAdd the Nutrient plugin:
Terminal window yarn add @nutrient-sdk/react-nativeInstall all the dependencies for the project:
Terminal window yarn installBased on whether you are installing Nutrient React Native dependency into an Android or iOS application, make your selection and follow the steps below.
4.1. Open your project’s build.gradle file:
open android/build.gradle4.2. Add the Nutrient repository to download the Nutrient library:
... allprojects { repositories { mavenLocal() maven { url 'https://my.nutrient.io/maven/' }...4.3. Open the app’s build.gradle file:
open android/app/build.gradle4.4. Modify the compile SDK version and the minimum SDK version:
...android { compileSdkVersion rootProject.ext.compileSdkVersion compileSdkVersion 34... defaultConfig { applicationId "com.nutrientdemo" minSdkVersion rootProject.ext.minSdkVersion minSdkVersion 21 targetSdkVersion rootProject.ext.targetSdkVersion versionCode 1 versionName "1.0" }}...4.1. Open your project’s Podfile in a text editor to update the platform to iOS 15, and add the Nutrient Podspec:
open ios/PodfileYour Podfile should look like this:
require_relative '../node_modules/react-native/scripts/react_native_pods'require_relative '../node_modules/@react-native-community/cli-platform-ios/native_modules'
 platform :ios, '11.0' platform :ios, '16.0'
target 'NutrientDemo' do  config = use_native_modules!
  use_react_native!( :path => config[:reactNativePath], # to enable hermes on iOS, change `false` to `true` and then install pods :hermes_enabled => false  )
  target 'NutrientDemoTests' do inherit! :complete # Pods for testing  end
  # Enables Flipper.  #  # Note that if you have use_frameworks! enabled, Flipper will not work and  # you should disable the next line.  use_flipper!()
  post_install do |installer|    react_native_post_install(installer)  endend
4.2. Change the location of the current working directory to the ios folder:
cd ios4.3. Install the CocoaPods dependencies:
pod install4.4. Open your project’s Workspace in Xcode:
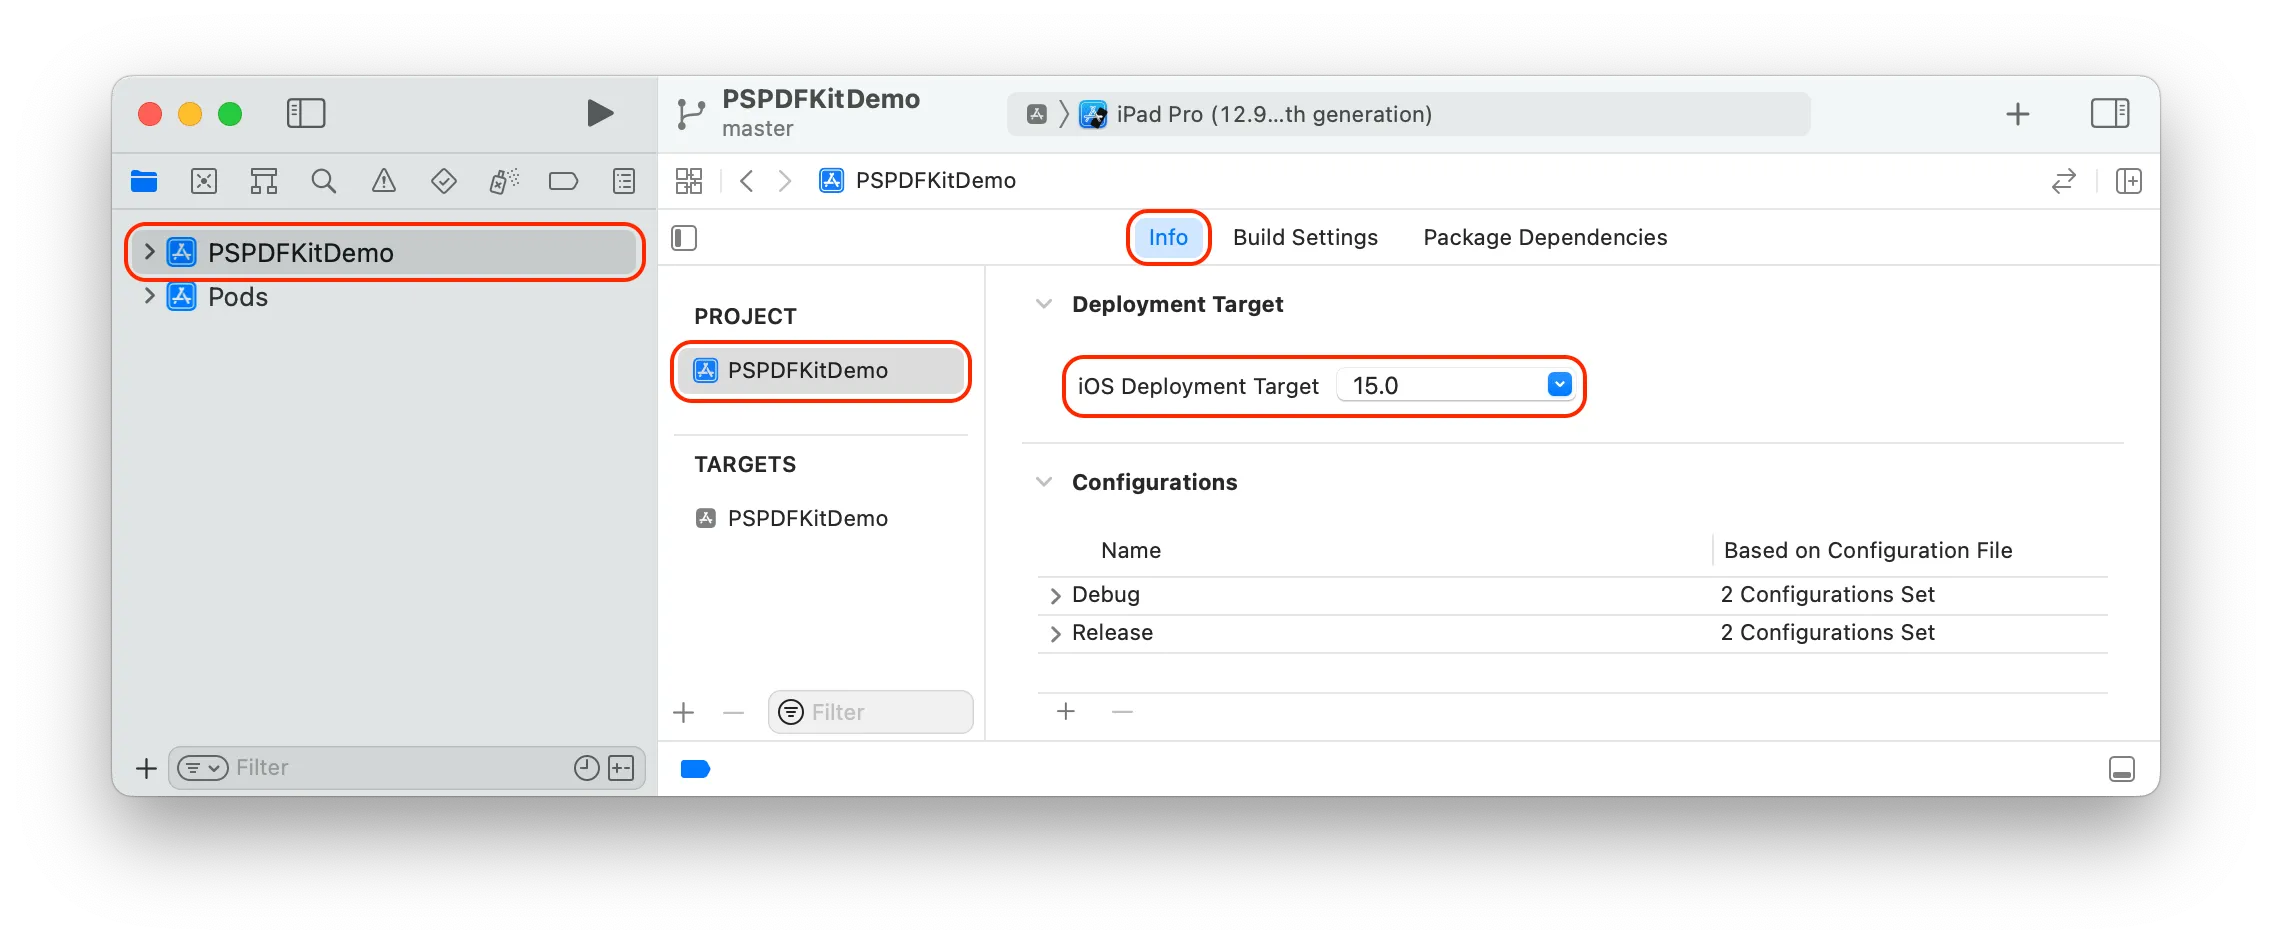
open YourProject.xcworkspace4.5. Make sure the deployment target is set to 16.0 or higher:
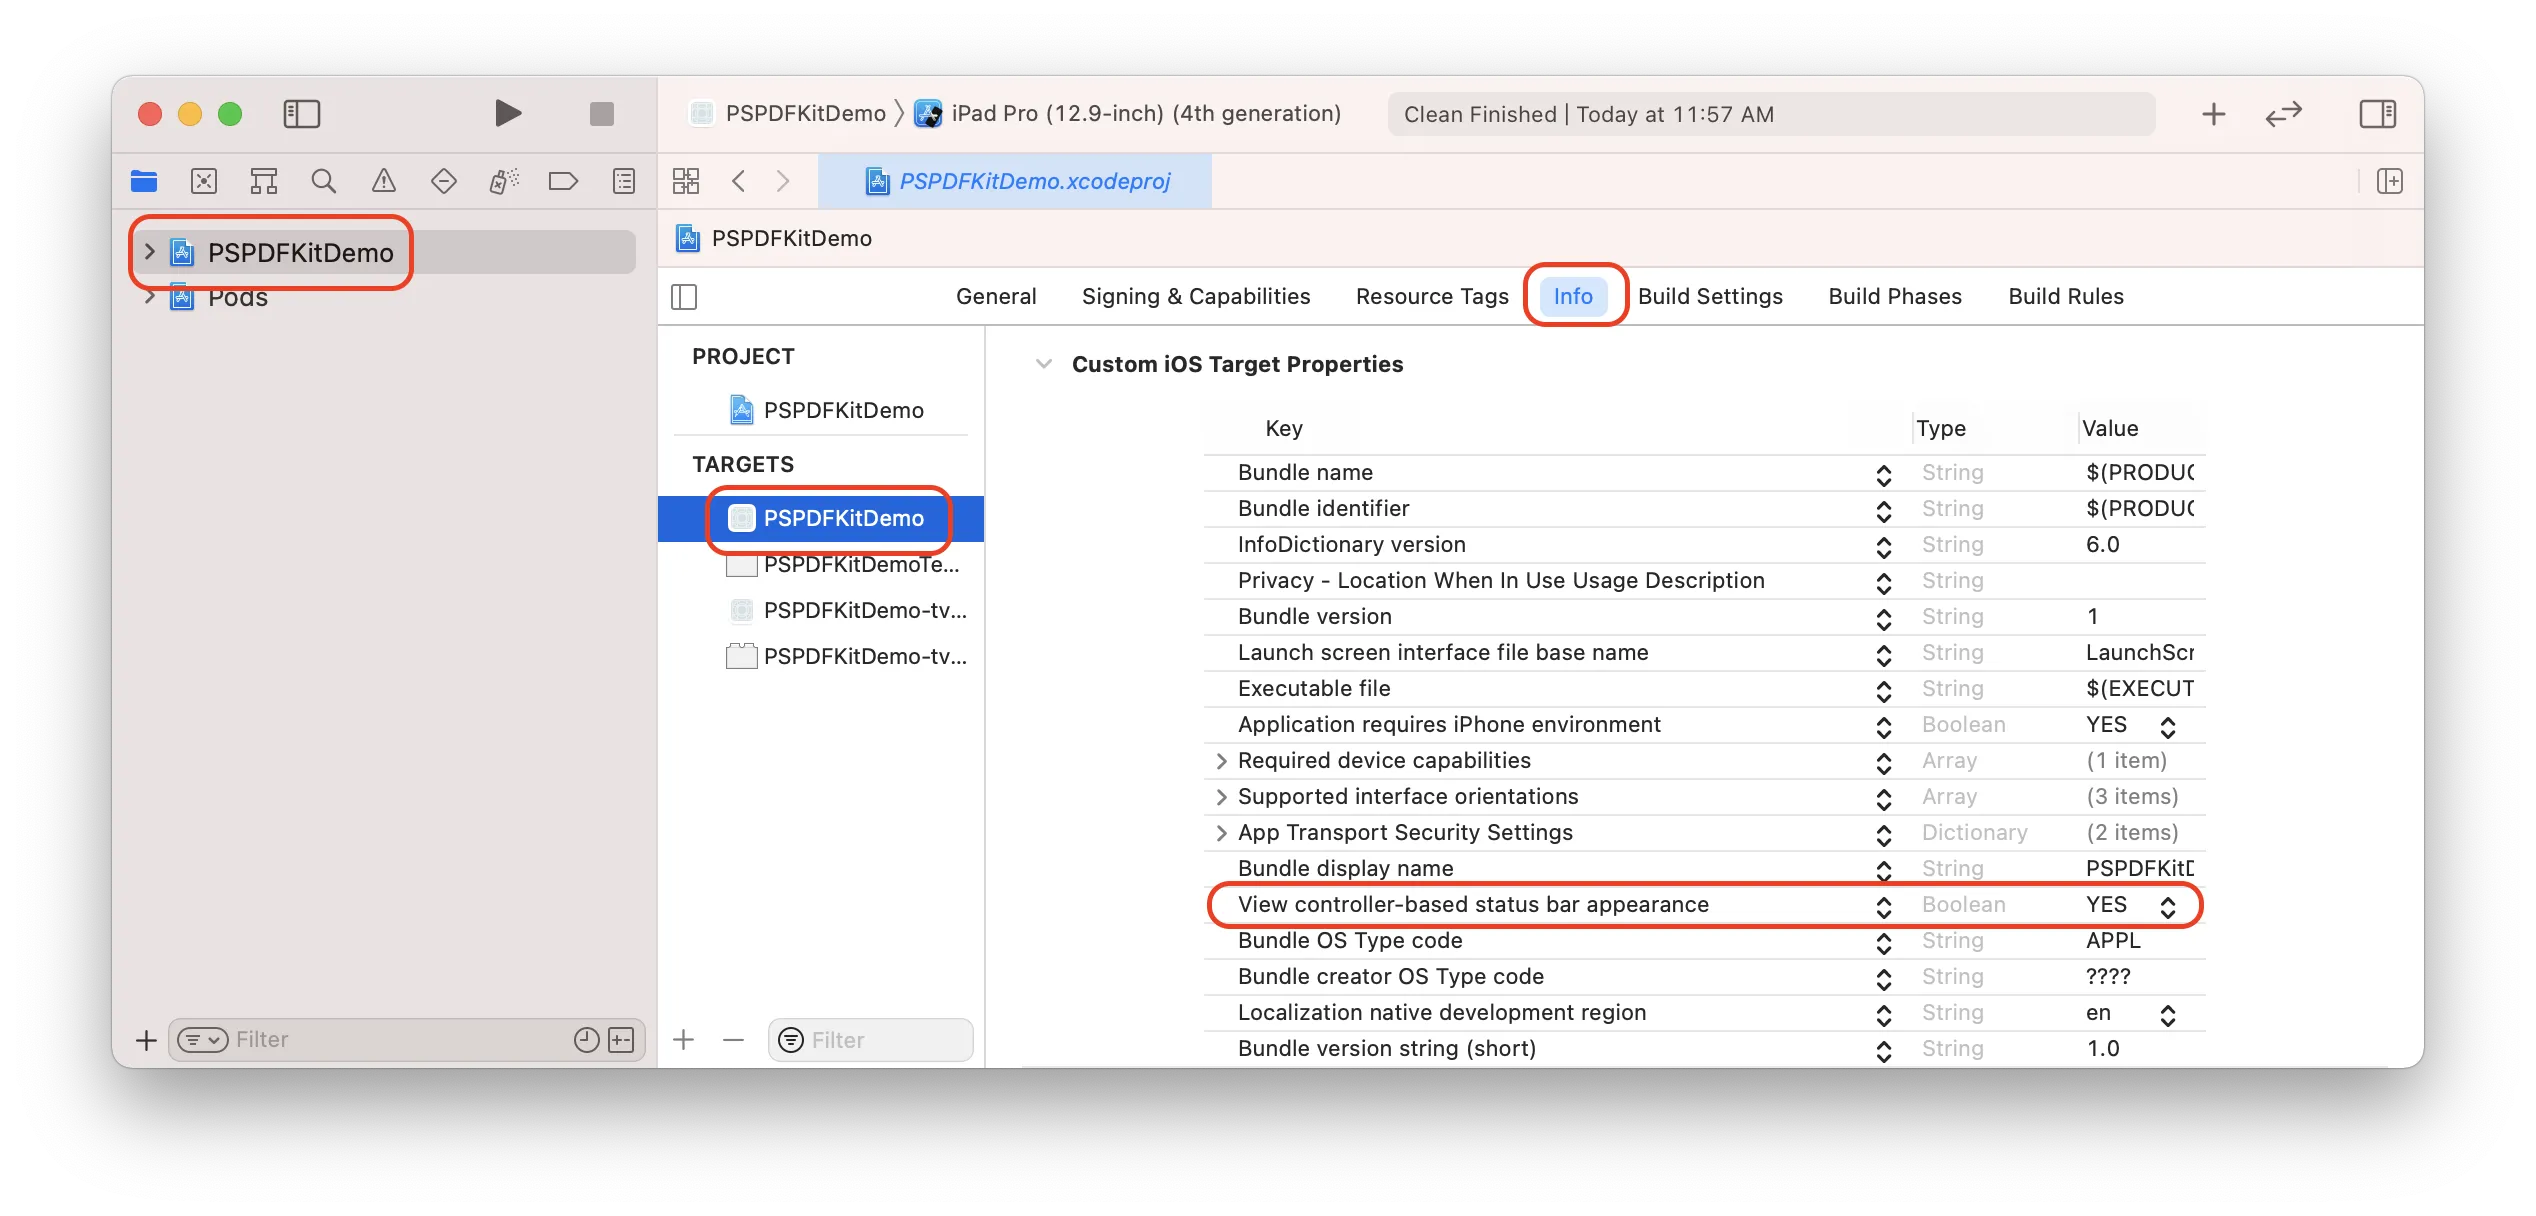
4.6. Change View controller-based status bar appearance to YES in your project’s Info.plist:
Displaying a PDF
Add the PDF document you want to display to your application by dragging it into your project. On the dialog that’s displayed, select Finish to accept the default integration options. You can use this Quickstart Guide PDF as an example.
Change the location of the current working directory back to the root project folder:
Terminal window cd ..Create the
assetsdirectory if you don’t have one already:Terminal window mkdir android/app/src/main/assetsCopy a PDF document into your
assetsdirectory:Terminal window cp ~/Downloads/Document.pdf android/app/src/main/assets/Document.pdfUse the
NutrientViewReact component in your project:import { Platform } from 'react-native';import NutrientView from '@nutrient-sdk/react-native';import { NativeModules } from 'react-native';import React from 'react';// ...const Nutrient = NativeModules.Nutrient;Nutrient.setLicenseKey(null); // Or your valid license keys using `setLicenseKeys`.const DOCUMENT =Platform.OS === 'ios' ? 'Document.pdf' : 'file:///android_asset/Document.pdf';// ...var pdfRef: React.RefObject<NutrientView | null> = React.createRef();<NutrientViewdocument={DOCUMENT}configuration={{showThumbnailBar: 'scrollable',pageTransition: 'scrollContinuous',scrollDirection: 'vertical',}}ref={pdfRef}fragmentTag="PDF1"style={{flex: 1}}/>The app is now ready to launch! Go back to the terminal app and run:
Terminal window npx react-native run-androidTerminal window npx react-native run-ios
Expo
If you’re using Expo, refer to the blog post that explains how to use Nutrient for React Native with Expo.
Next steps
To learn more about React Native, make sure to check out the following blog posts:
- React Native UI Component for Android
- React Native UI Component for iOS
- Advanced Techniques for React Native UI Components
- How to Extend React Native APIs
- How to Bridge Native iOS Code to React Native
- How to Open a PDF in React Native Using the Document Picker
- How to Build a React Native PDF Viewer