How to add annotations to PDFs using the Android library
Table of contents

In this post, you’ll learn how to annotate a PDF file using Nutrient’s Android PDF library. More specifically, you’ll learn how to programmatically add:
- Highlight annotations
- Link annotations
- Free text annotations
- Ink annotations
- Note annotations
- Stamp annotations
Nutrient Android SDK provides a clean and elegant way to annotate any PDF document while saving development time and cost.
Looking for other mobile PDF solutions? Compare with iOS PDF annotations, React Native PDF libraries, Flutter PDF integration, and Kotlin PDF development.
Requirements
To get started, you’ll need:
- Android Studio(opens in a new tab) — The official integrated development environment for Android
Getting started
To follow along, create a fresh Android Studio project and add Nutrient to your project. For step-by-step instructions on how to create a new project, follow our getting started on Android guide.
Displaying PDFs using PdfFragment
Nutrient Android SDK has a PdfFragment, which is used for displaying documents. It’s meant to be used if you want full custom implementation and design.
PdfFragmentcontains only the document view, without any additional views like the outline, thumbnail bar, search, etc.
Make sure your application is prepared for displaying and editing PDFs. Set the
android:largeHeap="true"property in your<application>tag inapp/src/mainAndroidManifest.xml:<application android:largeHeap="true">...</application>...This property will ensure your app has enough heap allocated to avoid out-of-memory errors.
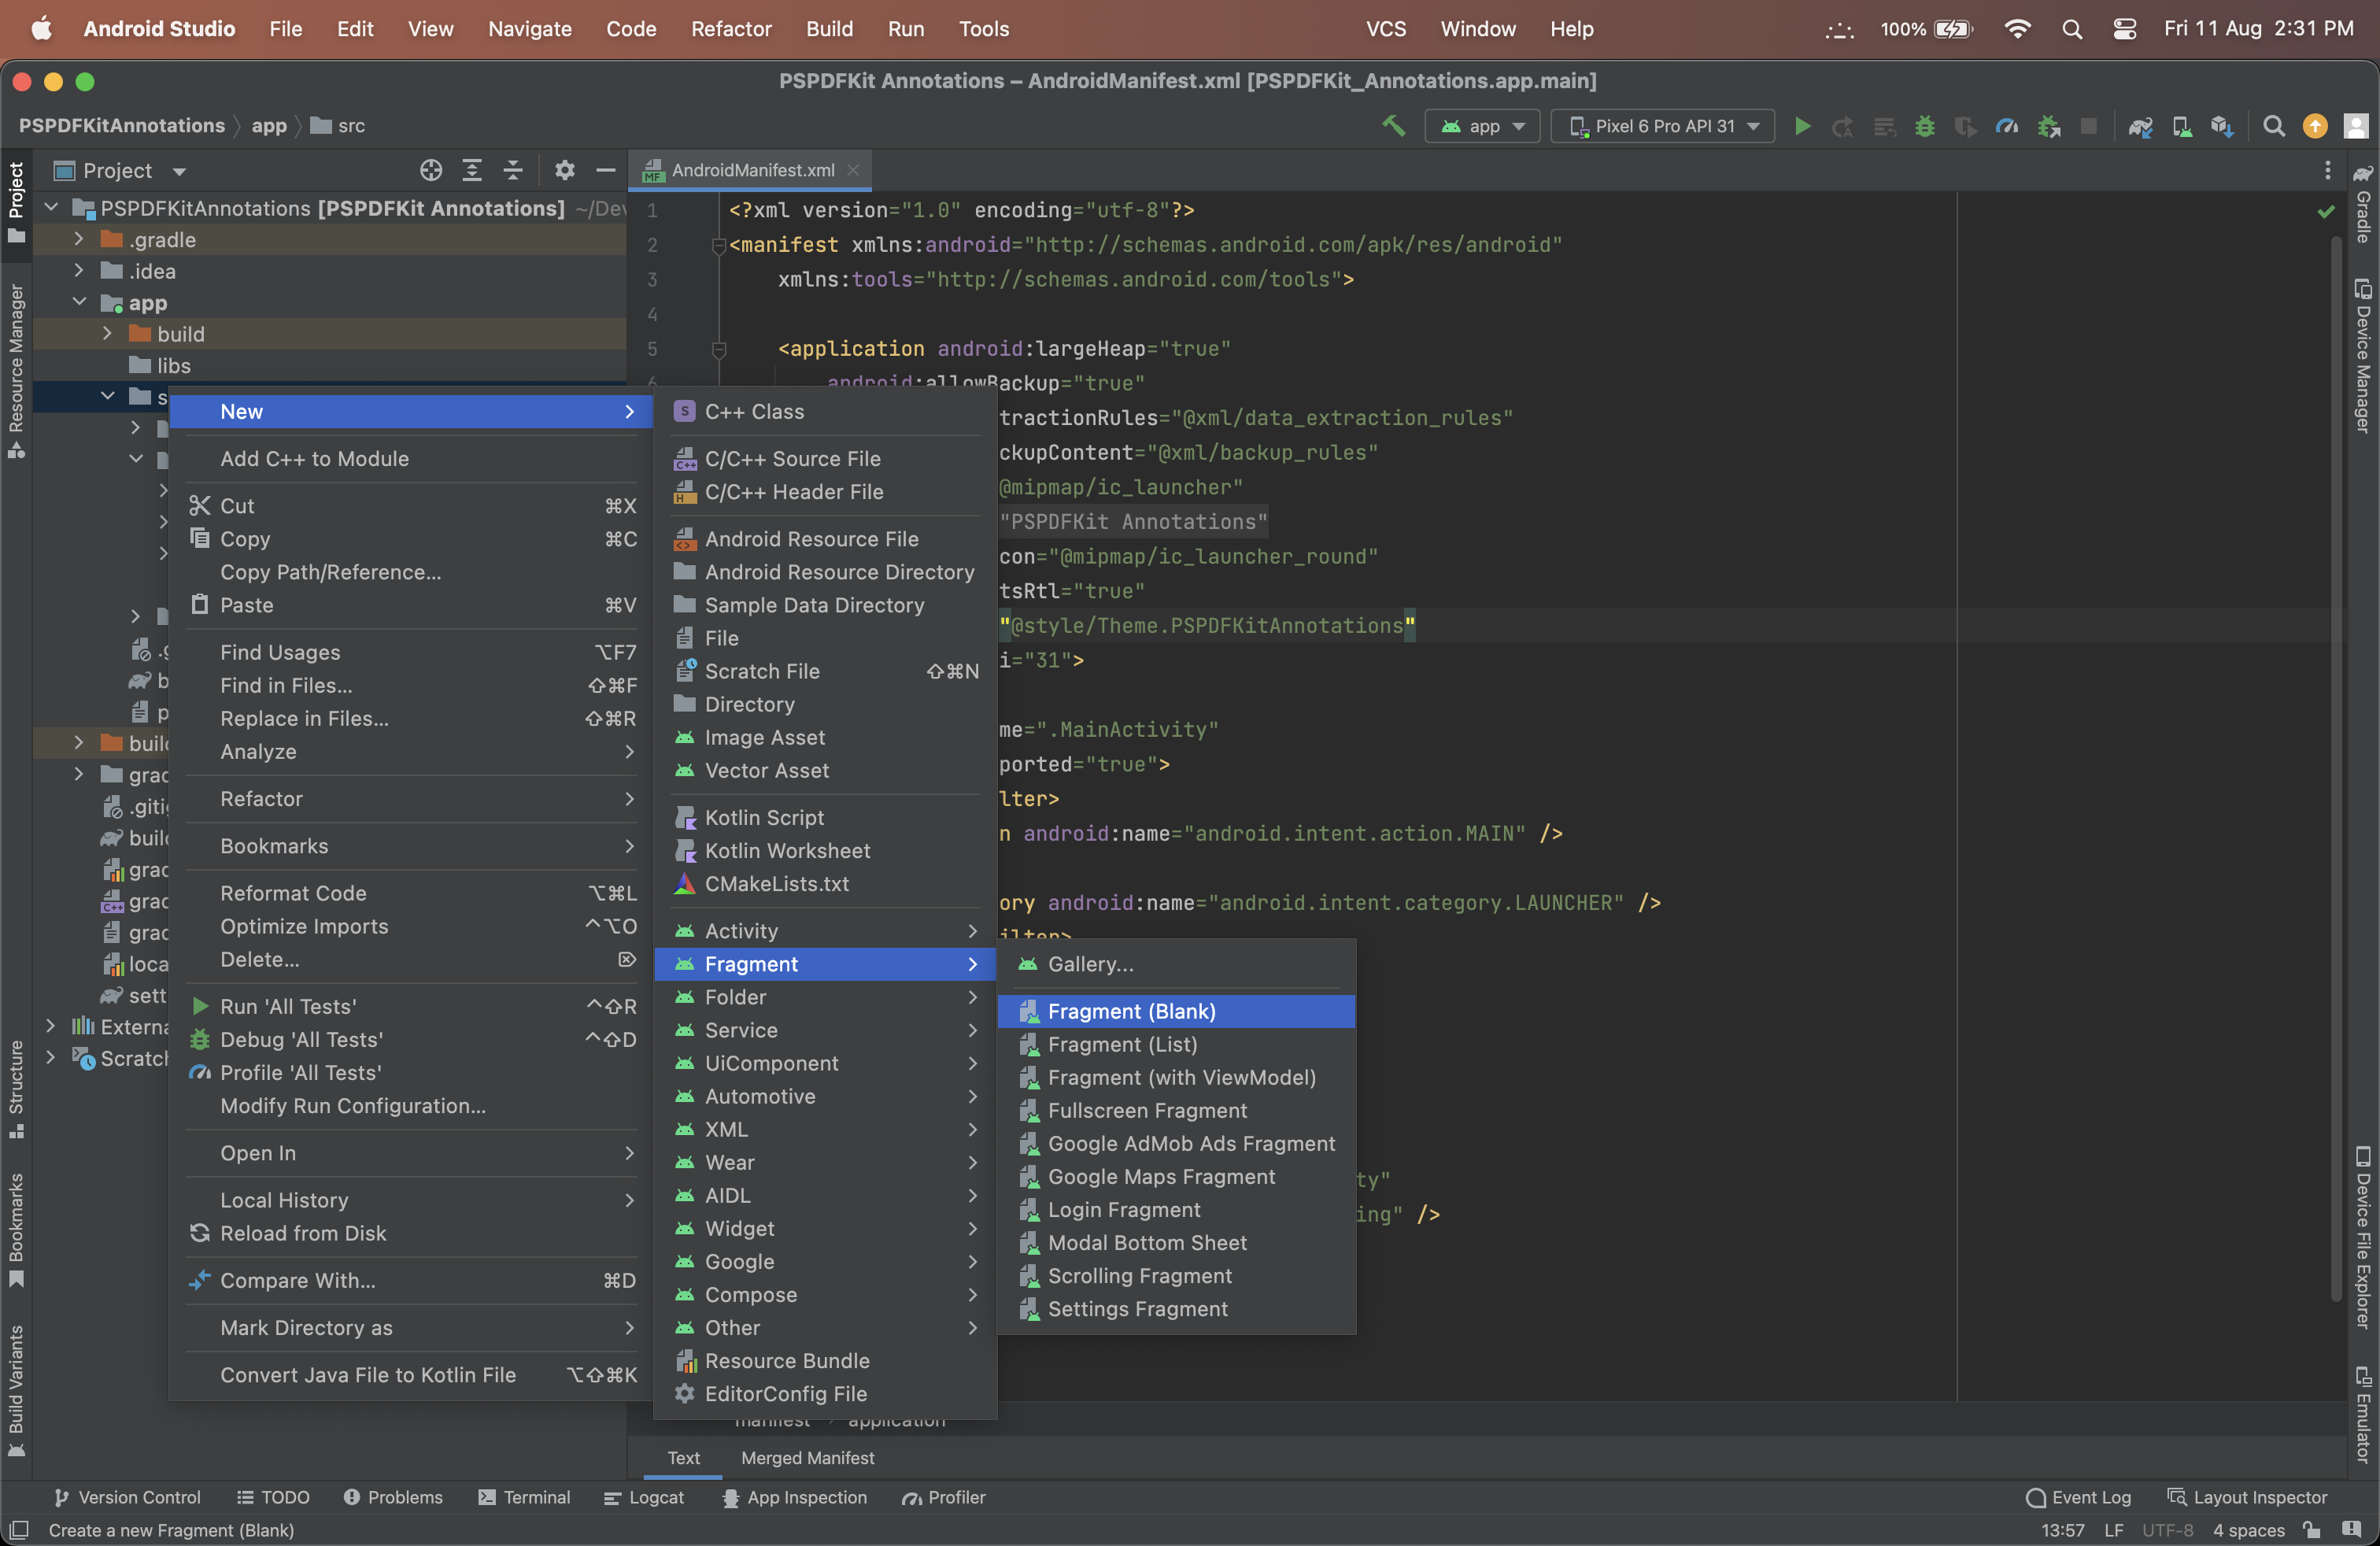
Add a blank fragment by right-clicking src and going to New > Fragment > Fragment (Blank). Ensure you select Kotlin as the language.
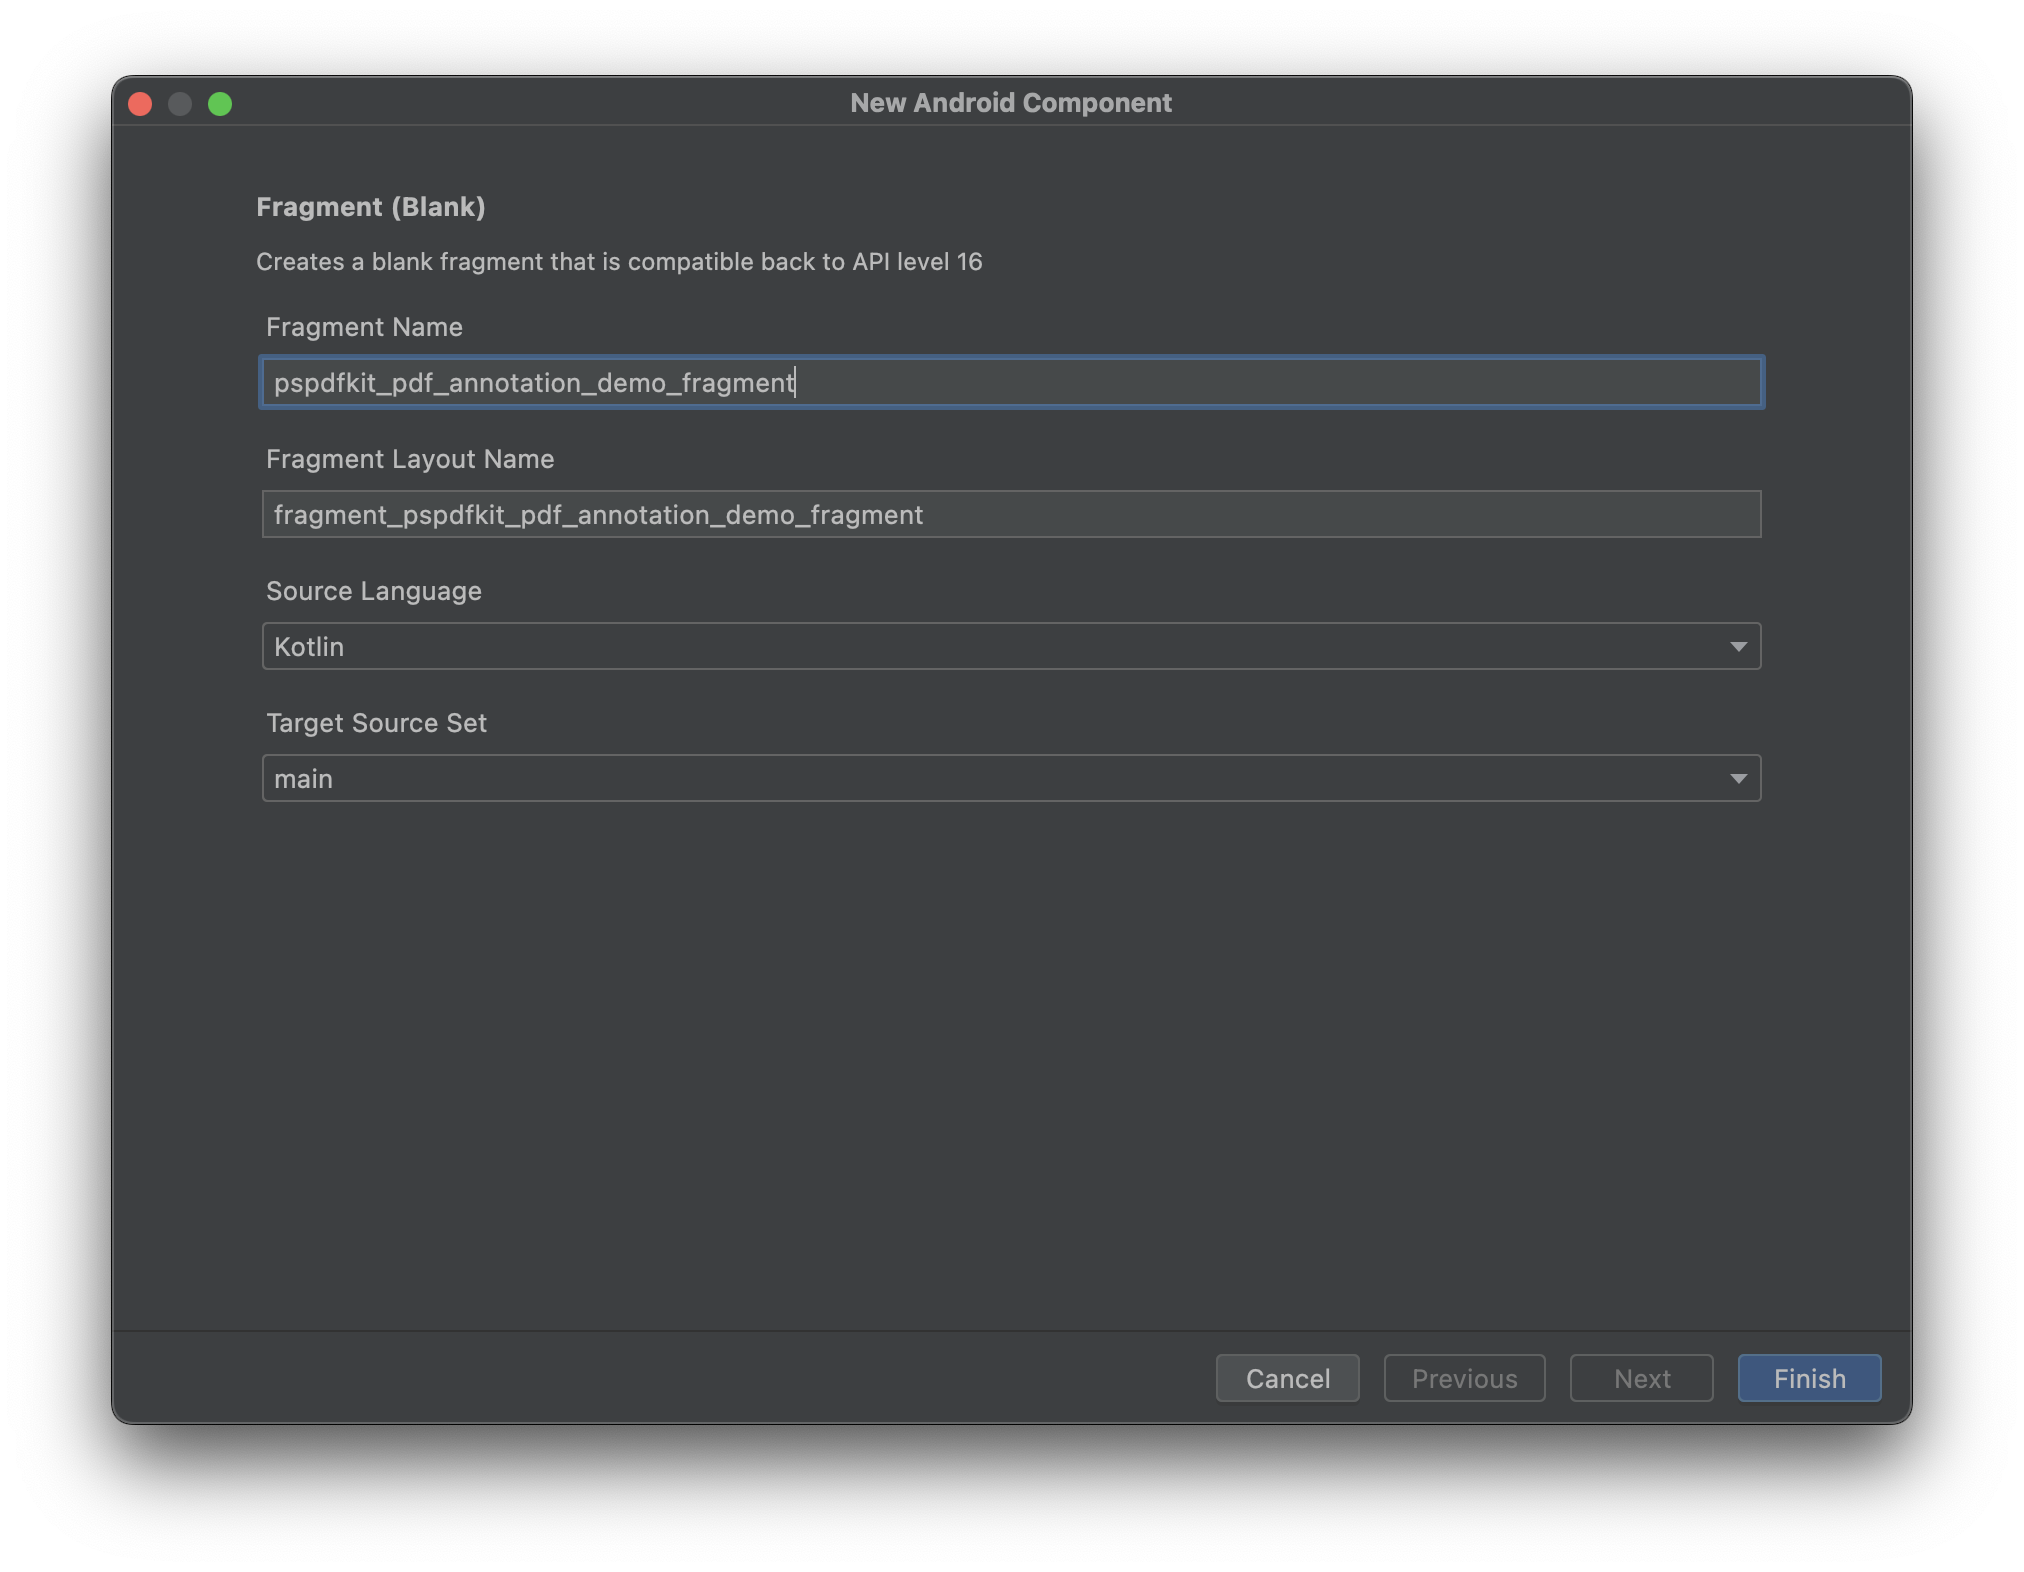
When prompted, enter the fragment name and click Finish.
Open your
src/main/res/layout/activity_main.xmlfile and a<fragment>tag:<fragmentandroid:id="@+id/fragmentContainer"android:name="[your-application-id].[your-fragment-name]"android:layout_width="match_parent"android:layout_height="wrap_content"app:layout_constraintBottom_toBottomOf="parent"app:layout_constraintEnd_toEndOf="parent"app:layout_constraintStart_toStartOf="parent"app:layout_constraintTop_toTopOf="parent" />Remember to replace
"[your-application-id]"and"[your-fragment-name]"with your actual app ID and fragment name.Remove any code and
TODOsyou don’t need in your newly created fragment file and pass the ID of the fragment tag you created earlier to theFragmentconstructor:package com.example.pspdfkitannotationsimport androidx.fragment.app.Fragmentclass PSPDFKitPDFAnnotationDemoFragment : Fragment(R.layout.fragment_pspdfkit_pdf_annotation_demo_fragment) {}If you want to follow along with the code, use the package name
com.example.pspdfkitannotations. Alternatively, you can use your own name.In
MainActivity.kt, create a fragment using thePdfConfigurationinstance and attach it to your activity:package [your-application-id]import android.net.Uriimport androidx.appcompat.app.AppCompatActivityimport android.os.Bundleimport com.pspdfkit.configuration.PdfConfigurationimport com.pspdfkit.configuration.page.PageScrollDirectionimport com.pspdfkit.ui.PdfFragmentclass MainActivity : AppCompatActivity() {override fun onCreate(savedInstanceState: Bundle?) {super.onCreate(savedInstanceState)setContentView(R.layout.activity_main)val uri = Uri.parse("file:///android_asset/[your-document].pdf")val configuration = PdfConfiguration.Builder().scrollDirection(PageScrollDirection.HORIZONTAL).build()createFragment(uri, configuration)}private fun createFragment(documentUri: Uri, configuration: PdfConfiguration): PdfFragment {val fragment = PdfFragment.newInstance(documentUri, configuration)supportFragmentManager.beginTransaction().replace(R.id.fragmentContainer, fragment).commit()return fragment}}Just like the
PdfActivity,PdfFragmentallows passing in a configuration object that defines various options.Run your application to display your PDF using
PdfFragment.
Adding highlight annotations
In activity_main.xml, add a button tag. You’ll use this button to add annotations when it’s clicked:
<?xml version="1.0" encoding="utf-8"?><androidx.constraintlayout.widget.ConstraintLayout xmlns:android="http://schemas.android.com/apk/res/android"    xmlns:app="http://schemas.android.com/apk/res-auto"    xmlns:tools="http://schemas.android.com/tools"    android:layout_width="match_parent"    android:layout_height="match_parent"    tools:context=".MainActivity">
    <androidx.fragment.app.FragmentContainerView        android:id="@+id/fragmentContainer"        android:name="com.example.testapp.TestPdfFragment"        android:layout_width="match_parent"        android:layout_height="0dp"        app:layout_constraintBottom_toTopOf="@id/annotatePdf"        app:layout_constraintEnd_toEndOf="parent"        app:layout_constraintStart_toStartOf="parent"        app:layout_constraintTop_toTopOf="parent"        tools:layout="@layout/fragment_pdf" />
    <Button        android:id="@+id/annotatePdf"        android:layout_width="wrap_content"        android:layout_height="wrap_content"        android:layout_marginTop="12dp"        android:text="Add Annotation"        app:layout_constraintBottom_toBottomOf="parent"        app:layout_constraintEnd_toEndOf="parent"        app:layout_constraintStart_toStartOf="parent"        app:layout_constraintTop_toBottomOf="@id/fragmentContainer" />
</androidx.constraintlayout.widget.ConstraintLayout>
Get the button’s reference and add a listener to it in your MainActivity.kt file to display a toast when clicked:
val annotateBtn = findViewById<Button>(R.id.annotatePdf)
annotateBtn.setOnClickListener{    Toast.makeText(this, "Annotation Added!", Toast.LENGTH_LONG).show()    frag.addAnnotationToPage(highlightAnnotation, false)}
The HighlightAnnotation API expects a page index and a list of rectangles that represent highlights (List<RectF>).
Define the places you want to highlight:
val textRects = listOf(RectF(440f, 760f, 715f, 800f))Supply the
HighlightAnnotationAPI with the page index and the places you want to highlight:val highlightAnnotation = HighlightAnnotation(0, textRects)Set the highlight color and add the annotation to the document using the
addAnnotationToPagemethod:package [your-application-id]import android.graphics.Colorimport android.graphics.RectFimport android.net.Uriimport androidx.appcompat.app.AppCompatActivityimport android.os.Bundleimport android.widget.Buttonimport android.widget.Toastimport com.pspdfkit.annotations.HighlightAnnotationimport com.pspdfkit.configuration.PdfConfigurationimport com.pspdfkit.configuration.page.PageScrollDirectionimport com.pspdfkit.ui.PdfFragmentclass MainActivity : AppCompatActivity() {override fun onCreate(savedInstanceState: Bundle?) {super.onCreate(savedInstanceState)setContentView(R.layout.activity_main)val uri = Uri.parse("file:///android_asset/[your-document].pdf")val configuration = PdfConfiguration.Builder().scrollDirection(PageScrollDirection.HORIZONTAL).build()// Define the places you want to highlight.val textRects = listOf(RectF(440f, 760f, 715f, 800f))// Create the highlight on the first page.val highlightAnnotation = HighlightAnnotation(0, textRects)// Set the color.highlightAnnotation.color = Color.YELLOWval frag = createFragment(uri, configuration)val annotateBtn = findViewById<Button>(R.id.annotatePdf)annotateBtn.setOnClickListener{Toast.makeText(this, "Annotation Added!", Toast.LENGTH_LONG).show()frag.addAnnotationToPage(highlightAnnotation, false)}}private fun createFragment(documentUri: Uri, configuration: PdfConfiguration): PdfFragment {val fragment = PdfFragment.newInstance(documentUri, configuration)supportFragmentManager.beginTransaction().replace(R.id.fragmentContainer, fragment).commit()return fragment}}Run your application and click the Add Annotation button to add a highlight annotation to your document.
Adding link annotations
The LinkAnnotation API expects only the page index.
Create the link on the first page:
val linkAnnotation = LinkAnnotation(0)Set the annotation position:
linkAnnotation.boundingBox = RectF(10f, 0f, 600f, 1000f)Set where the link points to:
linkAnnotation.action = GoToAction(4)Add the annotation to the document using the
addAnnotationToPagemethod:package [your-application-id]import android.graphics.RectFimport android.net.Uriimport androidx.appcompat.app.AppCompatActivityimport android.os.Bundleimport android.widget.Buttonimport android.widget.Toastimport com.pspdfkit.annotations.LinkAnnotationimport com.pspdfkit.annotations.actions.GoToActionimport com.pspdfkit.configuration.PdfConfigurationimport com.pspdfkit.configuration.page.PageScrollDirectionimport com.pspdfkit.ui.PdfFragmentclass MainActivity : AppCompatActivity() {override fun onCreate(savedInstanceState: Bundle?) {super.onCreate(savedInstanceState)setContentView(R.layout.activity_main)val uri = Uri.parse("file:///android_asset/[your-document].pdf")val configuration = PdfConfiguration.Builder().scrollDirection(PageScrollDirection.HORIZONTAL).build()// Create the link on the first page.val linkAnnotation = LinkAnnotation(0)// Set the position.linkAnnotation.boundingBox = RectF(10f, 0f, 600f, 1000f)// Set where the link points to — in this case, the fifth page.linkAnnotation.action = GoToAction(4)val frag = createFragment(uri, configuration)val annotateBtn = findViewById<Button>(R.id.annotatePdf)annotateBtn.setOnClickListener{Toast.makeText(this, "Annotation Added!", Toast.LENGTH_LONG).show()frag.addAnnotationToPage(linkAnnotation, false)}}private fun createFragment(documentUri: Uri, configuration: PdfConfiguration): PdfFragment {val fragment = PdfFragment.newInstance(documentUri, configuration)supportFragmentManager.beginTransaction().replace(R.id.fragmentContainer, fragment).commit()return fragment}}Run your application and click the Add Annotation button to add a link annotation to your document.
Adding free text annotations
The FreeTextAnnotation API expects a page index, a bounding rectangle (RectF), and a String (text of the annotation).
Create the text on the first page:
val freeTextAnnotation = FreeTextAnnotation(0, RectF(100f, 550f, 300f, 600f), "My Annotation")Set the text color:
freeTextAnnotation.color = Color.REDSet the text size and add the annotation to the document using the
addAnnotationToPagemethod:package [your-application-id]import android.graphics.Colorimport android.graphics.RectFimport android.net.Uriimport androidx.appcompat.app.AppCompatActivityimport android.os.Bundleimport android.widget.Buttonimport android.widget.Toastimport com.pspdfkit.annotations.FreeTextAnnotationimport com.pspdfkit.configuration.PdfConfigurationimport com.pspdfkit.configuration.page.PageScrollDirectionimport com.pspdfkit.ui.PdfFragmentclass MainActivity : AppCompatActivity() {override fun onCreate(savedInstanceState: Bundle?) {super.onCreate(savedInstanceState)setContentView(R.layout.activity_main)val uri = Uri.parse("file:///android_asset/[your-documnet].pdf")val configuration = PdfConfiguration.Builder().scrollDirection(PageScrollDirection.HORIZONTAL).build()// Create the text on the first page.val freeTextAnnotation = FreeTextAnnotation(0, RectF(100f, 550f, 300f, 600f), "My Annotation")// Set the text color.freeTextAnnotation.color = Color.RED// Set the text size.freeTextAnnotation.textSize = 30fval frag = createFragment(uri, configuration)val annotateBtn = findViewById<Button>(R.id.annotatePdf)annotateBtn.setOnClickListener{Toast.makeText(this, "Annotation Added!", Toast.LENGTH_LONG).show()frag.addAnnotationToPage(freeTextAnnotation, false)}}private fun createFragment(documentUri: Uri, configuration: PdfConfiguration): PdfFragment {val fragment = PdfFragment.newInstance(documentUri, configuration)supportFragmentManager.beginTransaction().replace(R.id.fragmentContainer, fragment).commit()return fragment}}Run your application and click the Add Annotation button to add a free text annotation to your document.
Adding ink annotations
The InkAnnotation API expects only the page index.
Create the ink annotation on the first page:
val inkAnnotation = InkAnnotation(0)Set the line color:
inkAnnotation.color = Color.REDSet the line width:
inkAnnotation.lineWidth = 10fCreate a line from a list of points and set it to the annotation:
val line = listOf(PointF(100f, 100f),PointF(150f, 150f),PointF(200f, 100f),PointF(250f, 150f),PointF(200f, 200f))// Ink annotations can hold multiple lines. We only use one here.inkAnnotation.lines = listOf(line)Add the annotation to the document using the
addAnnotationToPagemethod:package [your-application-id]import android.graphics.Colorimport android.graphics.PointFimport android.net.Uriimport androidx.appcompat.app.AppCompatActivityimport android.os.Bundleimport android.widget.Buttonimport android.widget.Toastimport com.pspdfkit.annotations.InkAnnotationimport com.pspdfkit.configuration.PdfConfigurationimport com.pspdfkit.configuration.page.PageScrollDirectionimport com.pspdfkit.ui.PdfFragmentclass MainActivity : AppCompatActivity() {override fun onCreate(savedInstanceState: Bundle?) {super.onCreate(savedInstanceState)setContentView(R.layout.activity_main)val uri = Uri.parse("file:///android_asset/[your-document].pdf")val configuration = PdfConfiguration.Builder().scrollDirection(PageScrollDirection.HORIZONTAL).build()// Create the ink annotation on the first page.val inkAnnotation = InkAnnotation(0)// Set the line color.inkAnnotation.color = Color.RED// Set the line width.inkAnnotation.lineWidth = 10f// Create a line from a list of points.val line = listOf(PointF(100f, 100f),PointF(150f, 150f),PointF(200f, 100f),PointF(250f, 150f),PointF(200f, 200f))// Ink annotations can hold multiple lines. We only use one here.inkAnnotation.lines = listOf(line)val frag = createFragment(uri, configuration)val annotateBtn = findViewById<Button>(R.id.annotatePdf)annotateBtn.setOnClickListener{Toast.makeText(this, "Annotation Added!", Toast.LENGTH_LONG).show()frag.addAnnotationToPage(inkAnnotation, false)}}private fun createFragment(documentUri: Uri, configuration: PdfConfiguration): PdfFragment {val fragment = PdfFragment.newInstance(documentUri, configuration)supportFragmentManager.beginTransaction().replace(R.id.fragmentContainer, fragment).commit()return fragment}}Run your application and click the Add Annotation button to add an ink annotation to your document.
Adding note annotations
The NoteAnnotation API expects a page index, a rectangle in page coordinates of the note position on the page (RectF), and two String values — one for the text of the note, and one for the icon name.
Create the note on the first page:
val noteAnnotation = NoteAnnotation(0,RectF(100f, 550f, 132f, 600f),"This is my note",NoteAnnotation.NOTE)Add the annotation to the document using the
addAnnotationToPagemethod:package [your-application-id]import android.graphics.RectFimport android.net.Uriimport androidx.appcompat.app.AppCompatActivityimport android.os.Bundleimport android.widget.Buttonimport android.widget.Toastimport com.pspdfkit.annotations.NoteAnnotationimport com.pspdfkit.configuration.PdfConfigurationimport com.pspdfkit.configuration.page.PageScrollDirectionimport com.pspdfkit.ui.PdfFragmentclass MainActivity : AppCompatActivity() {override fun onCreate(savedInstanceState: Bundle?) {super.onCreate(savedInstanceState)setContentView(R.layout.activity_main)val uri = Uri.parse("file:///android_asset/[your-document].pdf")val configuration = PdfConfiguration.Builder().scrollDirection(PageScrollDirection.HORIZONTAL).build()// Create the note on the first page.val noteAnnotation = NoteAnnotation(0,RectF(100f, 550f, 132f, 600f),"This is my note",NoteAnnotation.NOTE)val frag = createFragment(uri, configuration)val annotateBtn = findViewById<Button>(R.id.annotatePdf)annotateBtn.setOnClickListener{Toast.makeText(this, "Annotation Added!", Toast.LENGTH_LONG).show()frag.addAnnotationToPage(noteAnnotation, false)}}private fun createFragment(documentUri: Uri, configuration: PdfConfiguration): PdfFragment {val fragment = PdfFragment.newInstance(documentUri, configuration)supportFragmentManager.beginTransaction().replace(R.id.fragmentContainer, fragment).commit()return fragment}}Run your application and click the Add Annotation button to add a note annotation to your document:
Adding stamp annotations
Create the stamp on the first page using the
StampAnnotationAPI:val stampAnnotation = StampAnnotation(0,RectF(100f, 550f, 300f, 600f),StampType.CONFIDENTIAL)Add the annotation to the document using the
addAnnotationToPagemethod:package [your-application-id]import android.graphics.RectFimport android.net.Uriimport androidx.appcompat.app.AppCompatActivityimport android.os.Bundleimport android.widget.Buttonimport android.widget.Toastimport com.pspdfkit.annotations.StampAnnotationimport com.pspdfkit.annotations.stamps.StampTypeimport com.pspdfkit.configuration.PdfConfigurationimport com.pspdfkit.configuration.page.PageScrollDirectionimport com.pspdfkit.ui.PdfFragmentclass MainActivity : AppCompatActivity() {override fun onCreate(savedInstanceState: Bundle?) {super.onCreate(savedInstanceState)setContentView(R.layout.activity_main)val uri = Uri.parse("file:///android_asset/[your-document].pdf")val configuration = PdfConfiguration.Builder().scrollDirection(PageScrollDirection.HORIZONTAL).build()// Create the stamp on the first page.val stampAnnotation = StampAnnotation(0,RectF(100f, 550f, 300f, 600f),StampType.CONFIDENTIAL)val frag = createFragment(uri, configuration)val annotateBtn = findViewById<Button>(R.id.annotatePdf)annotateBtn.setOnClickListener{Toast.makeText(this, "Annotation Added!", Toast.LENGTH_LONG).show()frag.addAnnotationToPage(stampAnnotation, false)}}private fun createFragment(documentUri: Uri, configuration: PdfConfiguration): PdfFragment {val fragment = PdfFragment.newInstance(documentUri, configuration)supportFragmentManager.beginTransaction().replace(R.id.fragmentContainer, fragment).commit()return fragment}}Run your application and click the Add Annotation button to add a stamp annotation to your document.
Conclusion
In this post, you learned how to annotate a PDF document using Nutrient Android SDK. If you hit any snags while trying to implement any of the steps, don’t hesitate to reach out to our Support team for help.
At Nutrient, we offer a commercial, feature-rich, and completely customizable Android PDF library that’s easy to integrate and comes with well-documented APIs to handle advanced use cases. Try it for free, or visit our demo to see it in action.