How to edit PDFs in an iOS application using a PDF library

Table of contents

Nutrient iOS SDK lets you edit PDFs programmatically and through a built-in UI:
- Use the
Processorclass to rotate, crop, move, remove, and add pages, as well as to apply permanent watermarks. - Switch the
PDFViewControllerto content editing mode to edit text directly. - Attach embedded files to a page with a
FileAnnotation.
In this post, you’ll learn how to edit PDFs using Nutrient iOS SDK. More specifically, you’ll learn how to perform the following editing operations on a PDF document in your iOS application:
- Rotate pages
- Crop pages
- Rearrange (move) pages
- Remove pages
- Add new pages
- Edit text
- Attach files
- Add watermarks
iOS ships with Apple’s PDFKit for displaying PDFs, but editing them — rearranging pages, editing text, adding signatures or watermarks — goes beyond what the native framework covers. This post uses Nutrient’s iOS PDF library for those operations; the comparison near the end covers when PDFKit is enough and when a dedicated library earns its place.
Requirements
To get started, you’ll need:
- A computer running macOS
- The latest stable version of Xcode(opens in a new tab)
Getting started
To follow along, create a fresh Xcode project and add the Nutrient Swift package to your project. For step-by-step instructions, follow our Getting Started on iOS guide.
Rotating PDF pages using the Processor class
The Processor class provides APIs for document editing operations. Many Processor operations involve producing an output that’s the result of performing editing operations on an input document.
Use Processor when you want to build an automated document processing operation.
Load the document you want to edit:
let fileURL = Bundle.main.url(forResource: "YOUR-DOCUMENT", withExtension: "pdf")!let document = Document(url: fileURL)Configure the page rotation parameters on a
Processor.Configurationinstance:guard let configuration = Processor.Configuration(document: document) else {print("Could not create a processor configuration. The document might be locked or invalid.")return}configuration.rotatePage(0, by: 90)Construct a URL to write the modified document:
let editedDocumentURL = URL(fileURLWithPath: NSTemporaryDirectory()).appendingPathComponent("document-rotated.pdf")Apply the configuration and write the edited document:
let processor = Processor(configuration: configuration, securityOptions: nil)do {try processor.write(toFileURL: editedDocumentURL)} catch {print(error)}Load the edited document and present the PDF view controller:
let editedDocument = Document(url: editedDocumentURL)let pdfController = PDFViewController(document: editedDocument)present(UINavigationController(rootViewController: pdfController), animated: true)
For a working example, replace the contents of ViewController.swift with the following:
import UIKitimport PSPDFKitimport PSPDFKitUI
class ViewController: UIViewController {
    override func viewDidAppear(_ animated: Bool) {        super.viewDidAppear(animated)
        let fileURL = Bundle.main.url(forResource: "YOUR-DOCUMENT", withExtension: "pdf")!        let document = Document(url: fileURL)
        guard let configuration = Processor.Configuration(document: document) else {            print("Could not create a processor configuration. The document might be locked or invalid.")            return        }

        // Rotate the first page 90 degrees clockwise.        configuration.rotatePage(0, by: 90)
        let editedDocumentURL = URL(fileURLWithPath: NSTemporaryDirectory()).appendingPathComponent("document-rotated.pdf")
        let processor = Processor(configuration: configuration, securityOptions: nil)        do {            // Write the modified document. `editedDocumentURL` can be used            // to initialize and present the edited document.            try processor.write(toFileURL: editedDocumentURL)        } catch {            print(error)        }
        let editedDocument = Document(url: editedDocumentURL)
        let pdfController = PDFViewController(document: editedDocument)
        // Present the PDF view controller within a `UINavigationController` to show built-in toolbar buttons.        present(UINavigationController(rootViewController: pdfController), animated: true)
    }}
Remember to replace YOUR-DOCUMENT with the document you want to edit.
Cropping PDF pages using the Processor class
To crop a page of your document using Processor, configure the page cropping parameters on a Processor.Configuration instance:

// Crop the page to 200×200 pt.configuration.changeCropBoxForPage(at: 0, to: CGRect(x: 0, y: 0, width: 200, height: 200))For a working example, replace the contents of ViewController.swift with the following:
import UIKitimport PSPDFKitimport PSPDFKitUI
class ViewController: UIViewController {
    override func viewDidAppear(_ animated: Bool) {        super.viewDidAppear(animated)
        let fileURL = Bundle.main.url(forResource: "YOUR-DOCUMENT", withExtension: "pdf")!        let document = Document(url: fileURL)
        guard let configuration = Processor.Configuration(document: document) else {            print("Could not create a processor configuration. The document might be locked or invalid.")            return        }
        // Crop the page to 200×200 pt.        configuration.changeCropBoxForPage(at: 0, to: CGRect(x: 0, y: 0, width: 200, height: 200))
        let editedDocumentURL = URL(fileURLWithPath: NSTemporaryDirectory()).appendingPathComponent("document-cropped.pdf")
        let processor = Processor(configuration: configuration, securityOptions: nil)        do {            // Write the modified document. `editedDocumentURL` can be used            // to initialize and present the edited document.            try processor.write(toFileURL: editedDocumentURL)        } catch {            print(error)        }
        let editedDocument = Document(url: editedDocumentURL)
        // The configuration closure is optional and allows additional customization.        let pdfController = PDFViewController(document: editedDocument)
        // Present the PDF view controller within a `UINavigationController` to show built-in toolbar buttons.        present(UINavigationController(rootViewController: pdfController), animated: true)
    }}
Make sure that the file path used in editedDocumentURL is unique in the containing directory so that existing documents aren’t overwritten.
Moving PDF pages using the Processor class
To move pages via the Processor API, configure the page move parameters on a Processor.Configuration instance:
// Move the first page to the end of the document.configuration.movePages(IndexSet(integer: 0), toDestinationIndex: document.pageCount) 
Removing pages using the Processor class
To remove pages via the Processor API, configure the page removal parameters on a Processor.Configuration instance:
// Remove the first page. This API can be used to remove multiple pages at the same time.configuration.removePages(IndexSet(integer: 0)) 
Adding new pages using the Processor class

For this example, you’ll add a blank page to your document using the Processor API. You can add a blank page to a document using the .blank template document.
Create a blank page template:
let pageTemplate = PageTemplate(pageType: .emptyPage, identifier: .blank)Create a new page configuration:
let newPageConfiguration = PDFNewPageConfiguration(pageTemplate: pageTemplate, builderBlock: nil)Configure the add new page parameters:
configuration.addNewPage(at: 1, configuration: newPageConfiguration)
You’ll have the following in your ViewController.swift:
import UIKitimport PSPDFKitimport PSPDFKitUI
class ViewController: UIViewController {
    override func viewDidAppear(_ animated: Bool) {        super.viewDidAppear(animated)
        let fileURL = Bundle.main.url(forResource: "YOUR-DOCUMENT", withExtension: "pdf")!        let document = Document(url: fileURL)
        guard let configuration = Processor.Configuration(document: document) else {            print("Could not create a processor configuration. The document might be locked or invalid.")            return        }
        // Create a blank page template.        let pageTemplate = PageTemplate(pageType: .emptyPage, identifier: .blank)        // Create a new page configuration.        let newPageConfiguration = PDFNewPageConfiguration(pageTemplate: pageTemplate, builderBlock: nil)        // Add the blank page at index 1.        configuration.addNewPage(at: 1, configuration: newPageConfiguration)
        let editedDocumentURL = URL(fileURLWithPath: NSTemporaryDirectory()).appendingPathComponent("document-new-page.pdf")
        let processor = Processor(configuration: configuration, securityOptions: nil)        do {            // Write the modified document. `editedDocumentURL` can be used            // to initialize and present the edited document.            try processor.write(toFileURL: editedDocumentURL)        } catch {            print(error)        }
        let editedDocument = Document(url: editedDocumentURL)
        // The configuration closure is optional and allows additional customization.        let pdfController = PDFViewController(document: editedDocument)
        // Present the PDF view controller within a `UINavigationController` to show built-in toolbar buttons.        present(UINavigationController(rootViewController: pdfController), animated: true)
}} 
Editing text in PDFs
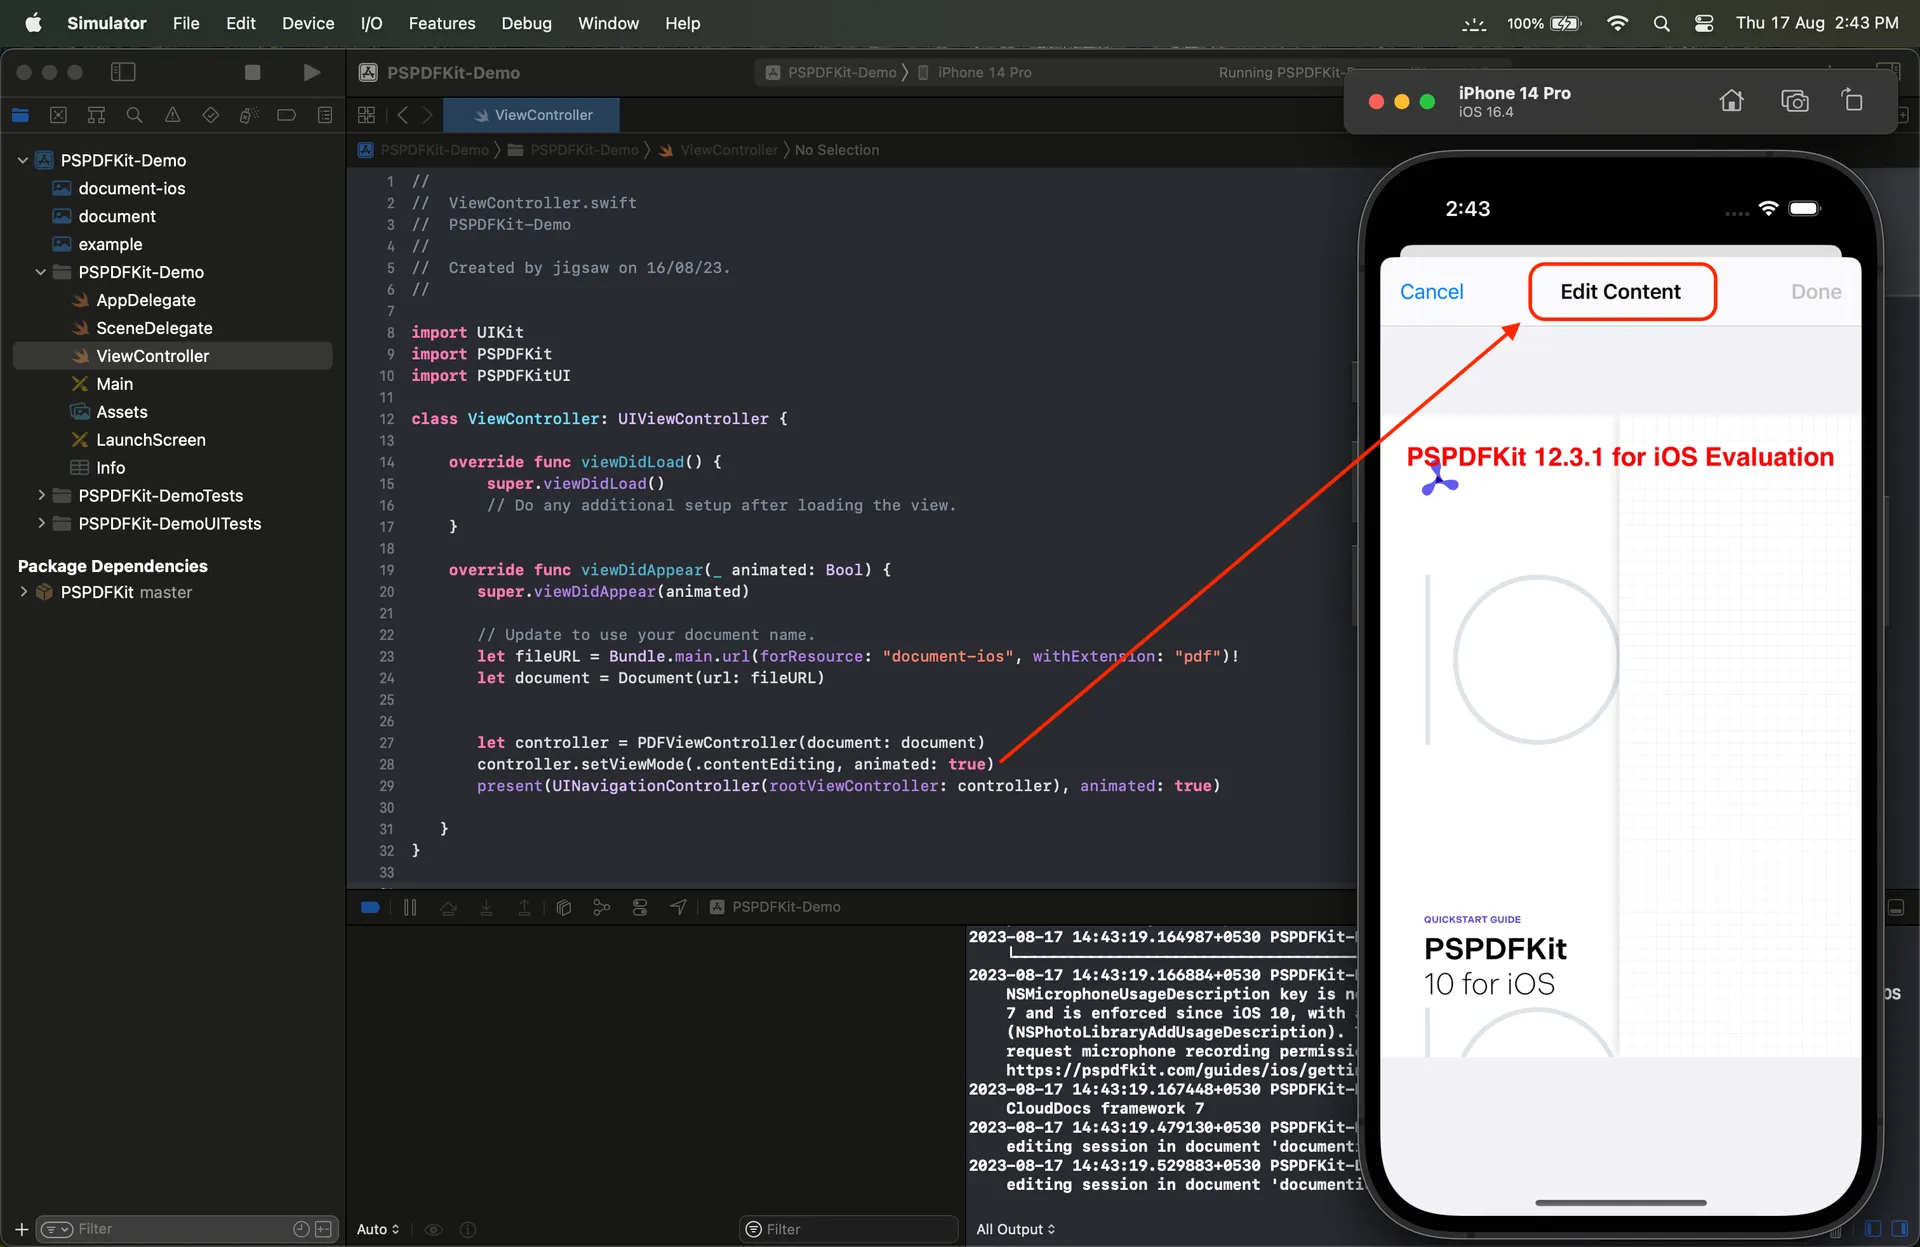
Nutrient enables you to edit text directly in PDF documents using the built-in user interface via Content Editor. You can change the text color, the font type, and the font size, and you can move and resize text boxes. Content Editor is a separately licensed component — reach out to add it to your license.
To enable content editing programmatically after loading a document, set the view mode to .contentEditing:
let controller = PDFViewController(document: document)controller.setViewMode(.contentEditing, animated: true)For a working example, replace the contents of ViewController.swift with the following:
import UIKitimport PSPDFKitimport PSPDFKitUI
class ViewController: UIViewController {
    override func viewDidAppear(_ animated: Bool) {       super.viewDidAppear(animated)
       // Update to use your document name.       let fileURL = Bundle.main.url(forResource: "YOUR-DOCUMENT", withExtension: "pdf")!       let document = Document(url: fileURL)
       let controller = PDFViewController(document: document)       controller.setViewMode(.contentEditing, animated: true)       present(UINavigationController(rootViewController: controller), animated: true)
}} 
Attaching files to PDFs

You can programmatically attach embedded files to a FileAnnotation object. You can create a file annotation with an embedded file using the URL of any file.
A working example looks like this:
import UIKitimport PSPDFKitimport PSPDFKitUI
class ViewController: UIViewController {
    override func viewDidAppear(_ animated: Bool) {        super.viewDidAppear(animated)
        // Update to use your document name.        let fileURL = Bundle.main.url(forResource: "YOUR-DOCUMENT", withExtension: "pdf")!        let document = Document(url: fileURL)
        // Create a new file annotation and set its properties.        let fileAnnotation = FileAnnotation()        fileAnnotation.pageIndex = 0        fileAnnotation.iconName = .graph        fileAnnotation.color = .blue        fileAnnotation.boundingBox = CGRect(x: 500, y: 250, width: 32, height: 32)
        let embeddedFileURL = Bundle.main.url(forResource: "DOCUMENT-TO-EMBED", withExtension: "pdf")!        let embeddedFile = EmbeddedFile(fileURL: embeddedFileURL, fileDescription: "Sample Document")        fileAnnotation.embeddedFile = embeddedFile
        document.add(annotations: [fileAnnotation])
        // The configuration closure is optional and allows additional customization.        let pdfController = PDFViewController(document: document)
        // Present the PDF view controller within a `UINavigationController` to show built-in toolbar buttons.        present(UINavigationController(rootViewController: pdfController), animated: true)
}} 
Adding watermarks to PDFs using the Processor class

Nutrient enables you to draw a permanent watermark on all pages of a document using the Processor API. The resulting PDF file will have a permanent watermark on all of its pages, even when opened in other PDF editors:
configuration.drawOnAllCurrentPages { context, pageIndex, pageRect, renderOptions in    // Careful. This code is executed on background threads. Only use thread-safe drawing methods.    let text = "Nutrient Live Watermark On Page \(pageIndex + 1)"    let stringDrawingContext = NSStringDrawingContext()    stringDrawingContext.minimumScaleFactor = 0.1
    // Add text over the diagonal of the page.    context.translateBy(x: 0, y: pageRect.size.height / 2)    context.rotate(by: -.pi / 4)    let attributes: [NSAttributedString.Key: Any] = [        .font: UIFont.boldSystemFont(ofSize: 30),        .foregroundColor: UIColor.red.withAlphaComponent(0.5)    ]    text.draw(with: pageRect, options: .usesLineFragmentOrigin, attributes: attributes, context: stringDrawingContext)}
For a working example, replace the contents of ViewController.swift with the following:
import UIKitimport PSPDFKitimport PSPDFKitUI
class ViewController: UIViewController {
    override func viewDidAppear(_ animated: Bool) {       super.viewDidAppear(animated)
       // Update to use your document name.       let fileURL = Bundle.main.url(forResource: "YOUR-DOCUMENT", withExtension: "pdf")!       let document = Document(url: fileURL)
       guard let configuration = Processor.Configuration(document: document) else {           print("Could not create a processor configuration. The document might be locked or invalid.")           return       }
       configuration.drawOnAllCurrentPages { context, pageIndex, pageRect, renderOptions in           // Careful. This code is executed on background threads. Only use thread-safe drawing methods.           let text = "Nutrient Live Watermark On Page \(pageIndex + 1)"           let stringDrawingContext = NSStringDrawingContext()           stringDrawingContext.minimumScaleFactor = 0.1
           // Add text over the diagonal of the page.           context.translateBy(x: 0, y: pageRect.size.height / 2)           context.rotate(by: -.pi / 4)           let attributes: [NSAttributedString.Key: Any] = [               .font: UIFont.boldSystemFont(ofSize: 30),               .foregroundColor: UIColor.red.withAlphaComponent(0.5)           ]           text.draw(with: pageRect, options: .usesLineFragmentOrigin, attributes: attributes, context: stringDrawingContext)       }
       let editedDocumentURL = URL(fileURLWithPath: NSTemporaryDirectory()).appendingPathComponent("document-watermark.pdf")
       let processor = Processor(configuration: configuration, securityOptions: nil)       do {           // Write the modified document. `editedDocumentURL` can be used           // to initialize and present the edited document.           try processor.write(toFileURL: editedDocumentURL)       } catch {           print(error)       }
       let editedDocument = Document(url: editedDocumentURL)
       // The configuration closure is optional and allows additional customization.       let pdfController = PDFViewController(document: editedDocument)
       // Present the PDF view controller within a `UINavigationController` to show built-in toolbar buttons.       present(UINavigationController(rootViewController: pdfController), animated: true)
   }
} 
Apple PDFKit vs. Nutrient
iOS includes Apple’s PDFKit, a system framework that’s easy to integrate and a solid starting point for displaying PDFs. It provides a viewer (PDFView), thumbnails, text selection and extraction, the document outline, and basic annotations.
Where a dedicated library earns its place is the editing and document work beyond viewing. Compared to PDFKit, Nutrient iOS SDK adds:
- A configurable UI that supports most PDF features
- Every annotation type in the PDF specification, with import and export in JSON and XFDF
- Programmatic form filling
- Electronic and digital signatures
- Page editing — add, remove, duplicate, rotate, and extract pages
- Permanent watermarks and access to embedded files
- Indexed full-text search with near-instant results
- First-class support from our engineers
If you only need to display PDFs and add the occasional basic annotation, PDFKit may be enough. If your app needs to edit, annotate, fill, sign, or search documents, that’s where Nutrient fits. To move an existing PDFKit integration over, the migrating from Apple PDFKit guide maps the APIs across.
Conclusion
In this post, you learned how to edit a PDF document using Nutrient’s iOS PDF editor library. If you hit any snags while trying to implement any of the steps, reach out to our Support team for help. If you want to learn more about how you can use Nutrient’s iOS library in your projects, you can reach out to our team.
FAQ
The Processor class provides APIs for document editing operations like rotating, cropping, moving, and removing pages. It works by applying a Processor.Configuration to an input document and writing the result to a new file URL. This is ideal for automated document processing workflows.
Use Processor.Configuration with the rotatePage(_:by:) method. Pass the page index (zero-based) and a Rotation value like .rotation90, .rotation180, or .rotation270. Then create a Processor instance and call write(toFileURL:) to save the rotated document.
Yes. Nutrient includes Content Editor for direct text editing. Set the view mode to .contentEditing on your PDFViewController instance. Users can then change text color, font type, font size, and move or resize text boxes.
Use Processor.Configuration with the drawOnAllCurrentPages method. This closure receives a drawing context for each page where you can draw text or graphics. The watermark becomes permanent and visible in other PDF viewers.
Nutrient SDK supports iOS 15 and later. The code examples in this tutorial use URL(fileURLWithPath:).appendingPathComponent() for compatibility with iOS 15+.
Create a FileAnnotation object, set its properties like pageIndex, iconName, and boundingBox. Then create an EmbeddedFile from a file URL and assign it to the annotation’s embeddedFile property. Add the annotation to your document using document.add(annotations:).