Rendering annotations on Android
If you need to render single annotation objects into Bitmap(opens in a new tab) instances, Nutrient offers several options for doing this. This article serves as a step-by-step guide to get you started quickly.
Before loading a document and rendering its annotations, you have to initialize Nutrient by providing your license. Make sure to follow the steps in our integrating Nutrient guide before continuing with this guide, in order to have Nutrient fully initialized.
Loading a document
The first step in rendering annotations of a document is to load the document into memory. The PdfDocumentLoader class offers a variety of static methods for doing this. The following example loads a PDF document from the app’s assets using PdfDocumentLoader.openDocument() and a file:///android_asset URI. The complete list of available document sources and ways to load them is outlined in our guide about using an activity:
// Use this `Uri` format to access files inside your app's assets.val documentUri = Uri.parse("file:///android_asset/shopping-center-plan.pdf")
// This synchronously opens the document. To keep your app UI responsive, either// don't run this on the main thread, or use `openDocumentAsync()` instead.val document: PdfDocument = PdfDocumentLoader.openDocument(context, documentUri)
// Use this `Uri` format to access files inside your app's assets.final Uri documentUri = Uri.parse("file:///android_asset/shopping-center-plan.pdf");
// This synchronously opens the document. To keep your app UI responsive, either// don't run this on the main thread, or use `openDocumentAsync()` instead.final PdfDocument document = PdfDocumentLoader.openDocument(context, documentUri);The synchronous PdfDocumentLoader.openDocument() method used in this example will throw an exception if there is an error while loading the document. You should wrap the call into try/catch to handle any errors properly.
Retrieving annotations
To retrieve the annotations of your loaded PdfDocument instance, get a reference of your document’s AnnotationProvider by calling document.getAnnotationProvider(). You can then query annotations by page number or annotation type:
// Retrieves all ink annotations of the document.val inkAnnotations = document .getAnnotationProvider() .getAllAnnotationsOfType(EnumSet.of(AnnotationType.INK))// Retrieves all ink annotations of the document.final List<Annotation> inkAnnotations = document .getAnnotationProvider() .getAllAnnotationsOfType(EnumSet.of(AnnotationType.INK));If you want to retrieve all annotations of your document at once, you can call getAllAnnotationsOfType() using AnnotationProvider#ALL_ANNOTATION_TYPES.
Rendering annotations
The rendering of annotations can be performed synchronously or asynchronously using the renderToBitmap() and renderToBitmapAsync() methods of Annotation, respectively.
Preparing a Bitmap
You first need to create a target Bitmap(opens in a new tab) instance, which is usually done using Bitmap.createBitmap()(opens in a new tab). Since annotations can have transparent regions as well, it makes sense to use a bitmap format that supports this — Bitmap.Config.ARGB_8888(opens in a new tab) is a good choice:
// Create a bitmap with an alpha channel so that transparent parts// of the annotation are properly displayed.val bitmap = Bitmap.createBitmap( bitmapWidth, bitmapHeight, Bitmap.Config.ARGB_8888)// Create a bitmap with an alpha channel so that transparent parts// of the annotation are properly displayed.final Bitmap bitmap = Bitmap.createBitmap( bitmapWidth, bitmapHeight, Bitmap.Config.ARGB_8888);While rendering, the annotation will be stretched to fill the entire bitmap area. If you want to maintain the aspect ratio of the annotation, you need to create a bitmap with the same aspect ratio as the annotation.
Calculating the Bitmap size
You can calculate the Bitmap(opens in a new tab) size from the annotation size stored within the bounding box of your annotation. To retrieve the bounding box, use annotation.getBoundingBox():
// The annotation has a size, which can be calculated from its bounding box.val annotationWidth = annotation.boundingBox.width()val annotationHeight = -annotation.boundingBox.height()
// Create a bitmap with a width of 300 pixels. The height of the bitmap is derived// by proportionally fitting the annotation into the width of the bitmap.val bitmapWidth = 300val heightFactor = bitmapWidth / annotationWidthval bitmapHeight = (annotationHeight * heightFactor).toInt()
// The annotation has a size, which can be calculated from its bounding box.final float annotationWidth = annotation.getBoundingBox().width();final float annotationHeight = -annotation.getBoundingBox().height();
// Create a bitmap with a width of 300 pixels. The height of the bitmap is derived// by proportionally fitting the annotation into the width of the bitmap.final int bitmapWidth = 300;final float heightFactor = bitmapWidth / annotationWidth;final int bitmapHeight = (int) (annotationHeight * heightFactor);The bounding box holds PDF coordinates, which, unlike Android’s coordinates, are vertically flipped. As such, the returned height()(opens in a new tab) is negative and has to be inverted.
Synchronous rendering
To synchronously render an annotation into a Bitmap(opens in a new tab) instance, call renderToBitmap() on your annotation, passing in the already prepared Bitmap(opens in a new tab) instance:
// This is the bitmap you already prepared (see explanation above).annotation.renderToBitmap(bitmap)// This is the bitmap you already prepared (see explanation above).annotation.renderToBitmap(bitmap);⚠️ Warning: When calling
annotation.renderToBitmap(), the method will block until rendering has finished, so don’t use it on your main thread! Instead, use asynchronous rendering.
Asynchronous rendering
In most instances, it’s better to render an annotation asynchronously to ensure you do not block the current thread. This can be done by using renderToBitmapAsync(), which can also be used on the main thread. The method returns Single<Bitmap>(opens in a new tab), which will emit the Bitmap(opens in a new tab) once rendering is done:
val annotationRendering = annotation.renderToBitmapAsync(bitmap)    .subscribe { bitmap, throwable ->        // This will be called with either your bitmap        // or a throwable (if there was an error while rendering).    }
// If you ever need to cancel the async render operation, use this.annotationRendering.dispose()
Disposable annotationRendering = annotation.renderToBitmapAsync(bitmap) .subscribe((bitmap, throwable) -> { // This will be called with either your bitmap // or a throwable (if there was an error while rendering). });
// If you ever need to cancel the async render operation, use this.annotationRendering.dispose();Rendering will only start once you call subscribe()(opens in a new tab) on Single<Bitmap>(opens in a new tab). Since rendering is asynchronous, you can cancel it at any time — for example, by calling dispose()(opens in a new tab) on the Disposable(opens in a new tab) that is returned by subscribe()(opens in a new tab).
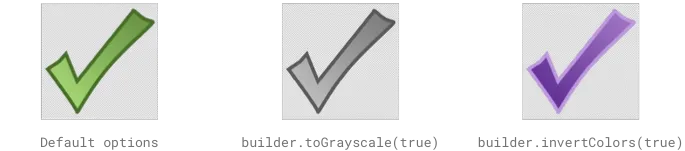
Providing an annotation render configuration
Both synchronous and asynchronous render methods allow you to specify an AnnotationRenderConfiguration object for defining render options. You can create the configuration using its Builder class:
val config = AnnotationRenderConfiguration.Builder()    .toGrayscale(true)    .build()
// Renders the annotation to the bitmap in grayscale.annotation.renderToBitmap(bitmap, config)
final AnnotationRenderConfiguration config = new AnnotationRenderConfiguration.Builder() .toGrayscale(true) .build();
// Renders the annotation to the bitmap in grayscale.annotation.renderToBitmap(bitmap, config);Available render options
It is possible to specify several different render configuration options via the Builder, including:
- Inversion of the annotation colors using
invertColors(). - Grayscale rendering using
toGrayscale(). - Form field highlight color, color of selected form items, and the border color for required form fields using
formHighlightColor(),formItemHighlightColor(), andformRequiredFieldBorderColor(), respectively.