Generate PDFs from a Word template using JavaScript
Nutrient Web SDK enables the generation of PDF documents from Word templates by dynamically merging them with data. You can run this process headlessly in the background or through our intuitive document viewer user interface (UI).
This guide explains creating PDFs from Word templates by:
- Preparing DOCX templates with placeholders
- Populating those templates with structured data
- Exporting to PDF or PDF/A formats
General principles
Word templating consists of the following elements:
- A DOCX file that will be used as the template.
- A template model that contains the placeholder values to replace in the DOCX template.
- Optional configuration for template delimiters.
Template model
The template model can be an external JSON file, or it can be created programmatically. It can contain:
- An optional configuration containing a start delimiter and an end delimiter. If omitted, delimiters default to
{and}. - At least one placeholder-value pair. The placeholder name must correspond to the placeholder defined in the DOCX template.
Classes, methods, and properties
Populating a Word template
Nutrient Web SDK supports replacing placeholder text strings, loops, and dynamic tables. As the amount of content changes, the DOCX template adjusts and reflows across pages as needed. Placeholders maintain their initial formatting from the DOCX template.

The first step is to prepare the DOCX template with placeholders. The example below uses {{ and }} as the delimiters to define the boundaries of placeholders.
Placeholder naming rules
Placeholder names must follow specific character restrictions:
- Supported characters — Letters (a–z, A–Z), numbers (0–9), and underscores (_)
- Valid examples —
{{name}},{{firstName}},{{item_1}},{{TOTAL_AMOUNT}} - Invalid examples —
{{first-name}},{{item.price}},{{user@email}},{{my placeholder}}
These restrictions ensure proper template parsing and avoid conflicts with special characters used in template syntax.

Prepare the data as follows:
const data = { config: { delimiter: { start: "{{", end: "}}", }, }, model: { name: "Alex Smith", text: "Hello World!", amount: "$249.99", },};Load the DOCX template and replace the placeholders in the DOCX template with the data. Then obtain the result as an ArrayBuffer containing the resulting DOCX file:
const buffer = await NutrientViewer.populateDocumentTemplate( { // Other configuration options. document: "template.docx", }, data,);The following image shows what the DOCX file looks like.

Lastly, convert the DOCX file into a PDF. The following example converts it to PDF/A using the PDF/A-1a NutrientViewer.Conformance level. However, you can choose whichever conformance enumeration you prefer:
const pdfBuffer = await NutrientViewer.convertToPDF( { // Other configuration options. document: buffer, }, NutrientViewer.Conformance.PDFA_1A,);Image substitution
In addition to text, loops, and conditionals, NutrientViewer.populateDocumentTemplate() supports image substitution in standalone mode.
Use the following markers in your DOCX template:
{{%name}}— Inserts an inline image.{{%%name}}— Inserts a centered image.
Set the corresponding model entry to an image object with _type: "image":
const data = { config: { delimiter: { start: "{{", end: "}}", }, }, model: { companyName: "Nutrient", logo: { _type: "image", source: "url", url: "https://example.com/logo.png", sizing: "fit-width", width: 96, altText: "Nutrient logo", }, },};Supported image sources
source: "base64"— Raw Base64 image payload indata.source: "dataUrl"— Data URL payload indata(alias ofbase64).source: "url"— HTTP(S) URL inurl(fetched and normalized at runtime).
For URL sources, the host must allow cross-origin requests (CORS). If CORS isn’t configured, use Base64 or data URL payloads instead.
Sizing and multipage behavior
- If
sizingis omitted, preprocessing leaves image sizing unchanged, and the engine applies its default layout behavior. sizing: "original"requires no dimensions.sizing: "fixed"andsizing: "fit-max"require bothwidthandheight(positive numbers).sizing: "fit-width"requireswidth(positive number).sizing: "fit-height"requiresheight(positive number).- For multipage images,
pageNumberis supported and must be a positive 1-based integer.
Validation and limitations
- For raw Base64 payloads, set
formatexplicitly (for examplepng,jpg,gif,bmp,tif). source: "file"isn’t supported in browser public APIs.- SVG payloads and SVG formats aren’t supported in this release.
- If any image entry is invalid or can’t be resolved, the entire templating request fails.
Image entries also support additional optional properties, such as borders, captions, rotation, link targets, and accessibility metadata. For the full list, refer to the NutrientViewer.populateDocumentTemplate API reference.
Advanced example: Looping through data sets
Loops enable you to dynamically repeat sections of content based on arrays in your data model. This is perfect for invoice line items, employee lists, or any scenario where you need to repeat content based on variable amounts of data.
When you have an array of data, the template section repeats once for each item in the array. For example, if your data contains three invoice items, the template creates three rows automatically.
lineItems: [ { product: "Laptop", price: "$999" }, { product: "Mouse", price: "$25" }, { product: "Keyboard", price: "$75" },];Creating loops
To create a loop, add an array of objects to the data model. For every object within the array, the loop’s body is replicated during each cycle of the loop when the DOCX and data model are processed.
The steps below outline how the complete loop process works.
Step 1: Prepare your data
Create a data structure with arrays that will drive the loops:
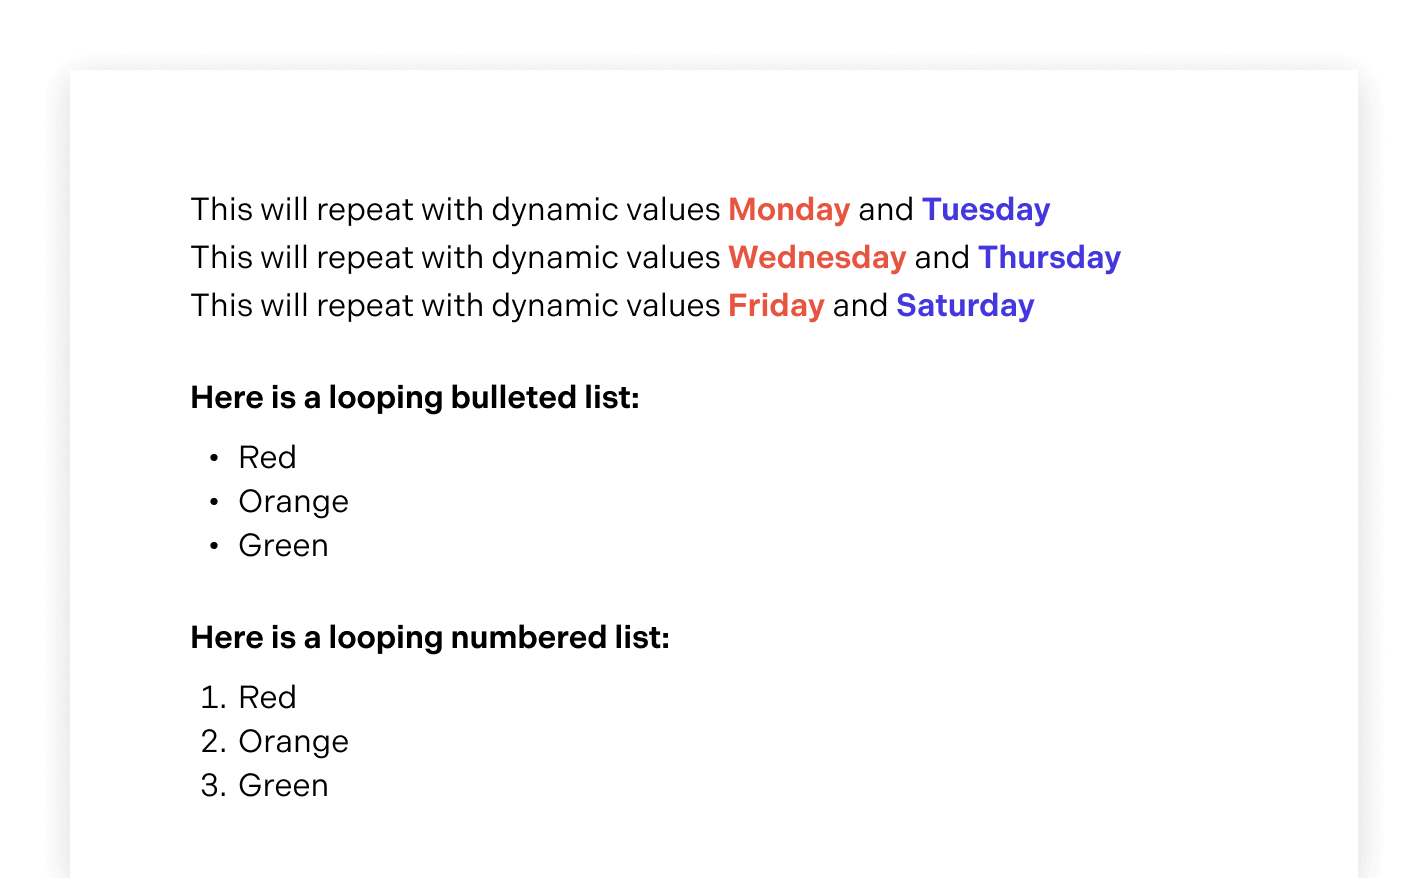
const data = { config: { delimiter: { start: "{{", end: "}}", }, }, model: { loop1: [ { loopDesc1: "Monday", loopDesc2: "Tuesday" }, { loopDesc1: "Wednesday", loopDesc2: "Thursday" }, { loopDesc1: "Friday", loopDesc2: "Saturday" }, ], loop2: [{ loopDesc: "Red" }, { loopDesc: "Orange" }, { loopDesc: "Green" }], },};Step 2: Create your DOCX template with loop placeholders
The template defines where and how the loops will repeat content.
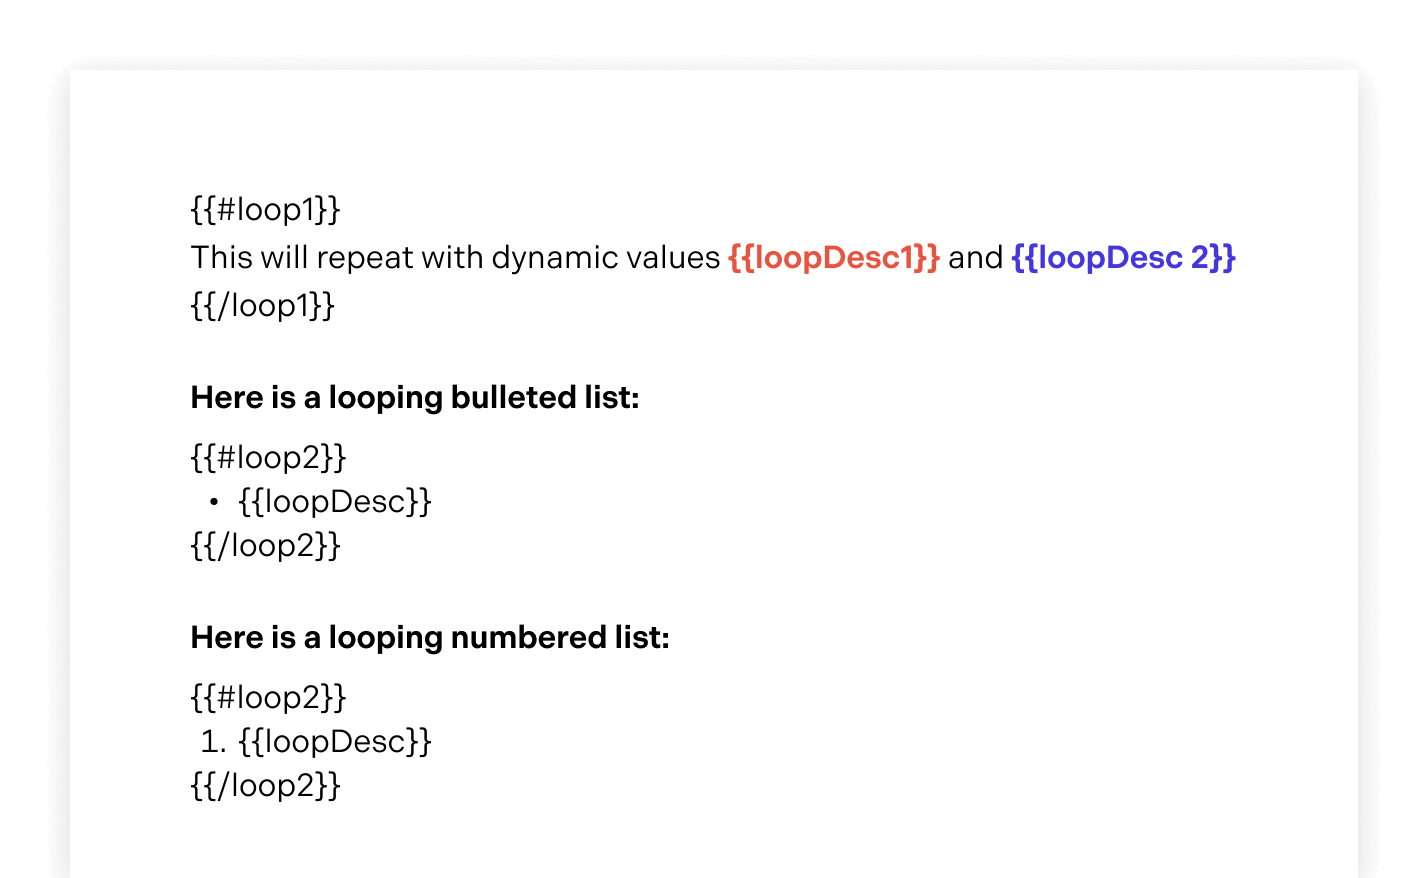
For bulleted or numbered lists, the opening placeholder must immediately precede the start of the list, and the closing placeholder must immediately follow the end of the list.
Step 3: Generate the populated document
When you combine the data from Step 1 with the template from Step 2, the loops automatically generate the repeated content.
For an example of combining loops with tables, refer to the dynamic table loop example below.
Nested loops example
Nested loops enable you to iterate through multiple levels of data structures, such as categories that contain multiple items. This is particularly useful for creating complex documents such as menus, catalogs, or reports with hierarchical data.
Real-world scenario: Restaurant menu
Consider a restaurant menu where you have multiple sections (starters, entrees, sides), and each section contains multiple items with their descriptions.
Step 1: Prepare nested data structure
const data = { config: { delimiter: { start: "{{", end: "}}", }, }, model: { title: "New Year’s", subtitle: "celebration", sections: [ { title: "STARTERS", items: [ { title: "SALSA TRIO & FRESH CHIPS", description: "Black Bean Salsa, Green Chili, Pico de Gallo", hasDescription: true, }, { title: "SHRIMP & AVOCADO CEVICHE", description: "Gulf Shrimp Marinated in Lime with Cilantro", hasDescription: true, }, ], }, { title: "ENTREES", items: [ { title: "GRILLED ACHIOTE CHICKEN", description: "Red Chili & Avocado Puree", hasDescription: true, }, { title: "SHREDDED BEEF ENCHILADAS", description: "Green Chili & Cheddar", hasDescription: true, }, ], }, { title: "SIDES", items: [ { title: "CALABACITAS", description: "Zucchini, Poblano Corn, Black Beans", hasDescription: true, }, { title: "CILANTRO LIME RICE", description: null, hasDescription: false, }, ], }, ], },};Step 2: Create your DOCX template with nested loop placeholders
In your Word template, structure the placeholders as demonstrated below:
{{title}} {{subtitle}}
{{#sections}}{{title}}{{#items}}• {{title}}{{#hasDescription}}{{description}}{{/hasDescription}}{{/items}}
{{/sections}}
Understanding the loop structure
- Outer loop — (
{{#sections}}...{{/sections}}) iterates through each menu section - Inner loop — (
{{#items}}...{{/items}}) iterates through each item within the current section - Conditional — (
{{#hasDescription}}...{{/hasDescription}}) only shows the description if the Boolean flag istrue.
Step 3: Generated output
When processed, this nested structure will generate the following output:
New Year’s celebration
STARTERS• SALSA TRIO & FRESH CHIPSBlack Bean Salsa, Green Chili, Pico de Gallo• SHRIMP & AVOCADO CEVICHEGulf Shrimp Marinated in Lime with Cilantro
ENTREES• GRILLED ACHIOTE CHICKENRed Chili & Avocado Puree• SHREDDED BEEF ENCHILADASGreen Chili & Cheddar
SIDES• CALABACITASZucchini, Poblano Corn, Black Beans• CILANTRO LIME RICE
Adding conditional logic
Conditionals enable a template to dynamically insert and format data based on conditions defined within the template itself. Conditionals can be combined with loops for more complex dynamic documents.
The template syntax for implementing conditionals uses special markers to denote the beginning and end of a conditional block, as well as to indicate the condition being tested:
#condition— Marks the beginning of a block that should be rendered if the condition istrue.^condition— Marks the beginning of a block that should be rendered if the condition isfalse(theelsepart)./condition— Marks the end of a conditional block.
The following is an example showing this syntax for an isBlue condition:
{{#isBlue}}Blue{{/isBlue}}{{^isBlue}}Red{{/isBlue}}{ config: { delimiter: { start: "{{", end: "}}" } }, model: { isBlue: true }}Below is a more complex example with conditionals.
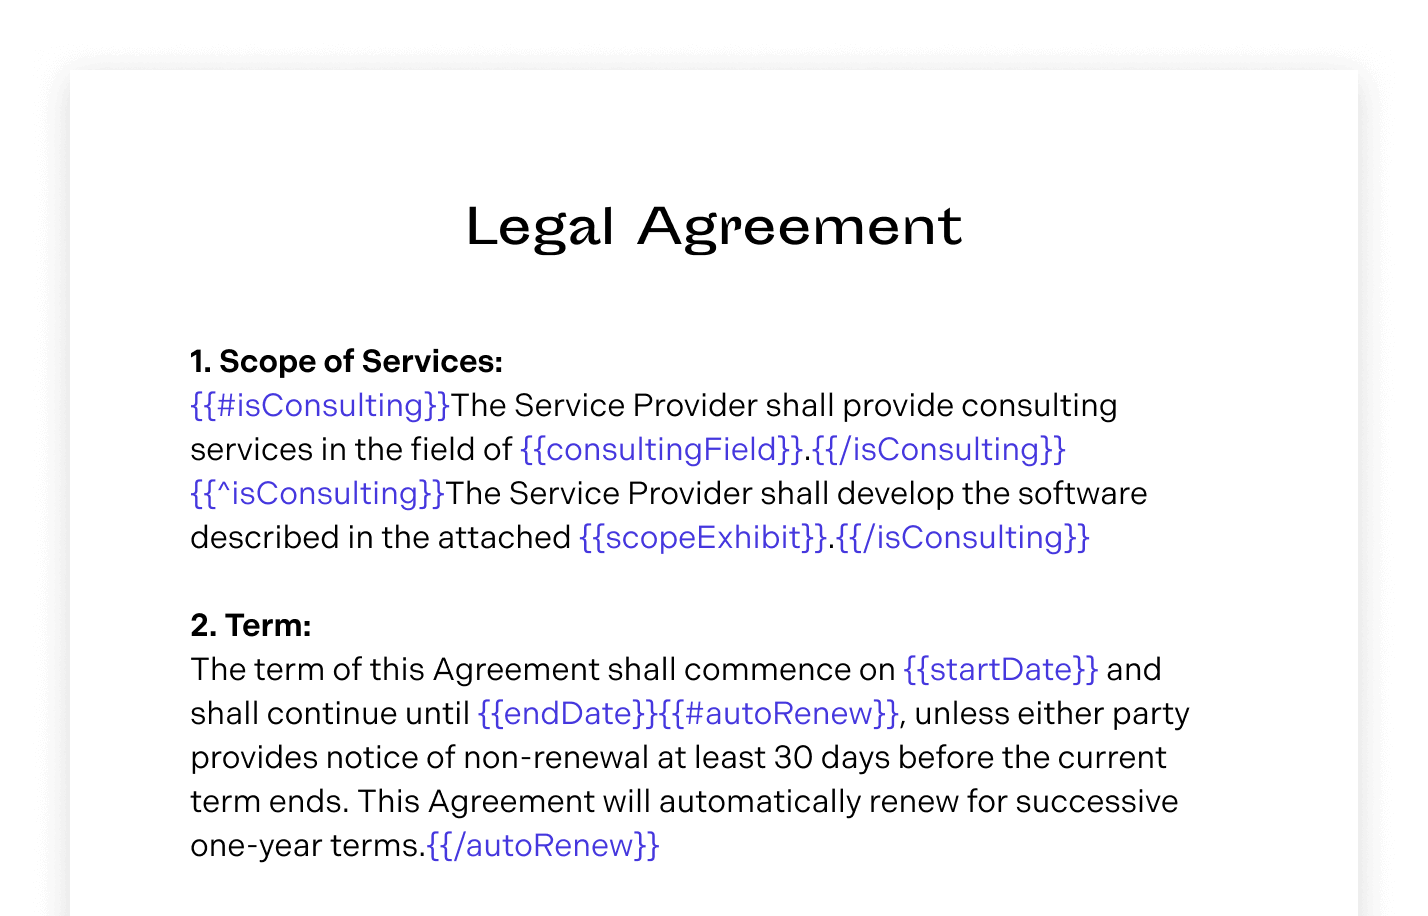
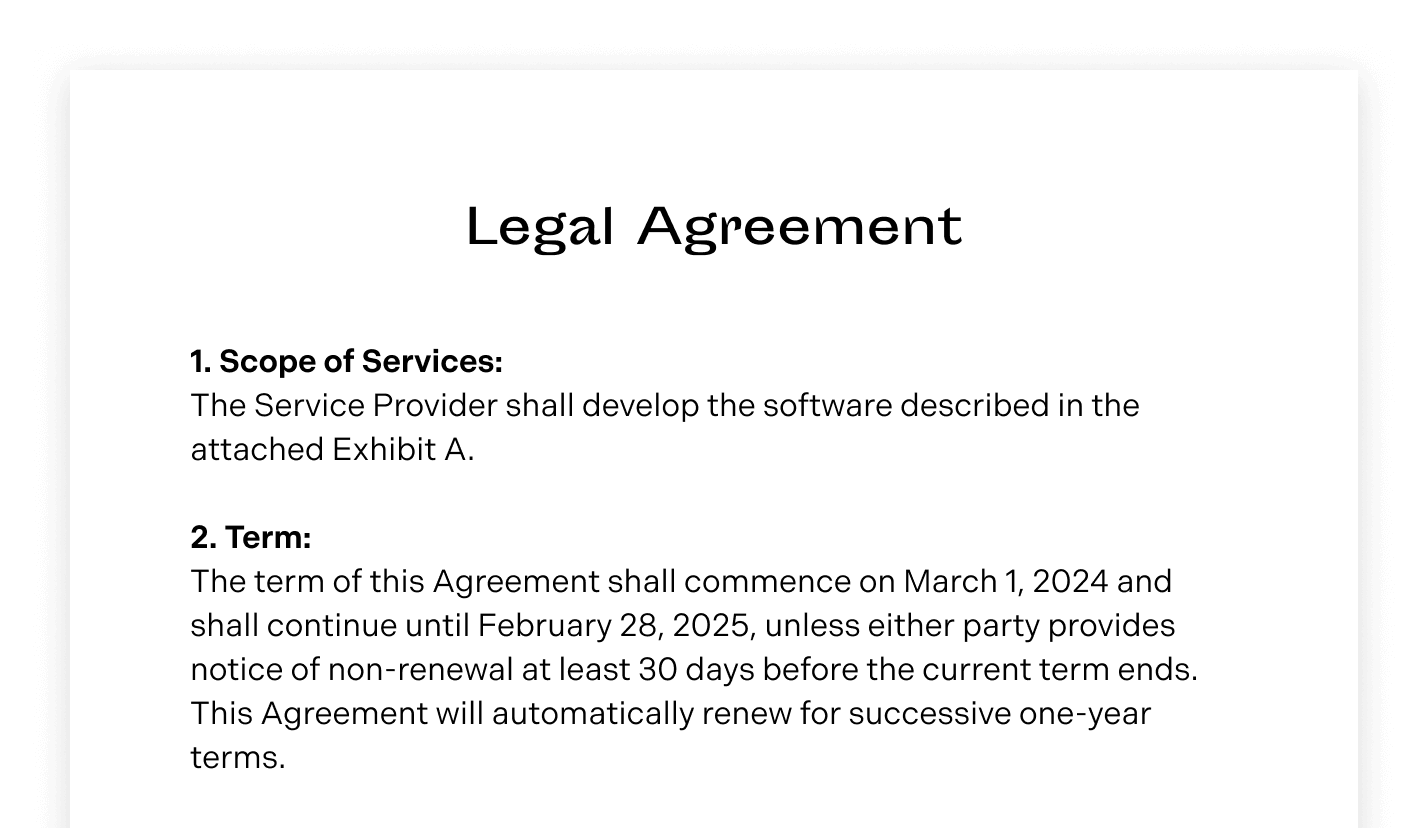
It’s possible to combine the template above with the following data:
{ config: { delimiter: { start: "{{", end: "}}" } }, model: { isConsulting: false, consultingField: "N/A", scopeExhibit: "Exhibit A", startDate: "March 1, 2024", endDate: "February 28, 2025", autoRenew: true }}In this case, the output will be the following DOCX, which can then be converted to PDF.
Dynamic table loop example
This example shows how to use loops for dynamically inserting rows into a table. You can download the DOCX template used in this example.
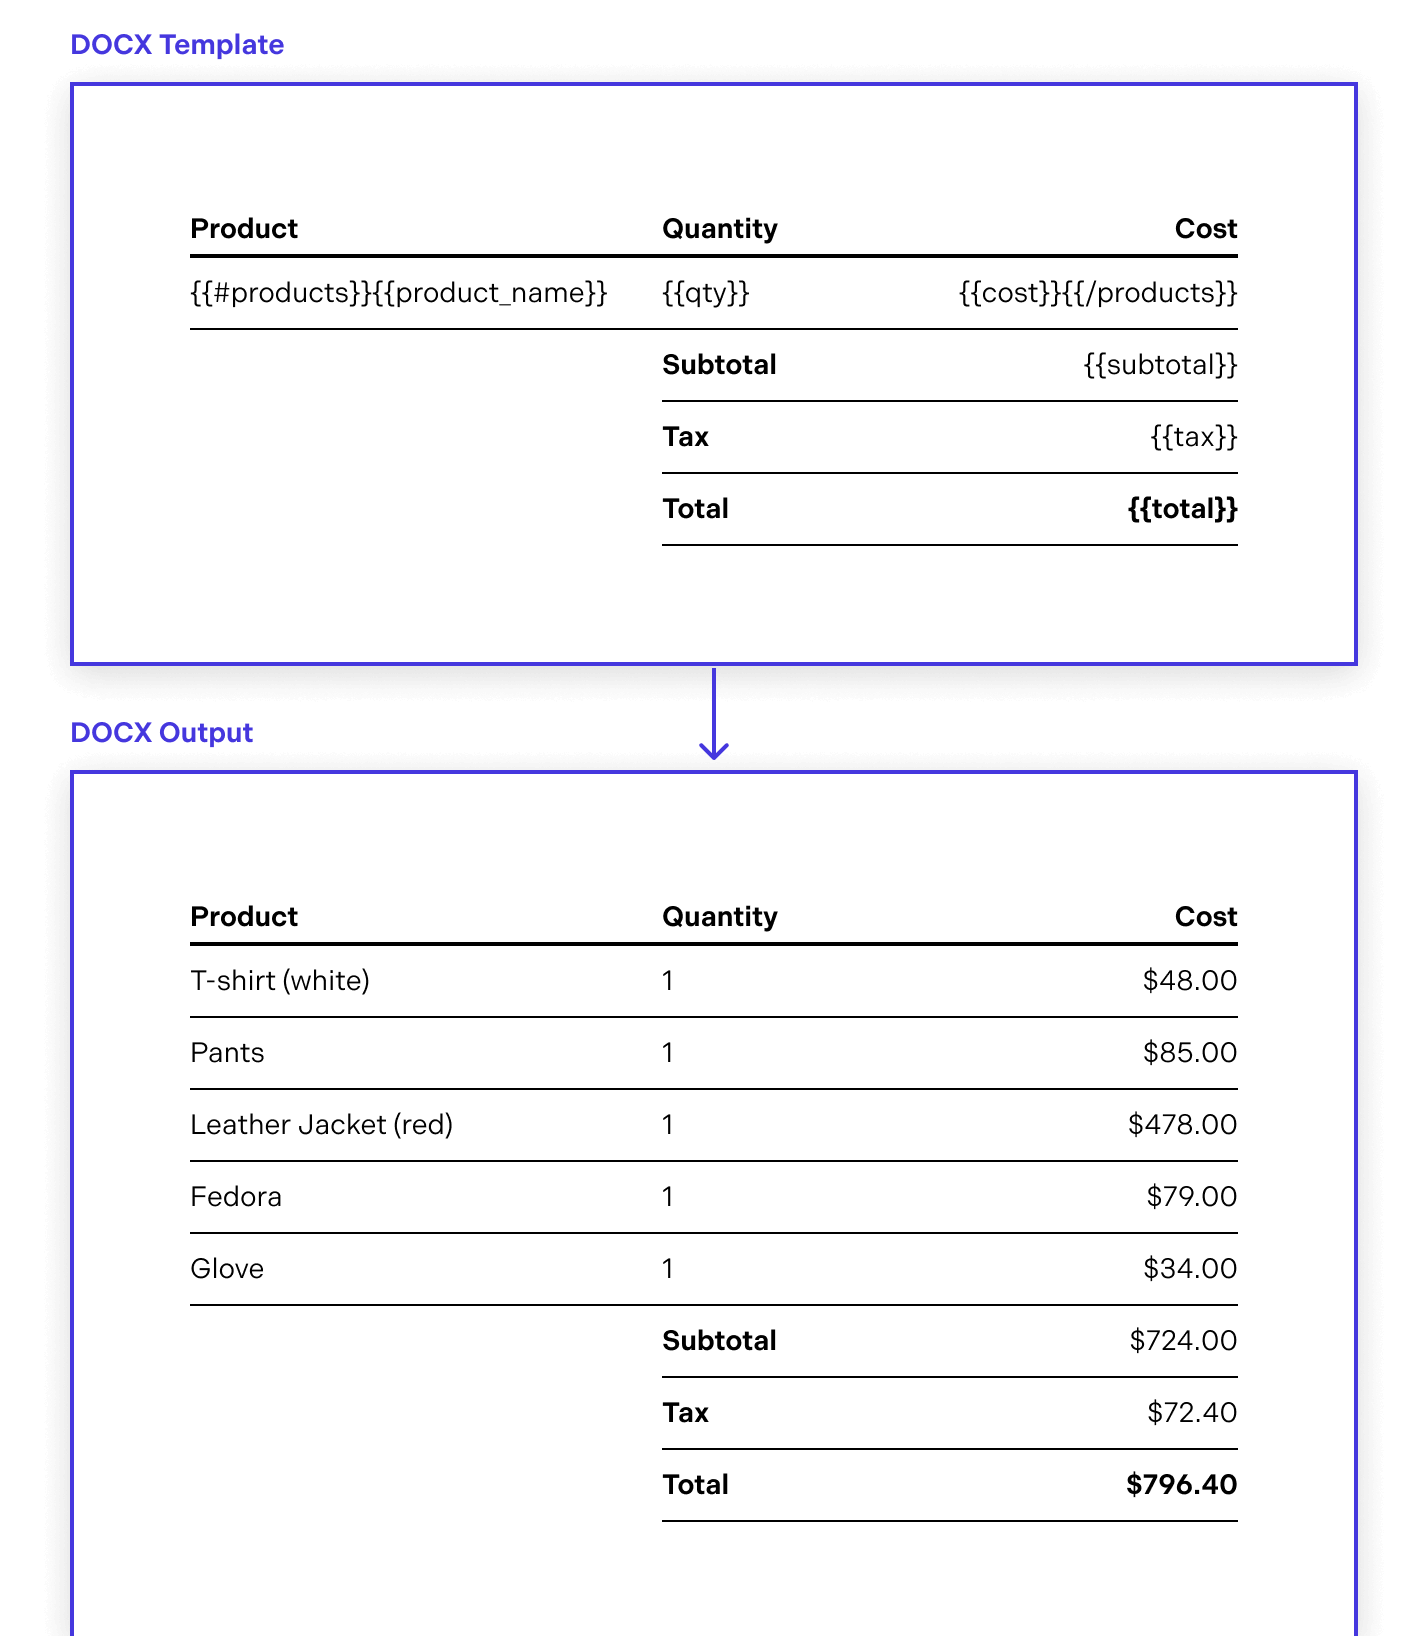
Using a model loaded from a JSON file
You can populate the DOCX template with data from a JSON file — download the JSON file used in this example:
const data = await fetch("table.json").then((response) => response.json());const docx = await NutrientViewer.populateDocumentTemplate(  {    // Other configuration options.    document: "table.docx",  },  data,);
const pdfBuffer = await NutrientViewer.convertToPDF(  {    // Other configuration options.    document: docx,  },  NutrientViewer.Conformance.PDFA_1A,);
Automatic reflow example
Text reflow refers to the automatic adjustment of text within a document or display area to ensure it fits within the given space without overflowing or leaving excessive empty space. This process involves moving words and characters to new lines, pages, or columns as needed based on the available width and height of the display area, the font size, and other formatting settings.
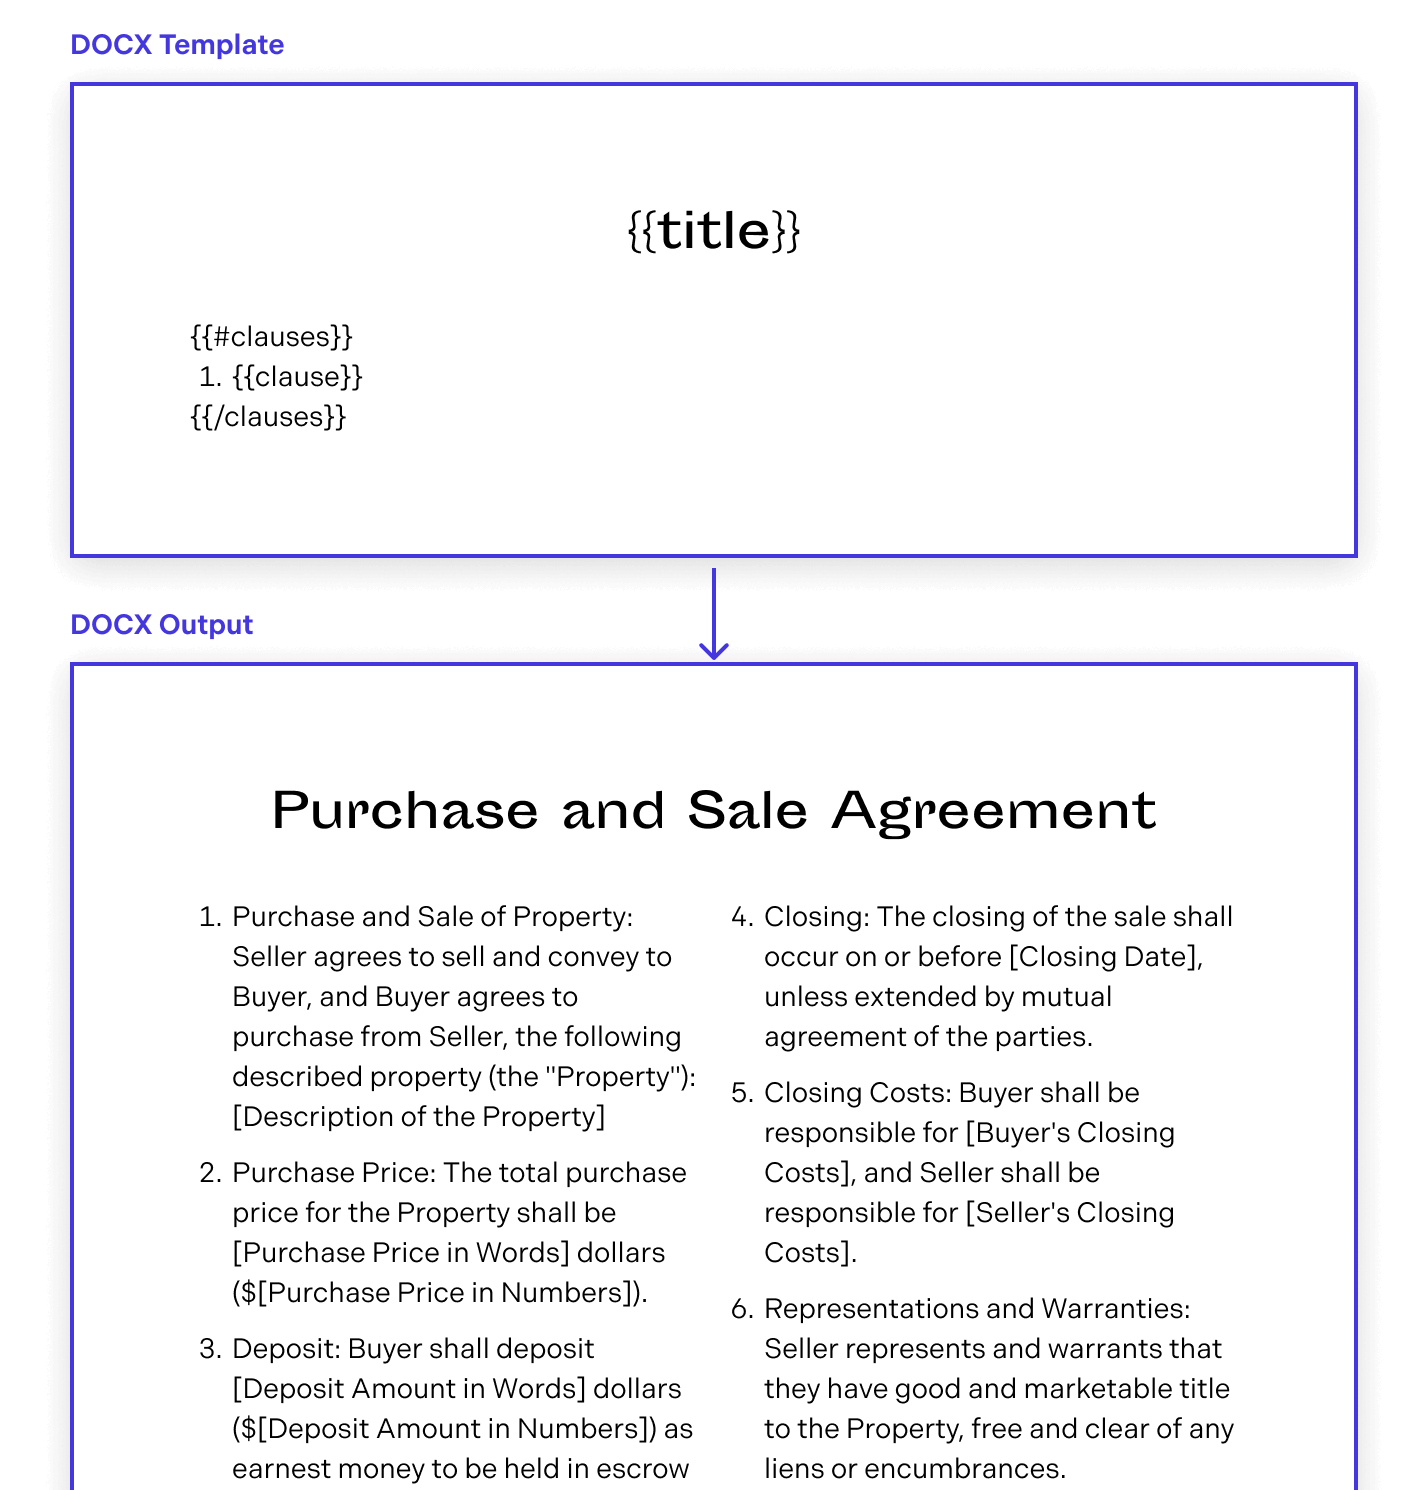
Below is the JSON you’ll use:
{ "config": { "delimiter": { "start": "{{", "end": "}}" } }, "model": { "clauses": [ { "clause": "Lorem ipsum dolor sit amet, consectetur adipiscing elit..." }, { "clause": "Lorem ipsum dolor sit amet, consectetur adipiscing elit..." }, { "clause": "Lorem ipsum dolor sit amet, consectetur adipiscing elit..." }, { "clause": "Lorem ipsum dolor sit amet, consectetur adipiscing elit..." }, { "clause": "Lorem ipsum dolor sit amet, consectetur adipiscing elit..." } ], "title": "Purchase and Sale Agreement" }}The example below shows how to generate a PDF from a DOCX template where the content is reflowed into another column by using a data model loaded from a JSON file. For an example of how to create the model programmatically, refer to the dynamic table loop example above.
data = await fetch("data.json").then((response) => response.json());const docx = await NutrientViewer.populateDocumentTemplate(  {    // Other configuration options.    document: "reflow.docx",  },  data,);
const pdfBuffer = await NutrientViewer.convertToPDF(  {    // Other configuration options.    document: docx,  },  NutrientViewer.Conformance.PDFA_1A,);