Building a comment thread UI with the customization API
This guide demonstrates building a custom comment thread user interface (UI) with all the core functionalities for viewing, adding, editing, and deleting comments.
It also showcases how you can use a framework like React to simplify the custom UI code and use Nutrient’s design system — Baseline UI(opens in a new tab) — for out-of-the-box React components that match the look and feel of Nutrient’s default UI.
Prefer to jump to the code? Check out the full example on GitHub.
Setup
This guide uses React, but you can use any frontend framework that works with DOM nodes. Read more about the customization API in the introduction guide.
Follow the getting started guide to set up a React + Vite project with Nutrient Web SDK.
Installing Baseline UI
Install Baseline UI packages:
Include Baseline UI stylesheets in your app. Add the following to a CSS file that is being used in your project (e.g.
App.cssor<your component>.css):App.css @import "@baseline-ui/tokens/dist/index.css";@import "@baseline-ui/core/dist/index.css";@layer bui-reset {* {box-sizing: border-box;margin: 0;padding: 0;-moz-osx-font-smoothing: grayscale;-webkit-font-smoothing: antialiased;}}You’re now ready to use Baseline UI components in your React app.
Rendering a React component into a slot
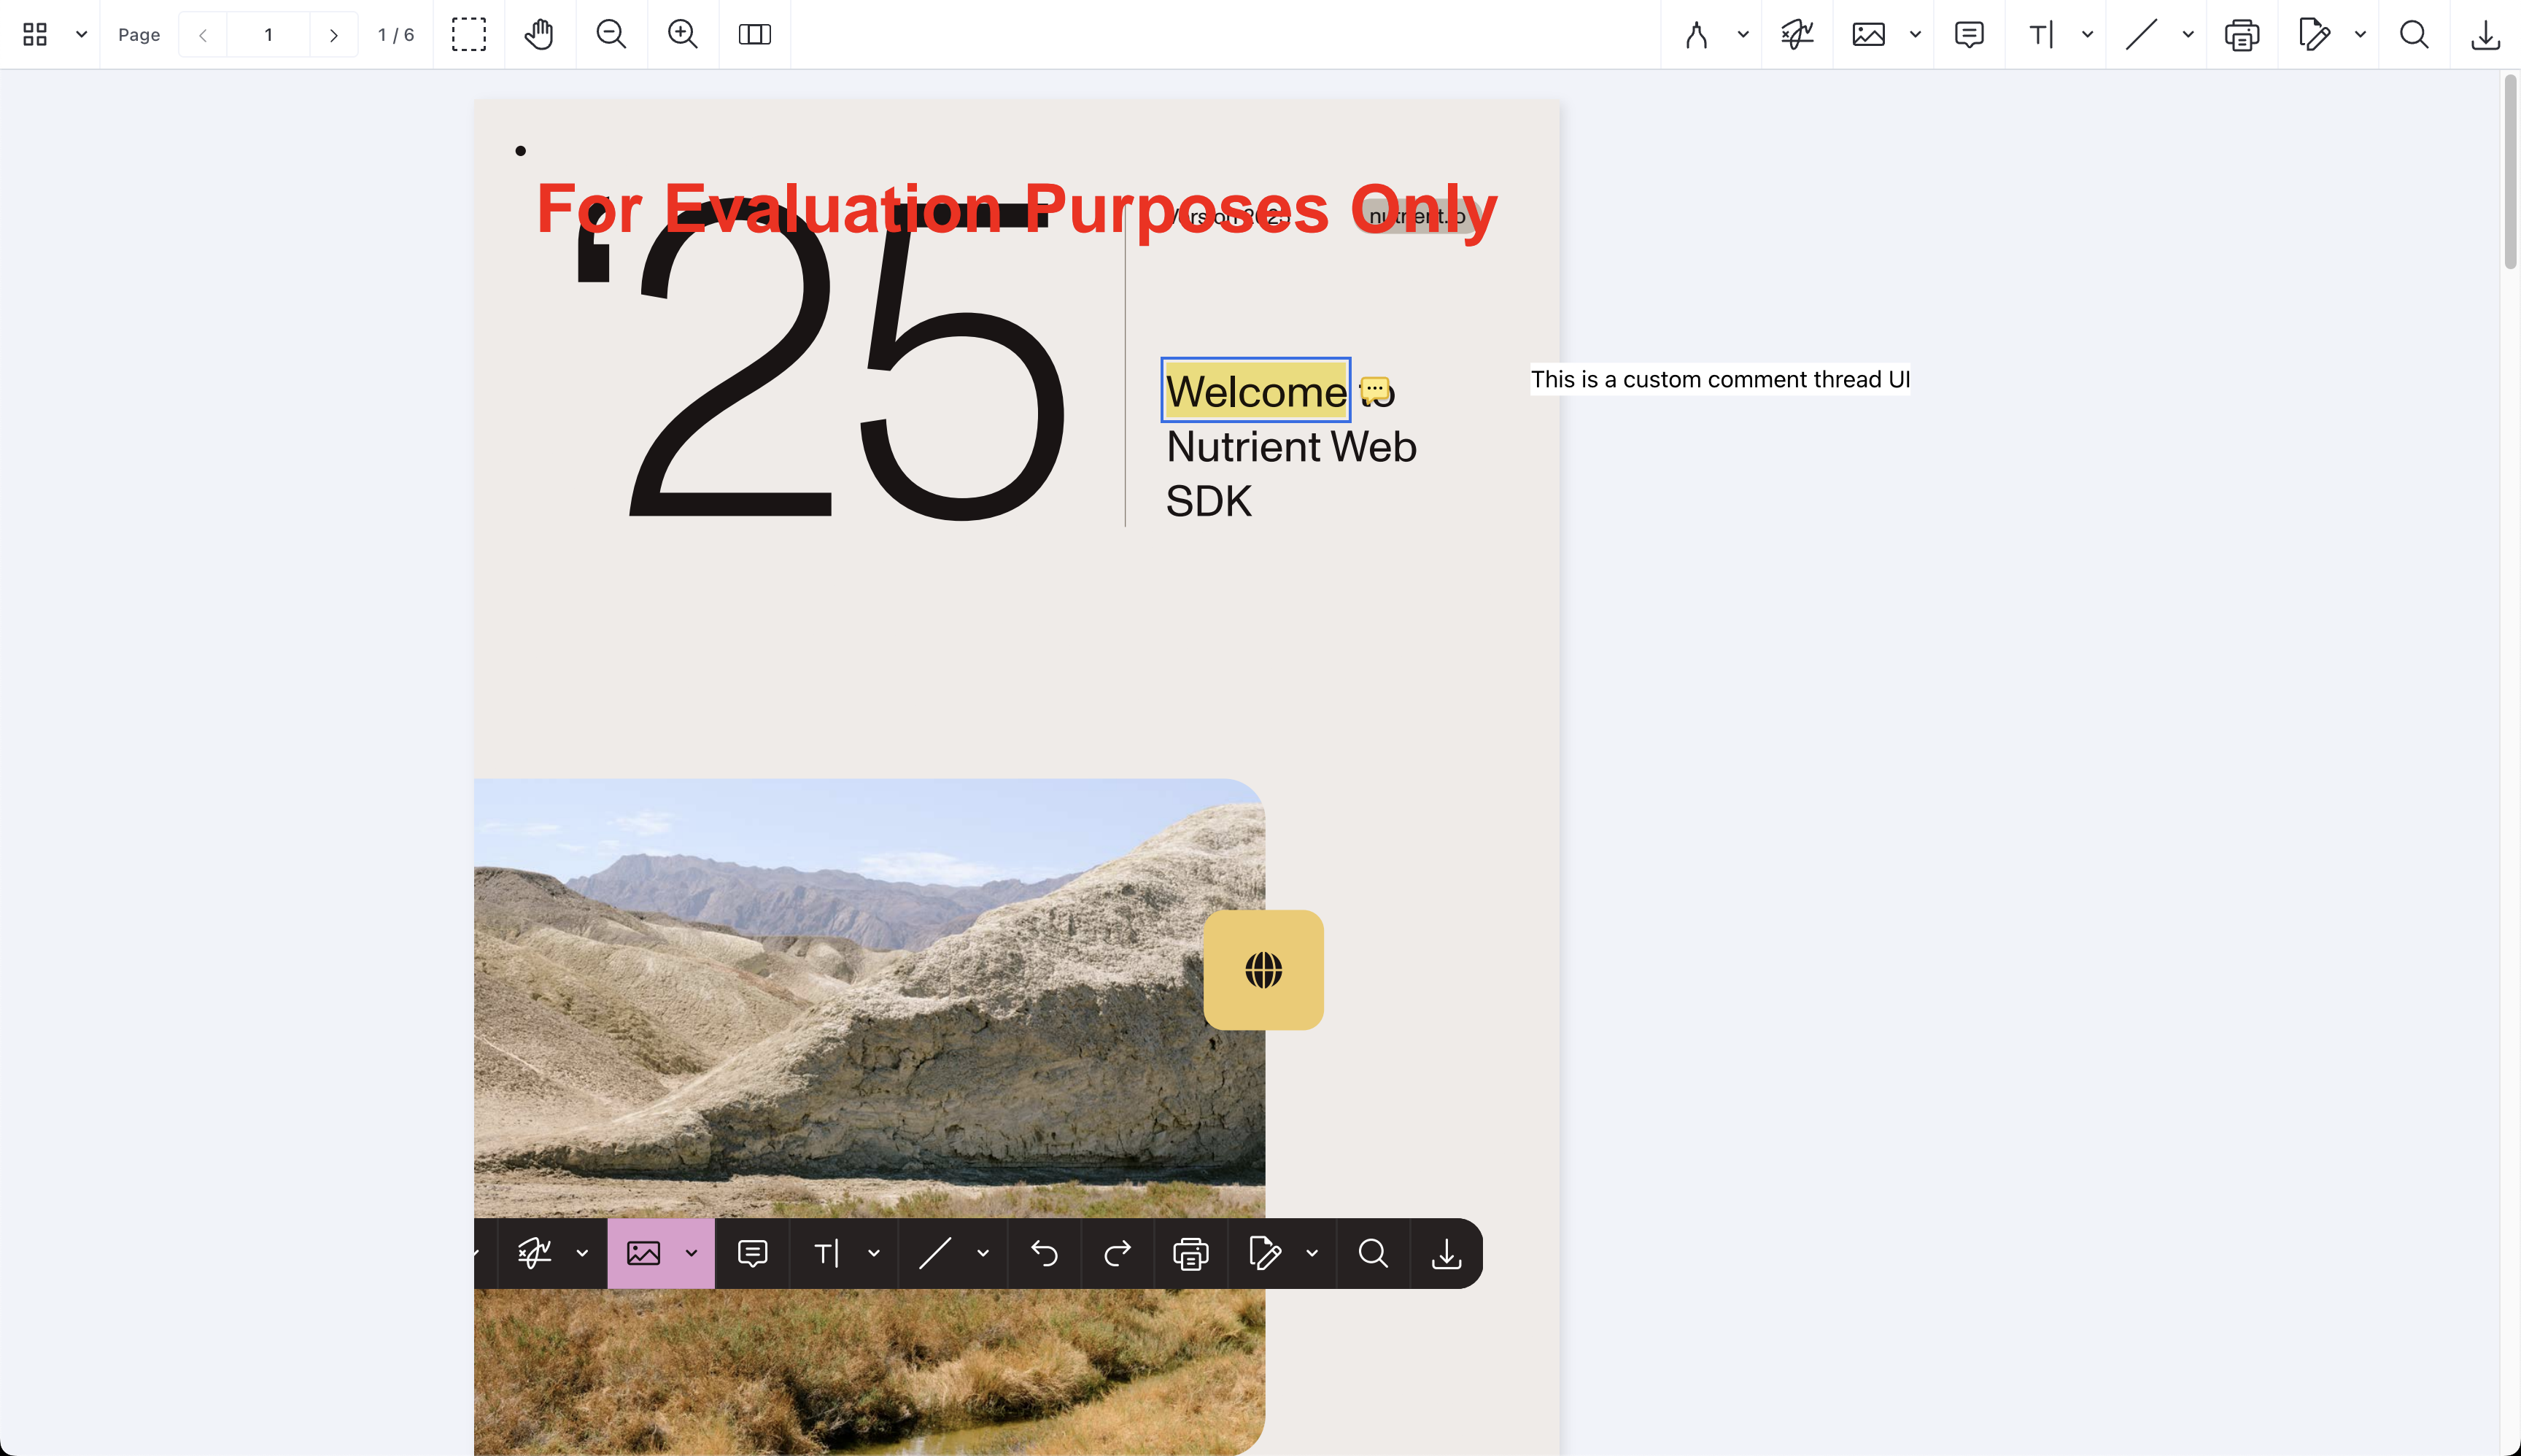
Start by rendering a simple React component into the commentThread slot.
Create a new React component at
src/CommentThread.tsx:CommentThread.tsx import React from "react";const CommentThread: React.FC = () => {return (<div className="comment-thread-container">This is a custom comment thread UI</div>);};export default CommentThread;Create a CSS file in a public directory (
public/comment-thread.cssfor Vite), which will be passed to the SDK via thestyleSheetsconfiguration:comment-thread.css .comment-thread-container {min-width: 240px;background-color: white;}Render the
CommentThreadcomponent into thecommentThreadslot using the customization API. The code insrc/App.tsxbuilds upon the code from the getting started guide, with important changes highlighted. Update yourApp.tsxfile:App.tsx import { useEffect, useRef } from "react";// Use `createRoot` to render our React component// as an isolated React app into the slot.import { createRoot } from "react-dom/client";import "./App.css";import CommentThread from "./CommentThread";function App() {const containerRef = useRef(null);useEffect(() => {const container = containerRef.current;let cleanup = () => {};(async () => {const NutrientViewer = (await import("@nutrient-sdk/viewer")).default;// Ensure there's only one `NutrientViewer` instance.NutrientViewer.unload(container);const baseUrl = `${window.location.protocol}//${window.location.host}/${import.meta.env.PUBLIC_URL ?? ""}`;if (container && NutrientViewer) {NutrientViewer.load({container,document:"https://www.nutrient.io/downloads/nutrient-web-demo.pdf",baseUrl,// Pass custom stylesheets path for the custom comment thread UI.styleSheets: [`${baseUrl}comment-thread.css`],// Pass the UI customization config.ui: {commentThread: (instance, id) => {const container = document.createElement("div");const root = createRoot(container);return {// Provide the DOM node; the UI is handled by `CommentThread` component.render: () => container,onMount: () => {// Render the React component once the slot is mounted.root.render(<CommentThread instance={instance} id={id} />);},onUnmount: () => {// Clean up the React root when the slot is unmounted.root.unmount();},};},},});}cleanup = () => {NutrientViewer.unload(container);};})();return cleanup;}, []);// Set the container height and width.return (<div ref={containerRef} style={{ height: "100vh", width: "100vw" }} />);}export default App;When you open a comment thread, you’ll see the custom UI — powered by React — instead of the default UI.
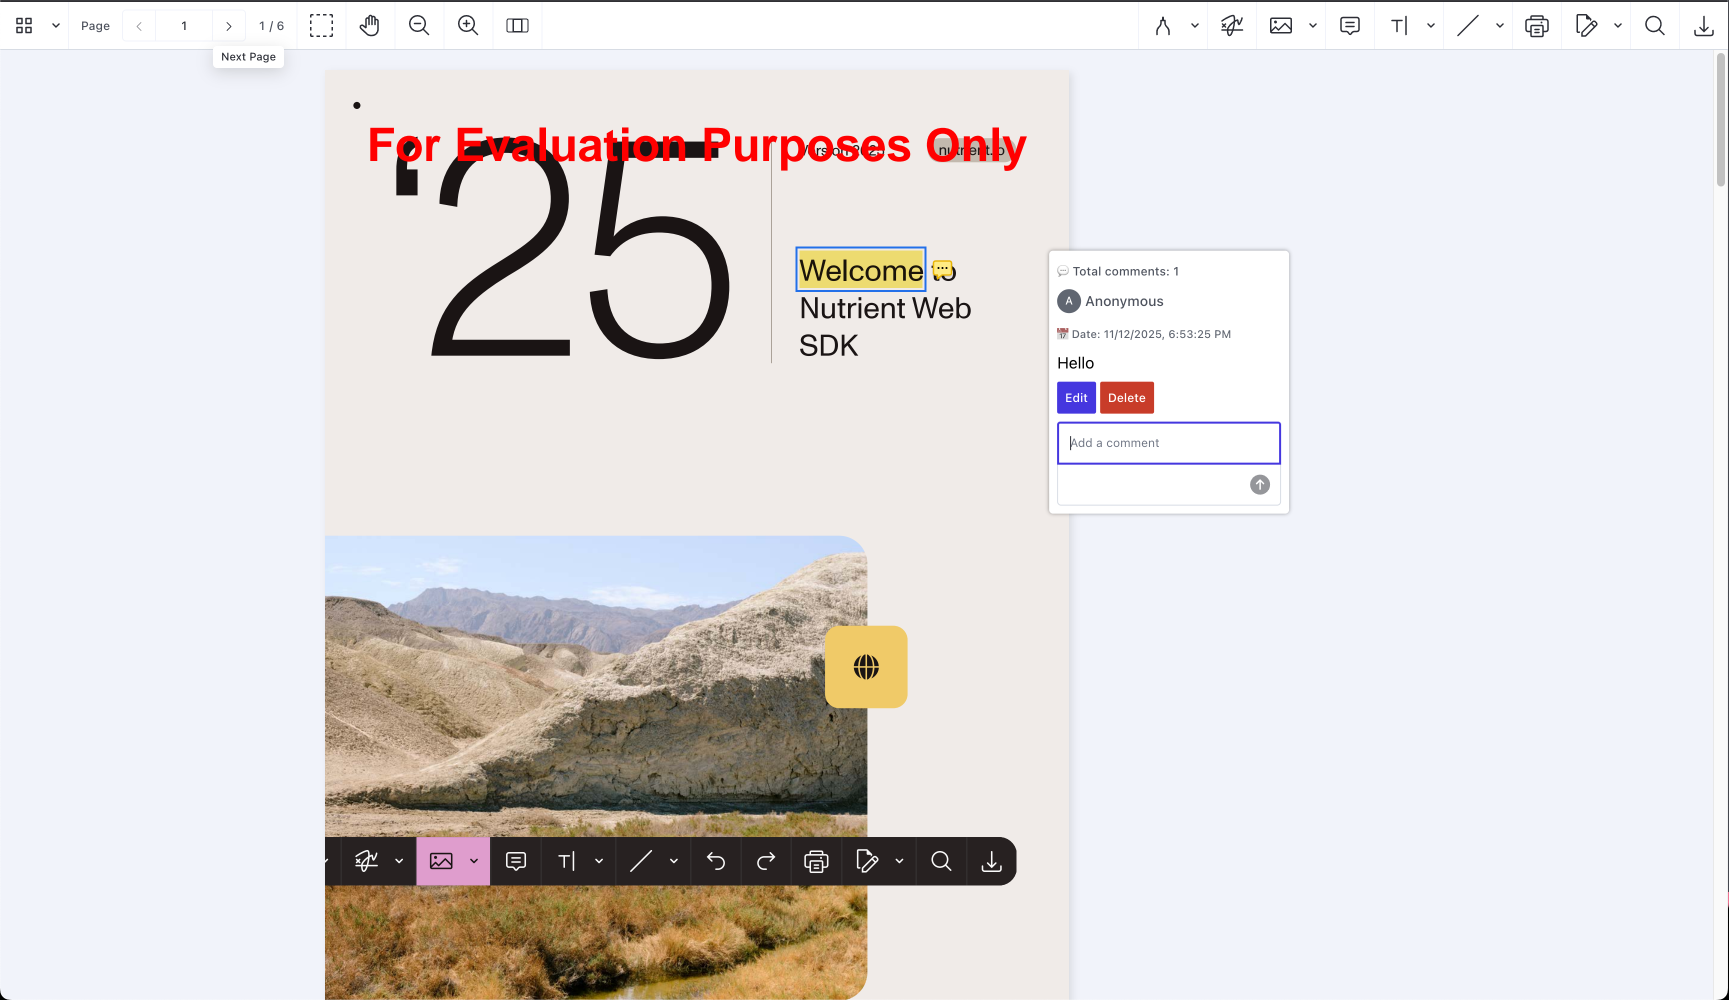
Building the comment thread UI
To build the fully functional comment thread UI, use APIs available on instance — which is the mounted document instance you get by using NutrientViewer.load — along with components from Baseline UI.
Use the following:
getComments— To fetch all comments and display them in the UI.getAnnotations— To fetch annotations for updating the root annotation associated with comment thread.comments.changeevent — To listen for changes in comments and update the UI accordingly.instance.create— To add new comments.instance.update— To edit comments.instance.delete— To delete comments.- Baseline UI(opens in a new tab) components —
ActionButton,Avatar,Box,Editor, andTextto build the UI.
Update the CommentThread component to handle viewing, adding, editing, and deleting comments. The code is annotated to explain the concepts inline:
import {  ActionButton,  Avatar,  Box,  Editor,  FrameProvider,  I18nProvider,  Text,  ThemeProvider,} from "@baseline-ui/core";import { themes } from "@baseline-ui/tokens";import { Comment, type Instance, type List } from "@nutrient-sdk/viewer";import React, { useEffect } from "react";
interface CommentThreadProps {  instance: Instance | null;  id: string;}
const CommentThread = (props: CommentThreadProps) => {  const { instance, id } = props;  const [comments, setComments] = React.useState<null | List<Comment>>(null);  // We only allow editing one comment at a time  const [editCommentId, setEditCommentId] = React.useState<string | null>(null);
  useEffect(() => {    const syncComments = () => {      // `getComments` lets us fetch all comments.      instance?.getComments().then((initialComments) => {        // Filter comments that belong to this thread using the ID passed to the component via props.        const commentsInThread = initialComments.filter((c) => c.rootId === id);        setComments(commentsInThread);      });    };
    syncComments();
    // Since comments can change due to various factors, we add a listener to sync them.    instance?.addEventListener("comments.change", syncComments);  }, [instance, id]);
  return (    <ThemeProvider theme={themes.base.light}>      <FrameProvider>        <I18nProvider shouldLogMissingMessages={false} locale="en-US">          <Box            padding="md"            backgroundColor="background.primary.subtle"            borderRadius="sm"            boxShadow="low"            className="comment-thread-container"          >            <Text size="sm" type="label" className="comment-thread-counter">              💬 Total comments: {comments?.size ?? 0}            </Text>            {comments?.map((comment) => (              <div key={comment.id} className="comment-container">                <div className="comment-creator">                  <Avatar                    name={comment.creatorName ?? "Anonymous"}                    showInitials                  />                  <Text type="label" size="md">                    {comment.creatorName ?? "Anonymous"}                  </Text>                </div>                <div className="comment-date">                  <Text type="helper" size="sm">                    📅 Date: {comment.createdAt?.toLocaleString()}                  </Text>                </div>                {editCommentId === comment.id ? (                  <Editor                    placeholder="Edit your comment"                    autoFocus                    clearOnSave                    clearOnCancel                    saveOnEnter                    aria-label="Comment"                    defaultValue={comment.text.value ?? ""}                    onSave={(value) => {                      const updatedComment = comment.set("text", {                        format: "plain",                        value,                      });
                      // Use the update API to save the edited comment.                      instance?.update(updatedComment).then(() => {                        setEditCommentId(null);                      });                    }}                  />                ) : (                  <>                    <div className="comment-content">{comment.text.value}</div>                    <ActionButton                      label="Edit"                      onClick={() => setEditCommentId(comment.id)}                      className="comment-button"                    />                    <ActionButton                      label="Delete"                      variant="error"                      // Use the delete API to remove the comment.                      onClick={() => instance?.delete(comment)}                      className="comment-button"                    />                  </>                )}              </div>            ))}            <Editor              placeholder="Add a comment"              aria-label="Comment"              autoFocus              clearOnSave              saveOnEnter              onSave={async (value) => {                if (!instance) {                  return;                }
                const commentsInThread = (await instance.getComments()).filter(                  (c) => c.rootId === id,                );
                const isFirstComment = commentsInThread.size === 0;
                if (isFirstComment) {                  /*                   * In case of first comment, the SDK already creates a draft comment along with `CommentMarkerAnnotation`.                   * So we need to update that draft comment instead of creating a new one.                   */
                  const draftCommentInThread: Comment =                    // `includeDrafts` option helps us fetch draft comments.                    (await instance.getComments({ includeDrafts: true }))                      .filter((c) => c.rootId === id && c.pageIndex === null)                      .first();
                  const annotations = await instance.getAnnotations(                    instance.viewState.currentPageIndex,                  );
                  /* We also need to mark the associated `CommentMarkerAnnotation` as the root of the comment thread. */                  const rootAnnotation = annotations                    .find((a) => a.id === id)                    ?.set("isCommentThreadRoot", true);
                  if (!rootAnnotation) {                    return;                  }
                  // Update the draft comment with the content and `pageIndex`, which publishes it.                  const newComment = draftCommentInThread                    .set("text", {                      format: "plain",                      value,                    })                    .set("pageIndex", instance.viewState.currentPageIndex);
                  // Use update API to update both the draft comment and the root annotation.                  await instance.update([newComment, rootAnnotation]);                } else {                  /* For subsequent comments, we can create new comments without relying on draft comments. */                  const newComment = new Comment({                    rootId: id,                    text: {                      format: "plain",                      value,                    },                    pageIndex: instance.viewState.currentPageIndex,                    createdAt: new Date(),                  });
                  // Use create API to add the new comment.                  await instance.create(newComment);                }              }}            />          </Box>        </I18nProvider>      </FrameProvider>    </ThemeProvider>  );};
export default CommentThread;
There are additional styles you can add to public/comment-thread.css:
.comment-thread-container {  min-width: 240px;}
.comment-thread-counter {  margin-bottom: 8px;}
.comment-button {  margin-right: 4px;  margin-bottom: 8px;}
.comment-creator {  display: flex;  gap: 4px;  align-items: center;  margin: 8px 0;}
.comment-content {  margin: 8px 0;}
After these changes, you’ll have a fully functional custom comment thread UI that allows viewing, adding, editing, and deleting comments.
Conclusion
You’ve successfully built a custom comment thread UI using Nutrient Web SDK’s customization API, React, and Baseline UI components.
The customization API lets you customize various parts of the Nutrient Web SDK UI to fit your application’s needs. It also makes it easier to maintain custom code by letting you author your custom UI with a framework of your choice that can work with DOM nodes.
Check out the full example on GitHub.