Common AI configurations
This guide covers shared configuration steps for all AI features in Nutrient Workflow Automation. Complete these steps before setting up any AI feature.
Prerequisites
Before beginning, ensure you have:
- An account with an AI provider (OpenAI, Claude, etc.).
- A valid API key from the AI provider.
- Write access to AI Sources in Nutrient Workflow Automation.
- In Workflow Automation, AI Sources is the settings area where you create and manage AI connections. An AI source combines the AI provider, selected model, and stored credential, and it can be reused across AI features such as using AI data extraction to populate forms, generating forms using AI, agentic approval, and Workflow’s Workflow Assistant.
- AI Sources is managed from Settings in your system configuration. Setup relies on credentials stored in Credential Center, so this access is typically limited to administrators. If you need write access to create or edit AI sources, contact your Workflow Automation system administrator.
Supported file types and sizes
AI providers accept common document formats such as PDF, DOC, DOCX, and TXT. Specific limits and supported formats vary by provider.
- OpenAI
- Accepts a range of file types (TXT, PDF, DOCX, CSV, JSON, etc.).
- For the latest supported file types and size limits, refer to the OpenAI documentation(opens in a new tab).
- Claude (Anthropic)
- Supports multiple text-based file types, including PDFs.
- For the latest supported file types and size limits, refer to Anthropic’s documentation(opens in a new tab).
Always verify the current constraints directly from the provider’s documentation, as limits may change over time.
Creating a new API credential and AI connection
Obtain an API key from your AI provider:
- OpenAI — Log in to your OpenAI account and create a new API key.
- Claude (Anthropic) — Log in to your Claude account and follow the instructions to create a new API key.
Open Credential Center and add a new credential, or create the credential inline from the AI Source screen when configuring the connection.
Enter a credential name — for example, OpenAI API Key or Claude Key — paste the API key, and save.
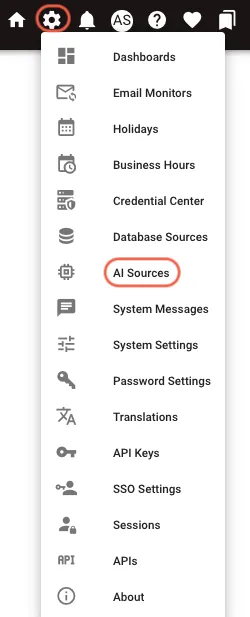
Open AI Sources.
Click Add Connection. Enter a name and description for the connection and select the AI Provider and Model.
Available providers and models in AI Sources are maintained by the platform and may change over time as provider definitions are updated. Deprecated models are hidden when creating new connections. If you edit an existing connection that uses a deprecated model, the UI shows a warning and requires selecting a supported model before saving.
Some providers include model options labeled with (latest), such as Claude Sonnet (latest). These options track the latest supported model in that model family automatically. If you select a (latest) option, Workflow Automation stores a latest-model alias for the AI source and resolves it to the current supported model when the source is used. If a newer model in that family becomes the supported latest model later, the AI source follows it without requiring you to edit the connection.
In Select Credentials, choose the credential you created in Credential Center or the credential you created inline from the AI Source screen. After all required fields are set, Save becomes available.
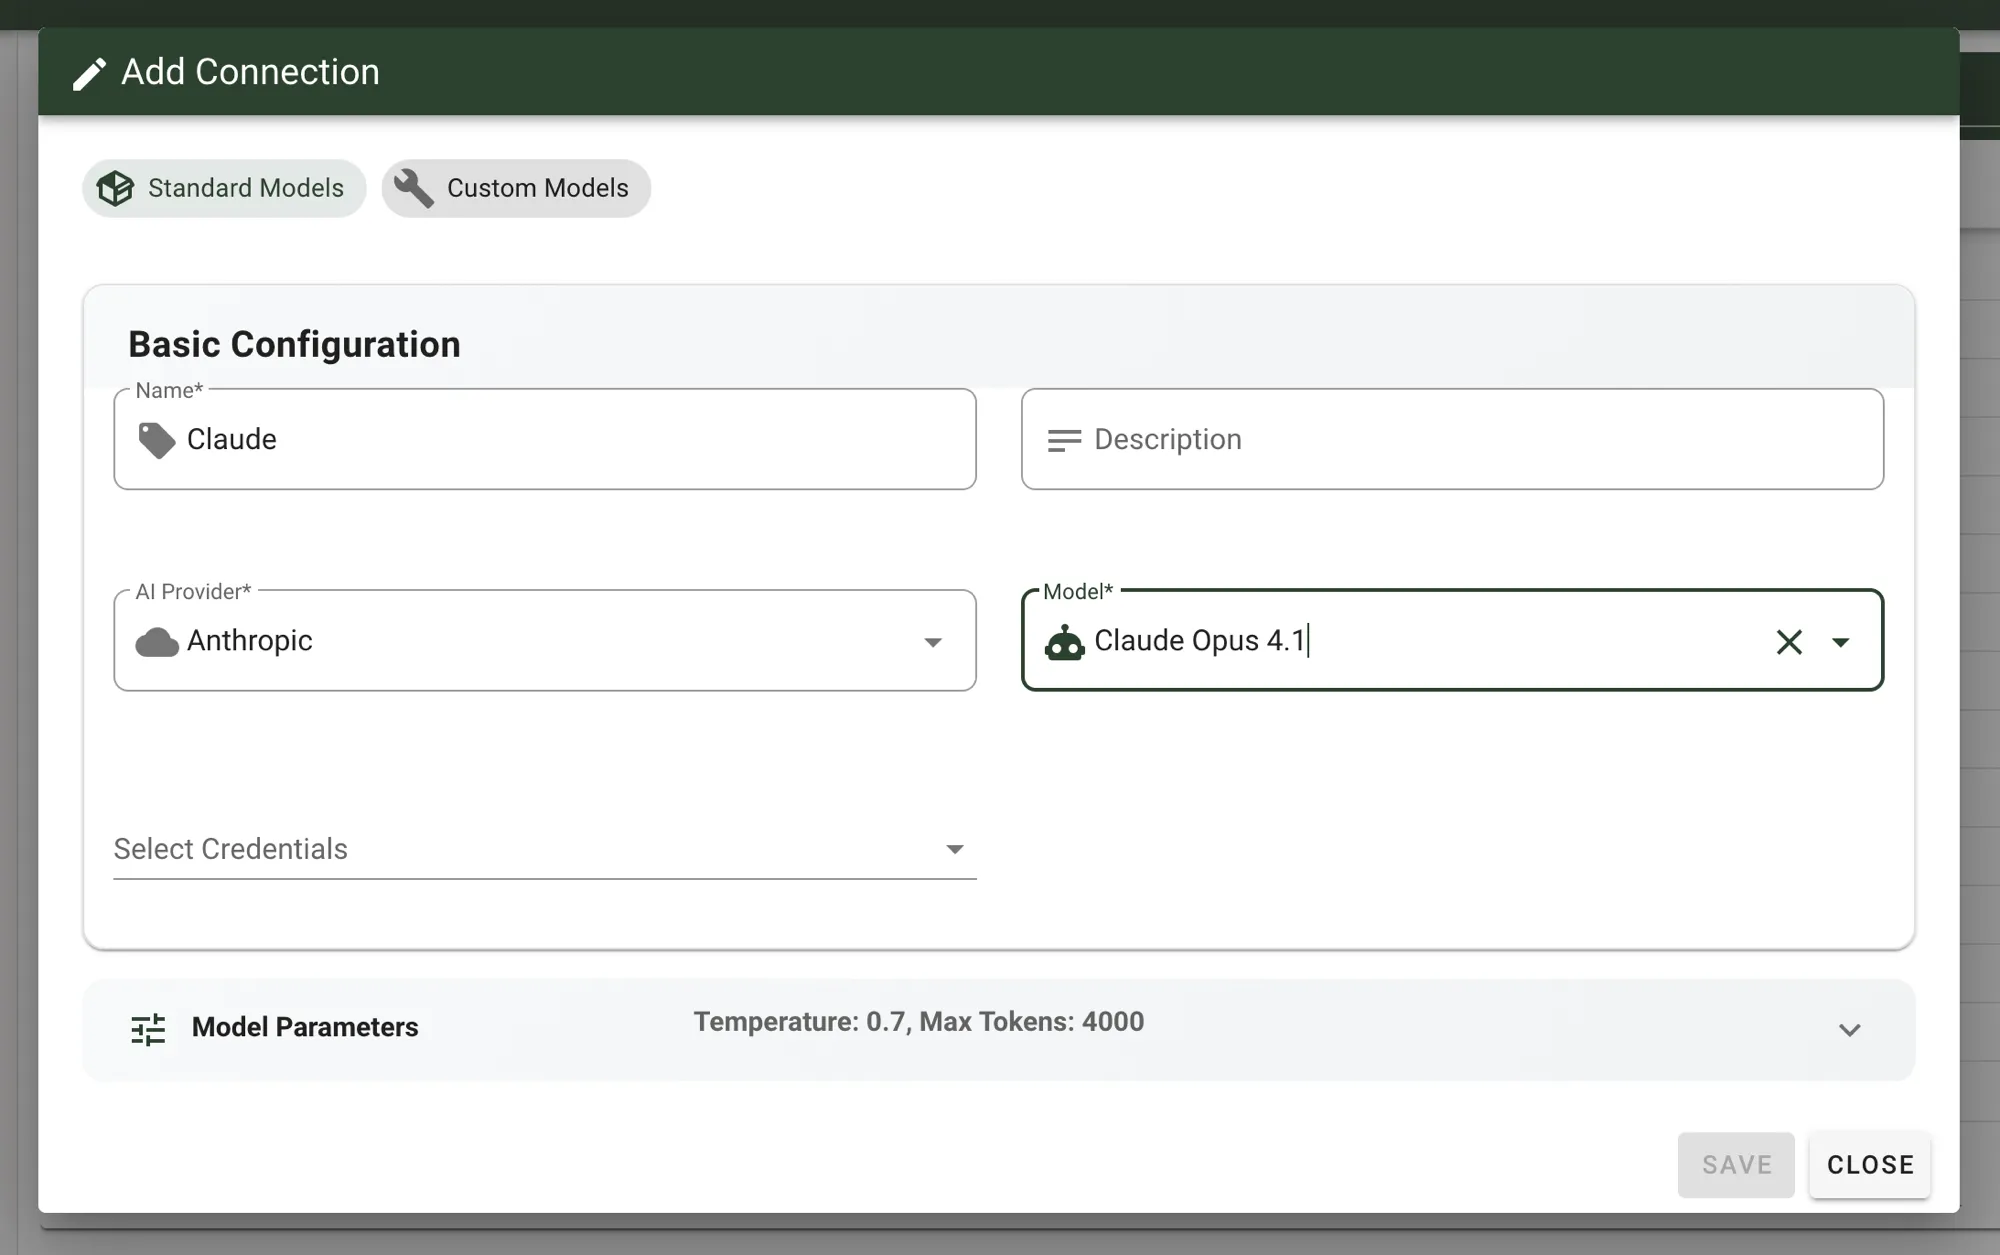
Click Save.
Choosing between latest and pinned models
When a model dropdown includes both a (latest) family option and concrete model versions, choose based on how much control your workflow needs:
- Choose (latest) when you want the AI source to automatically use the newest supported model in a family as Nutrient updates the provider catalog. This reduces maintenance because you don’t need to edit every AI source when a newer supported model is added.
- Choose a specific model version when stable, repeatable behavior is more important than automatic upgrades. Pinning a model helps avoid output changes that can happen when the latest model for a family changes.
Model parameters for custom AI sources
A custom AI source points Workflow Automation at a self-hosted or third-party endpoint instead of a managed provider. To create one, open AI Sources, select Add Connection, and choose Custom models. Supply the base URL, endpoint path, model name, API format, and a credential when the authentication method requires one. The Model parameters panel sets connection-level generation defaults and controls whether Workflow Automation sends them to the endpoint. Some individual AI features can override these defaults.
Use the endpoint’s own generation defaults
Some OpenAI-compatible endpoints validate request arguments strictly, returning an HTTP 400 error for parameters they don’t recognize. Some reasoning models or API versions reject temperature, top_p, or repetition penalties and use max_completion_tokens instead of max_tokens.
Use the endpoint’s own generation defaults omits the sampling, token-limit, penalty, and stop settings from requests that use the OpenAI-compatible wire format. While the switch is on, the controls remain visible but can’t be edited. Slider fields display Default; Max tokens and Stop sequences remain blank.
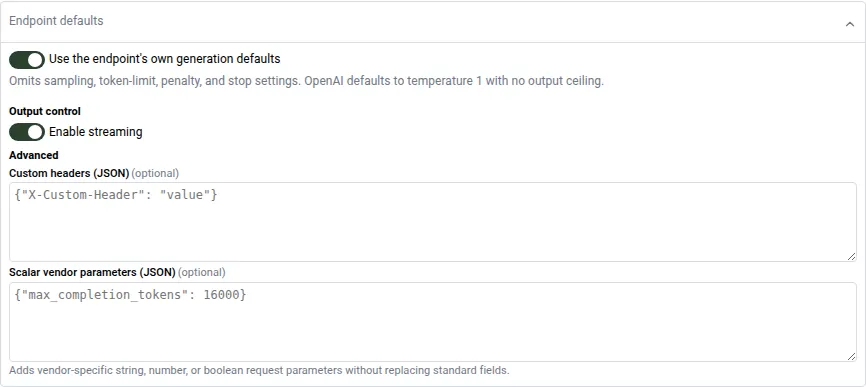
- The switch is on by default when a custom connection is added with an OpenAI-compatible API format.
- Connections saved before this setting existed keep their stored behavior: The switch is off and their parameters are still sent.
- The setting applies to the OpenAI API format. With Auto, it takes effect only when runtime detection resolves the endpoint as OpenAI-compatible. Anthropic, Google Gemini, Ollama, and Hugging Face use their own parameter contracts.
Turning the switch off enables Generation control, Repetition control, and Output control. Unset slider fields display Default; Max tokens and Stop sequences remain blank. Unset parameters aren’t sent, so the model’s own default applies.
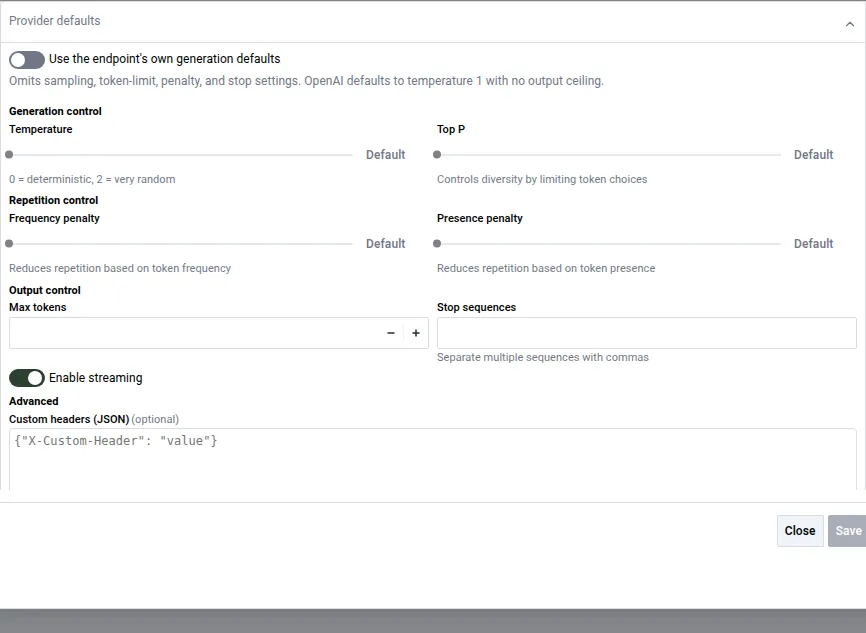
When a request doesn’t specify temperature or a token limit, the endpoint and model apply their own defaults. Enabling endpoint defaults on a source used for structured extraction can therefore remove a configured low temperature that keeps results consistent. Confirm the endpoint’s defaults suit the task before relying on them.
Scalar vendor parameters
The Scalar vendor parameters (JSON) field, under Advanced, sends request parameters that aren’t part of the standard set — max_completion_tokens for a model that requires it, for example:
{ "max_completion_tokens": 16000 }The following limits apply:
- Values must be strings, numbers, or Booleans. Objects and arrays are rejected.
- A connection can carry up to 20 parameters. Keys can be up to 100 characters long, and string values up to 1,000 characters.
- Parameters can’t replace standard request fields such as
model,messages,tools, orresponse_format. - The field applies only to OpenAI-compatible API formats.
While Use the endpoint’s own generation defaults is on, the omitted generation names — temperature, top_p, max_tokens, top_k, the penalties, and stop — are accepted here. That combination restores a single parameter the endpoint does accept while the rest stay omitted.
Tips and best practices
- Set up the AI connection first. Then test it with representative documents before rolling it out broadly.
- For prompt-writing guidance — including how to make instructions clearer, reduce hallucinations, and refine results iteratively — refer to the prompt engineering for AI features guide.
If you want users to ask questions about forms, processes, requests, tasks, files, and users by using live workflow data, refer to the Workflow Assistant guide.