Configure task start rules
Every task within a process in Nutrient Workflow Automation requires a starting point. This start rule defines the condition the workflow engine requires to start a task.
Start rules function as business rules that determine your process flow based on task completion, form data, or other specific conditions.
The Process Flow visually represents these relationships. Transition lines between tasks indicate defined start rules.

All processes in Nutrient Workflow Automation include default Start and End tasks in the Process Flow.
Read a Nutrient Workflow Automation process from top to bottom. A transition entering the top of a task indicates a start rule condition. Follow that line to identify the initiating task.
The Configure Rules area enables you to define the start rules for a task. These rules determine how and when a task starts during process execution.

Start rules typically depend on the status of a previous task, such as completion, or data associated with that task, such as a form question value or an approval option.
Configure rules editor
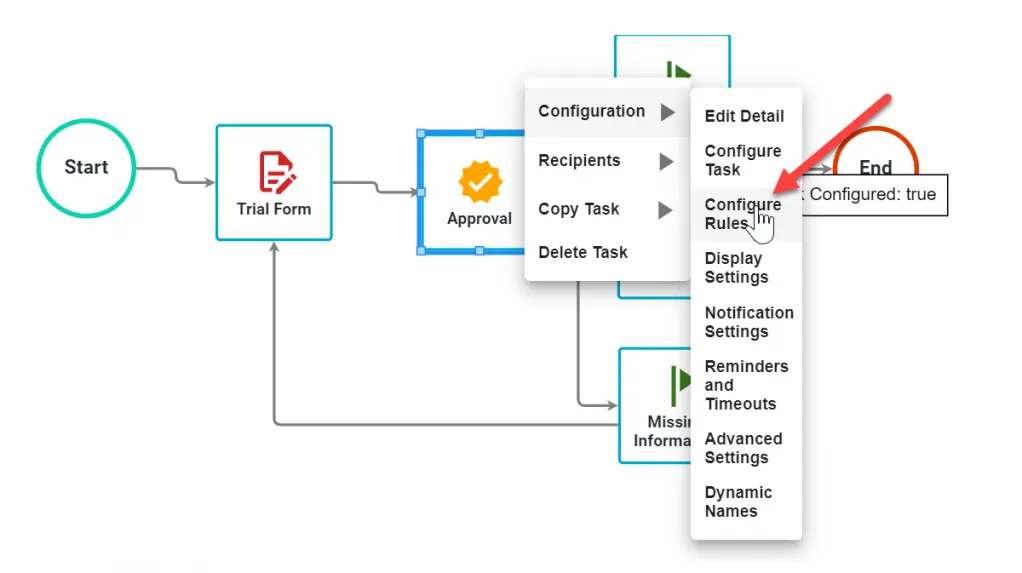
To view the start rules for any task, right-click the task, hover the pointer over Configuration, and click Configure Rules.
The Configure rules editor opens and displays the start rules for the selected task.
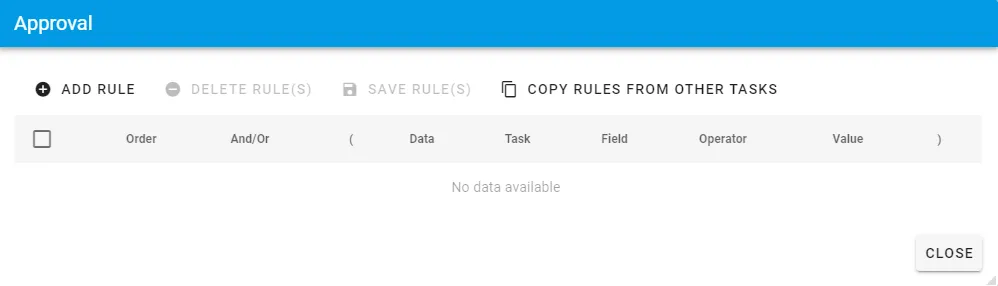
When you add a task to the process design canvas, the start rules are empty by default unless you’ve connected it to another task.
The Configure Rules editor consists of two areas:
- Rules — The list of all defined rules that determine how the task starts.
- Add, Edit, or Delete rules — The area where you manage rules. This area changes based on the Rule Source Data you select.
Adding a start rule
Configure the start rule for a task using one of two methods.
Method 1: Transition lines
Drag a transition line from one task to another. Click the perimeter of the source task until a pink line appears. Then drag it to the target task.

In the example above, we drag the transition line from Start to Form, and then from Form to Approval.
Release the mouse to save the layout. To view the start rule, right-click the task and select Configure Rules. Adding a transition line automatically creates a start rule.
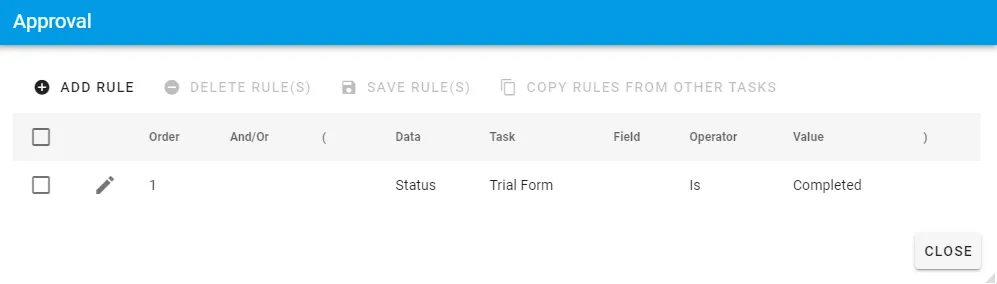
To remove the start rules for a task, select the transition line entering the task and press the Delete key.
Method 2: Configure rules editor
Select a task’s Configure Rules option. If the task is new and unconnected, the editor displays empty rules. Click Add Rule.
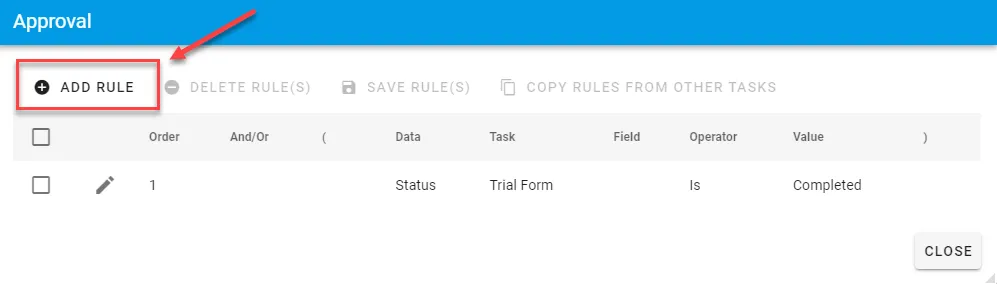
The following options appear for adding a rule.
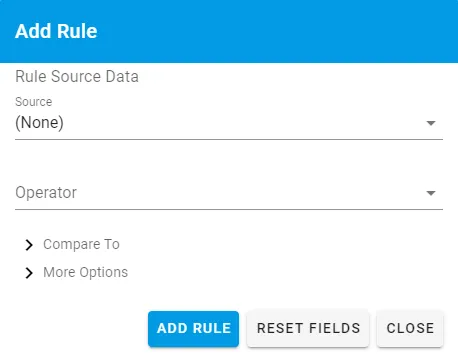
To add a new start rule, select an option from the Source list.
The following example adds a rule for the Approved milestone task to start when the approval choice is Approved.
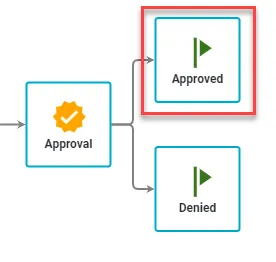
The result displays as follows.
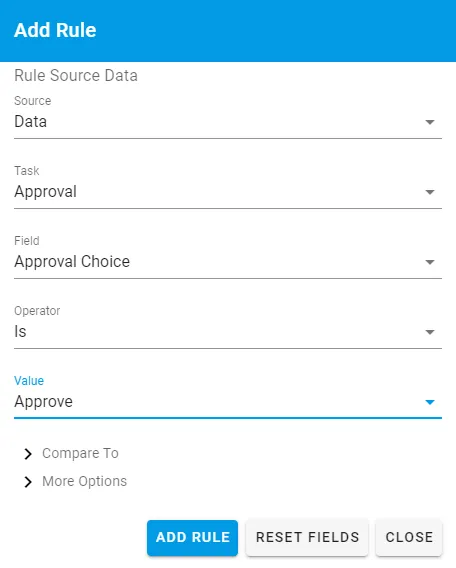
The Source list determines if the start rule depends on the Status of a task (such as Completed or Failed), the Data (such as a form question value or an approval task option), or an attribute associated with the process Requester (such as Division or Department).
The available Source options are as follows:
| Option | Description |
|---|---|
| Status | Displays a list of all available tasks (in the Tasks dropdown list) in the process and the corresponding statuses for a start rule. Available status values: Completed, Cancelled, Excluded, Evaluated, Failed, Timed Out. |
| Data | Displays a list of all available tasks (in the Tasks dropdown list) in the process. Selecting a task makes available any data associated with it, such as a form question or an approval task option, for use in the start Rule. |
| Requester, Client, Task Completer, Task Recipient, etc. | Similar to using Dynamic Recipients for a task recipient. Dynamic Recipients can also determine start rules. Selecting a Dynamic Recipient displays a list of available attributes from that recipient’s Nutrient Workflow Automation profile. |
| Request | Enables you to base a rule on specific attributes associated with a request, such as a start date, last milestone, or request name. |
Selecting an option in the Source list populates additional options in the Rule Source Data area. The Field list changes dynamically based on the selected task.
For an Approval task, the available choices defined for that task appear, such as Approved, Denied, or Needs more information.
After you define the Rule Source Data configurations, select how to evaluate the status or data:
- Select the Operator type, such as Is, Is Not, or Contains.
- Apply the operator to the Value selected in the corresponding box.
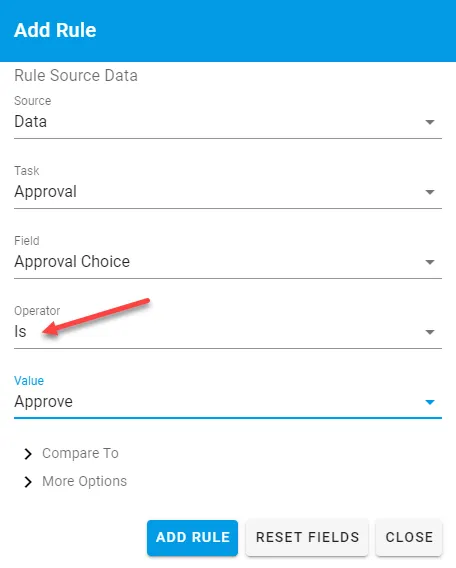
In the example above, the Is operator matches a specific Value.
Select the data from the Value list for comparison. Depending on the data type, this field may function as a free-form text field for entering a custom Value.
In the Approved Milestone example, the task executes only when the user selects the Approved option defined for that Approval task.
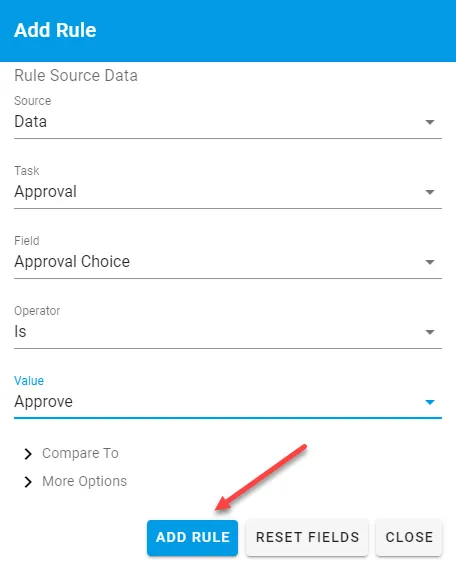
After you define the rule, click Add Rule. The new rule appears in the rules list.
Editing a start rule
To edit an existing rule, click the Edit icon on the rule’s row.
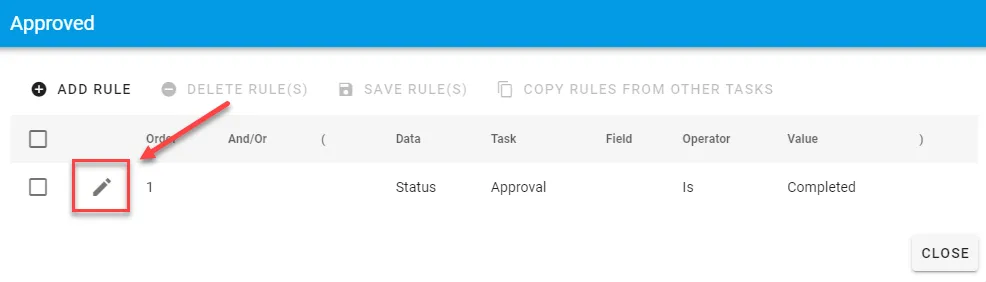
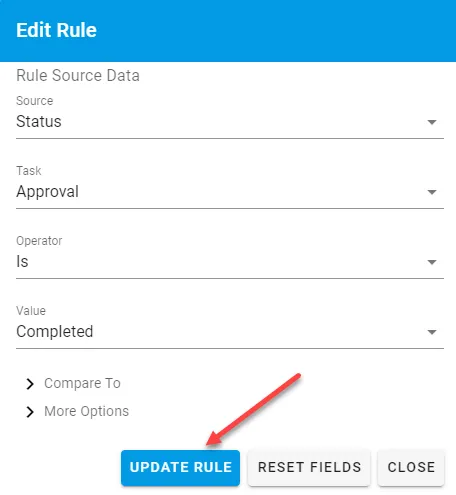
The Rule Source Data area displays the original rule options. Modify the configurations as needed. Click Update Rule.
Don’t change business rules if the process has a Publish status of Production and there are outstanding requests executing the process definition.
Grouping rules
In some scenarios, you must group start rules into a series of conditions. This typically occurs when a task has multiple trigger paths.
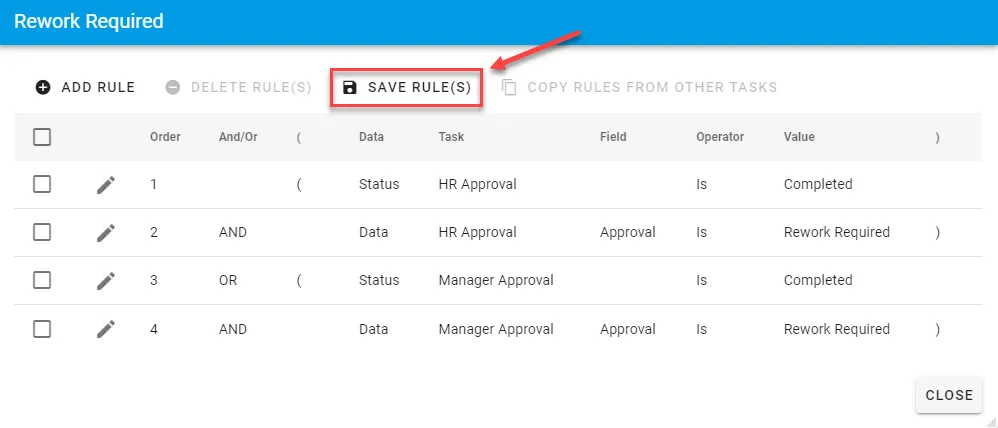
For example, the Rework Required milestone task in the following process starts from either the Manager Approval or the HR Approval task.
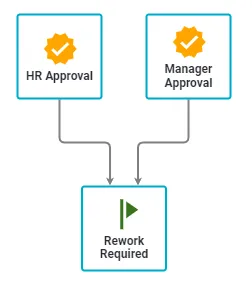
In the scenario above, add the status and data conditions for the start rules based on both the HR Approval and Manager Approval tasks. Then, group those rules for correct evaluation.
Start by adding conditions based on the HR Approval task being Completed and the user selecting the Rework option.
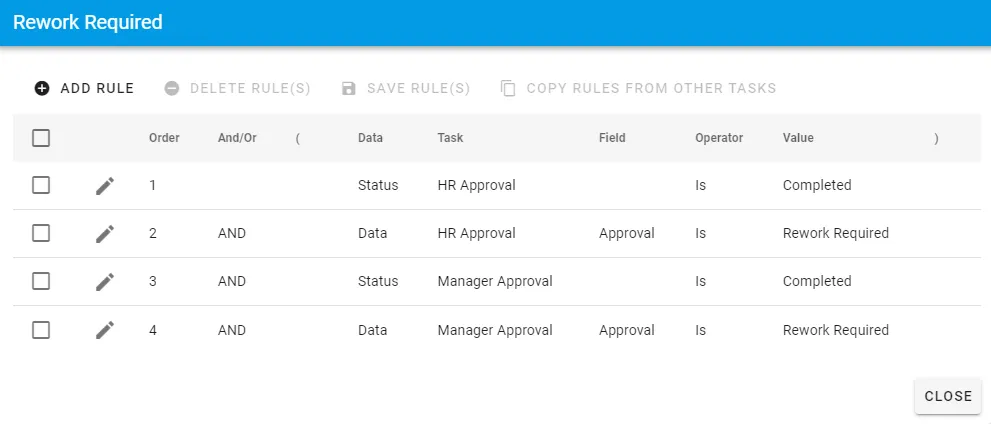
To reorder rules, drag and drop them or change the number in the Order column.

Group the rules after adding them. Without grouping, the system evaluates all four rules as a single condition.
- Click the text box to the left of the Status label on row one.
- Add an opening parenthesis.
- Add a closing parenthesis at the end of the condition on row two.
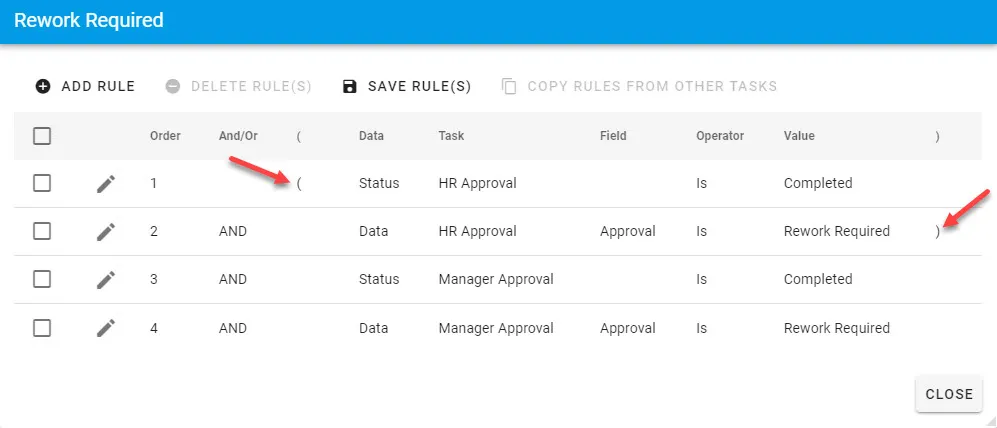
Grouping rows one and two tells the Nutrient Workflow Automation engine to evaluate them as one condition. Repeat this grouping for rows three and four.
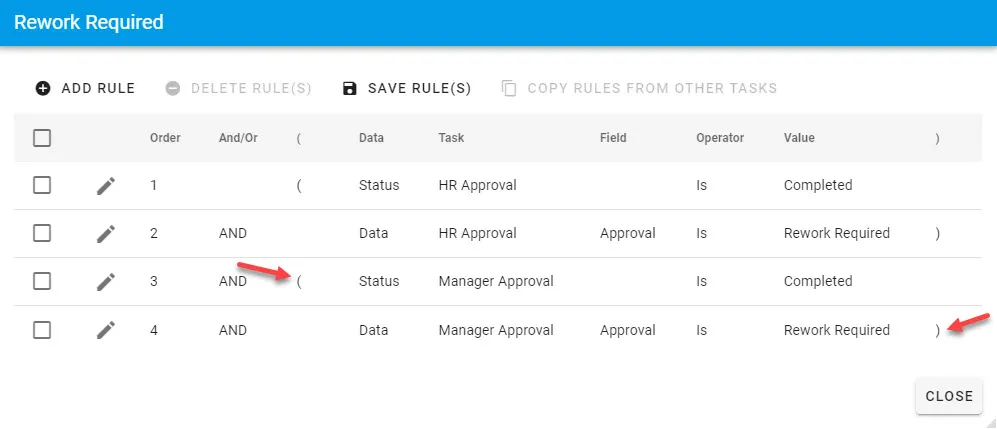
Change the bitwise (and/or) operator where applicable. In this example, change the operator at row three to indicate the task starts if rows one and two evaluate to true, OR if rows three and four evaluate to true.
To change the operator:
Click the and label to open the dropdown list.

Select Or.
Click Save to commit the changes.
Compare to option
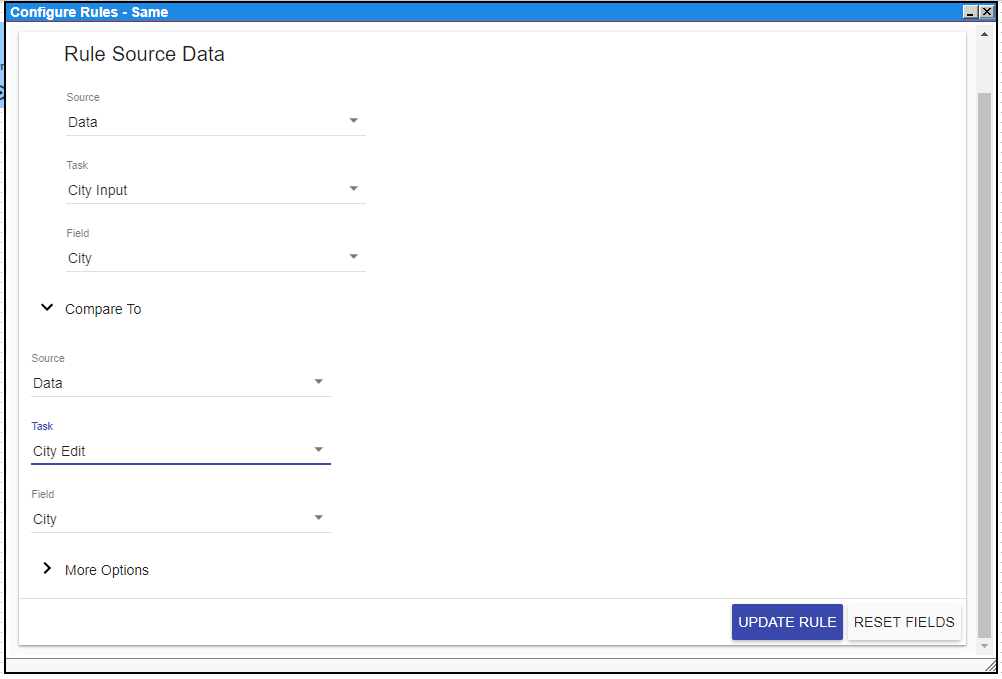
The Compare To start rule option enables you to compare similar data from two different forms to evaluate if they match.
The following image shows a configured rule.
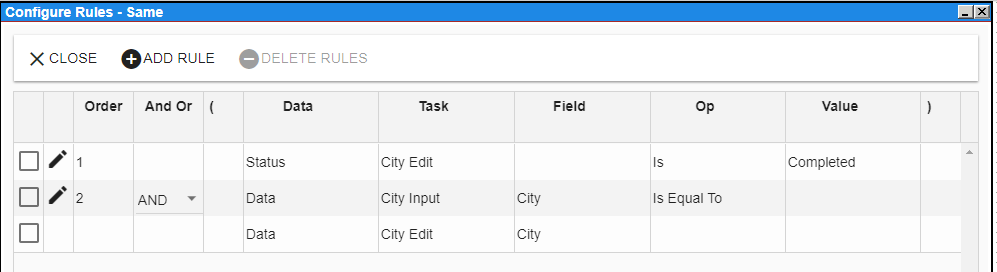
To configure the rule above, perform the steps below in the editor:
- Select the Source and Field for the first data point.
- Select the Operator.
- Select Compare To as the value type.
- Choose the target Source and Field for comparison.
More options
More options exposes the Multi-recipient handling dropdown and, when Majority is selected, the % Required threshold. The dropdown controls how a start rule evaluates when the source task has multiple recipients; it’s hidden on single-recipient source tasks.
Multi-recipient handling
The Multi-recipient handling dropdown under More options controls how a start rule evaluates when the source task has multiple recipients. It appears automatically for rules on multi-recipient tasks (recipient processing set to All or Sequential) and stays hidden when the source task has a single recipient.
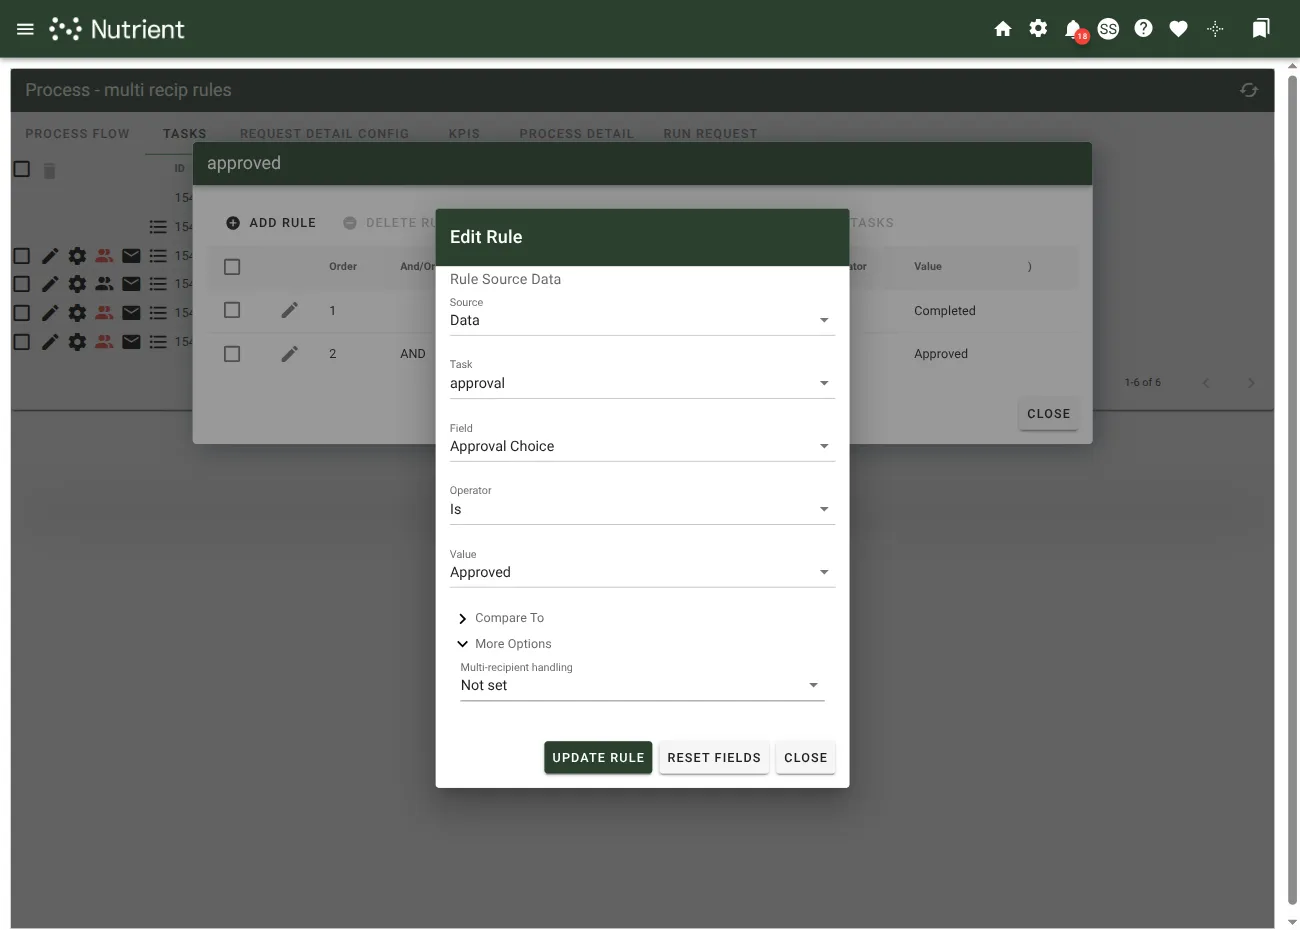
Selecting an option tells the workflow engine which subset of recipient responses causes the rule to fire.
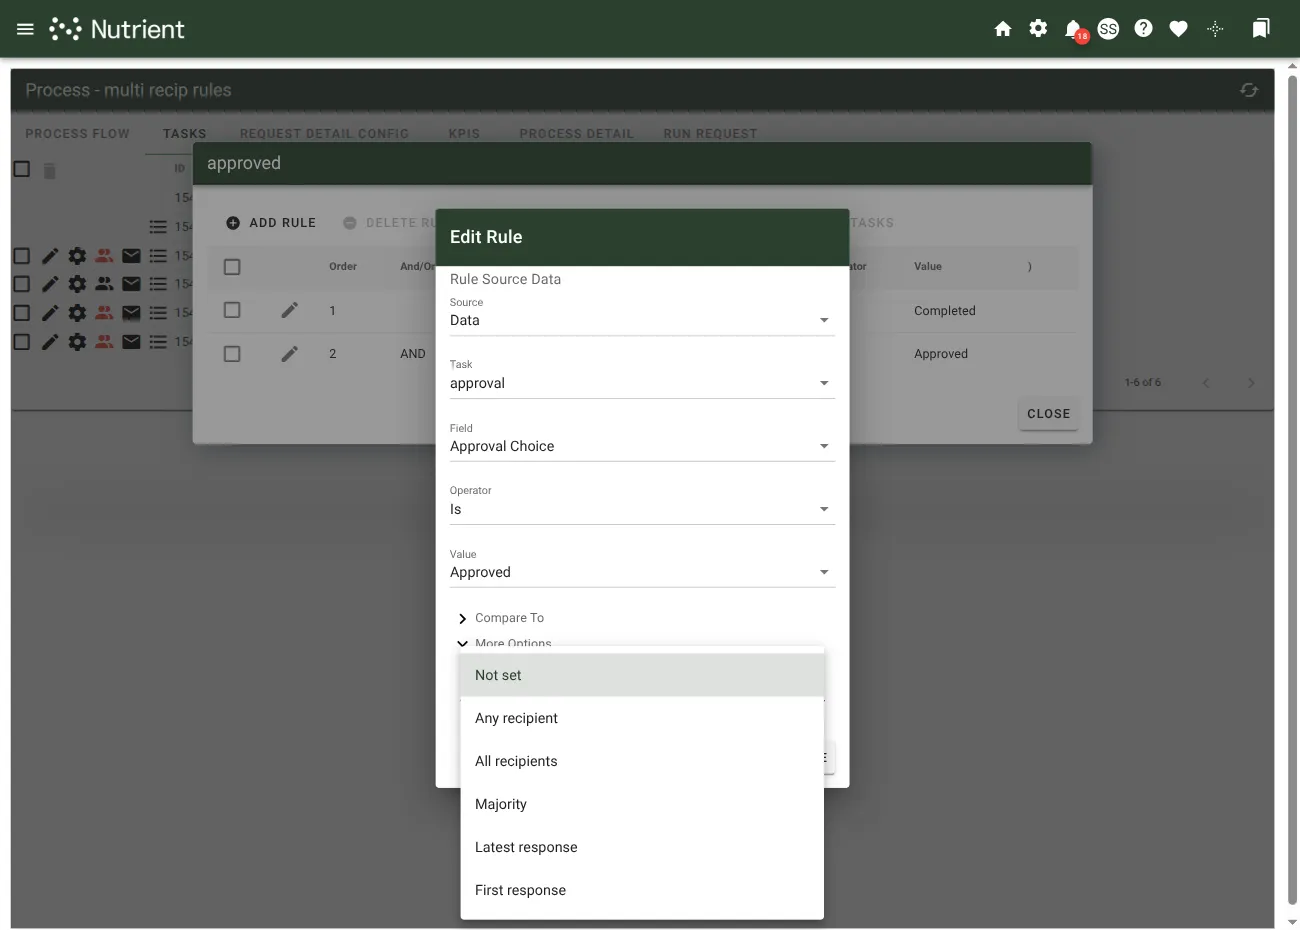
| Option | When to use |
|---|---|
| Not set | The dropdown’s unselected state. For rules comparing response values on a multi-recipient task, the workflow engine falls back to Latest response behavior. Select Latest response explicitly so your intent is visible in the editor rather than leaving it as Not set. Older rules can load as Not set with different behavior — see Editing older rules below. |
| Any recipient | Fires when at least one recipient’s response matches the rule value. Use when the task should react as soon as any recipient submits the matching value — for example, a Denied milestone that should route as soon as one reviewer denies, even if others approve. |
| All recipients | Fires only when all required recipient responses match the rule value. In the usual flow, this makes unanimous agreement explicit. |
| Majority | Fires when the count of matching responses meets or exceeds a threshold set by % Required (see below). A two-vs.-two split on a four-recipient task with % Required = 50 meets the threshold and fires the rule — and if the process has complementary rules (for example, both Is Approved and Is Denied with Majority + 50 percent), both milestones fire on that split. Use % Required = 51 (or higher) to avoid firing on an exact tie. |
| Latest response | Fires when the most recently submitted recipient response matches the rule value. Ordering is by response submission time across all recipients — not just responses that match the rule value. |
| First response | Fires when the earliest submitted recipient response matches the rule value. Ordering is by response submission time across all recipients — not just responses that match the rule value. |
Latest and First evaluate responses as submitted; they don’t wait for all recipients to respond.
If an Approval choice uses Complete If Selected, selecting that choice can complete the task early. The rule then evaluates the responses submitted before completion; recipients whose tasks were canceled don’t contribute a response. For Majority rules, the required_recipients count in the formula is the number of recipient tasks still required at evaluation time — Complete If Selected can reduce it (commonly from N down to one), while the saved % Required value stays unchanged.
Editing older rules
This section is only about rules saved before Multi-recipient handling was introduced. Rules you save now with an explicit dropdown selection load with that selection preserved — a rule saved as Majority loads with Majority selected and the % Required field visible.
Some rules saved before Multi-recipient handling was introduced load into the editor with the dropdown showing Not set and no visible % Required field, yet retain a saved threshold that continues to control evaluation. No automatic conversion runs against existing persisted rows — but at evaluation time, rules using Greater Than or Greater Than or Equal To with a saved % Required value are routed through the same inclusive-threshold evaluator as an explicit Majority rule.
If you want to inspect a saved threshold value, select Majority in the dropdown — the saved value reappears in the % Required field. Do not save unless you intend to change how the rule evaluates: Explicit Majority removes the all-recipients completion guard that legacy percentage rules enforce, applies a different match-counting mechanism, and for non-Greater-Than operators, exits the legacy behavior entirely. To inspect only, cancel out of the editor without saving.
If you do save an older rule as Majority, review the % Required value first — values below 50 are no longer accepted. Adjust to a value from 50 to 100 before saving.
Single-recipient tasks
When the rule’s source task has a single recipient, the Multi-recipient handling dropdown is hidden — with only one response, the option has no effect.
% Required (Majority threshold)
When you select Majority in the Multi-recipient handling dropdown, a % Required field appears below it. Enter an integer from 50 to 100. The rule fires when the count of matching responses meets or exceeds the threshold: matching_responses × 100 ≥ required_recipients × % Required. A count that exactly matches the threshold fires the rule.
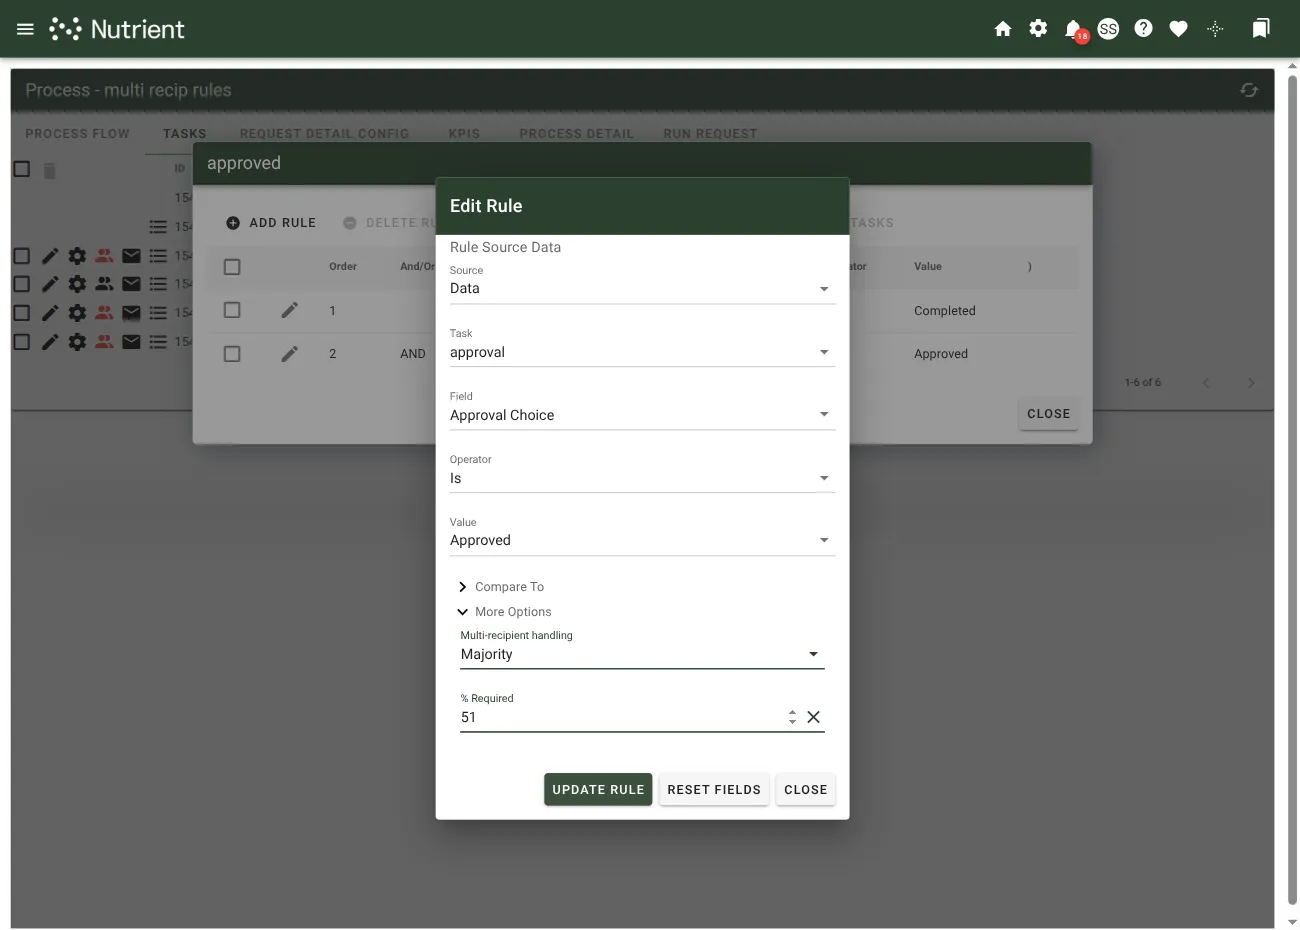
Example: Three-recipient task with two Approved + one Denied, Approval Is Approved rule with Majority + % Required = 51 → fires (200 ≥ 153). Same task with % Required = 67 → doesn’t fire (200 is less than 201). Three-recipient task where all three recipients approve + % Required = 100 → fires (300 ≥ 300).
% Required is required when Majority is selected and must be an integer from 50 to 100; it’s hidden for other options. If you selected Majority and left % Required blank or entered a value outside 50 to 100, the rule fails validation on save.
Enable the Case Sensitive slider to compare character values based on capitalization. For example, “use” doesn’t equal “Use” when you enable this option.
Invalid rules detection
The system validates task rules each time the Process Flow canvas loads. If rules reference deleted transitions, removed tasks, or contain unbalanced grouping parentheses, a warning icon appears on the affected task.
When you delete a transition line or remove a task, any rules referencing those elements become invalid. Always check the Configure Rules editor for affected tasks after you make structural changes to your process flow.
Common causes of invalid rules include:
- Orphaned transition references — A rule references a transition line you deleted from the canvas instead of removing it through the Configure Rules editor.
- Orphaned task references — A rule references a task you removed from the process.
- Unbalanced grouping — Parentheses used for grouping rules don’t match. For example, an opening parenthesis lacks a corresponding closing parenthesis.
To fix invalid rules:
- Right-click the affected task.
- Select Configuration > Configure Rules.
- Update or remove the rules referencing the missing transitions or tasks.