Import and sync users
The user syncing feature imports large numbers of users from an external source. Instead of adding users one at a time, you can create reusable sync configurations, define field-level conflict rules, preview changes before you apply them, and choose whether to send new users a welcome email with a link to set their password. To add or manage users individually, refer to the add and manage user accounts guide.
Accessing user syncing
You can open user syncing from the Administration area.
- Select Administration > Users from the left navigation panel.
- Select the Import & Sync tab.
The following screen appears.
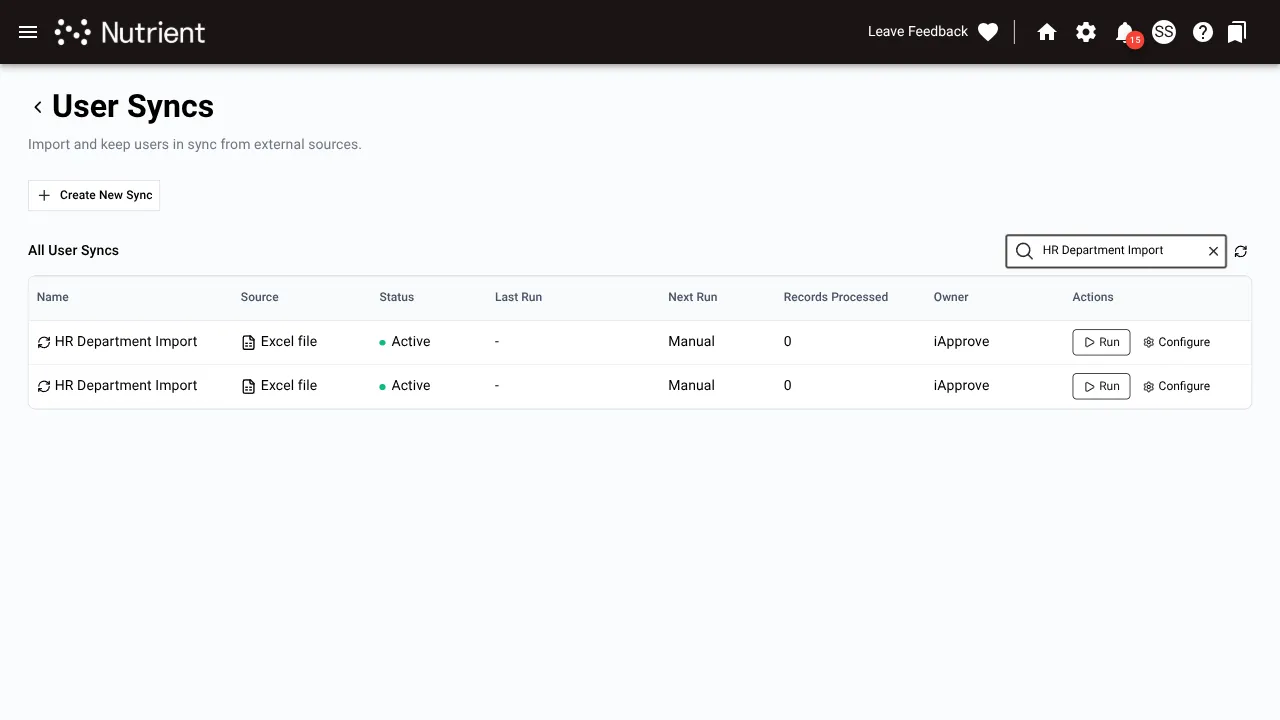
Creating a sync configuration
A sync configuration defines how the system maps imported data to user fields and how it handles conflicts. You create the configuration once and reuse it each time you run that sync.
Select Create New Sync to open the creation wizard.
Step 1: Choose source
Start by selecting the source type that matches your data.
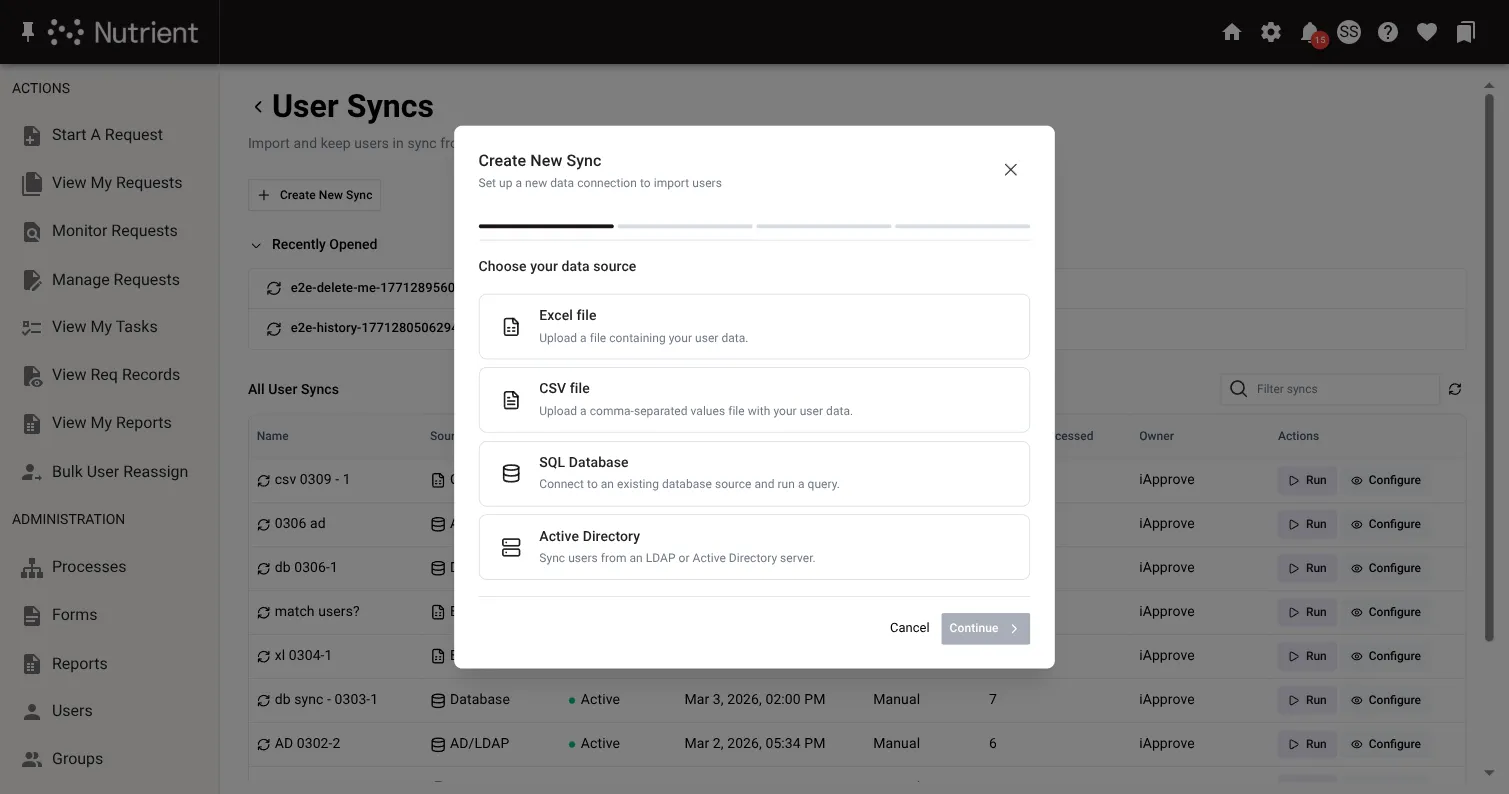
| Source | Description |
|---|---|
| Excel file | Upload an .xlsx or .xls file by using the provided template |
| CSV file | Upload a comma-separated values file |
| SQL Database | Connect to an existing database and run a query |
| Active Directory | Sync users from a Lightweight Directory Access Protocol (LDAP) or Active Directory server |
Step 2: Configure your source
In this step, the available options depend on the source type you selected.
Every source type in Step 2 also enables you to set optional defaults for language, time zone, and locale. These defaults apply to any user row where those fields aren’t mapped or return a blank value.
Excel file
For an Excel-based sync, upload the file you want to use. The system stores this file with the sync configuration and reuses it each time you run the sync.
Select Download blank template to get a file with all supported columns. Open the file in a spreadsheet application, enter one user per row, and then upload the completed file.
The template includes a sample row in italics that shows the expected format. Delete this row before you upload the file.
CSV file
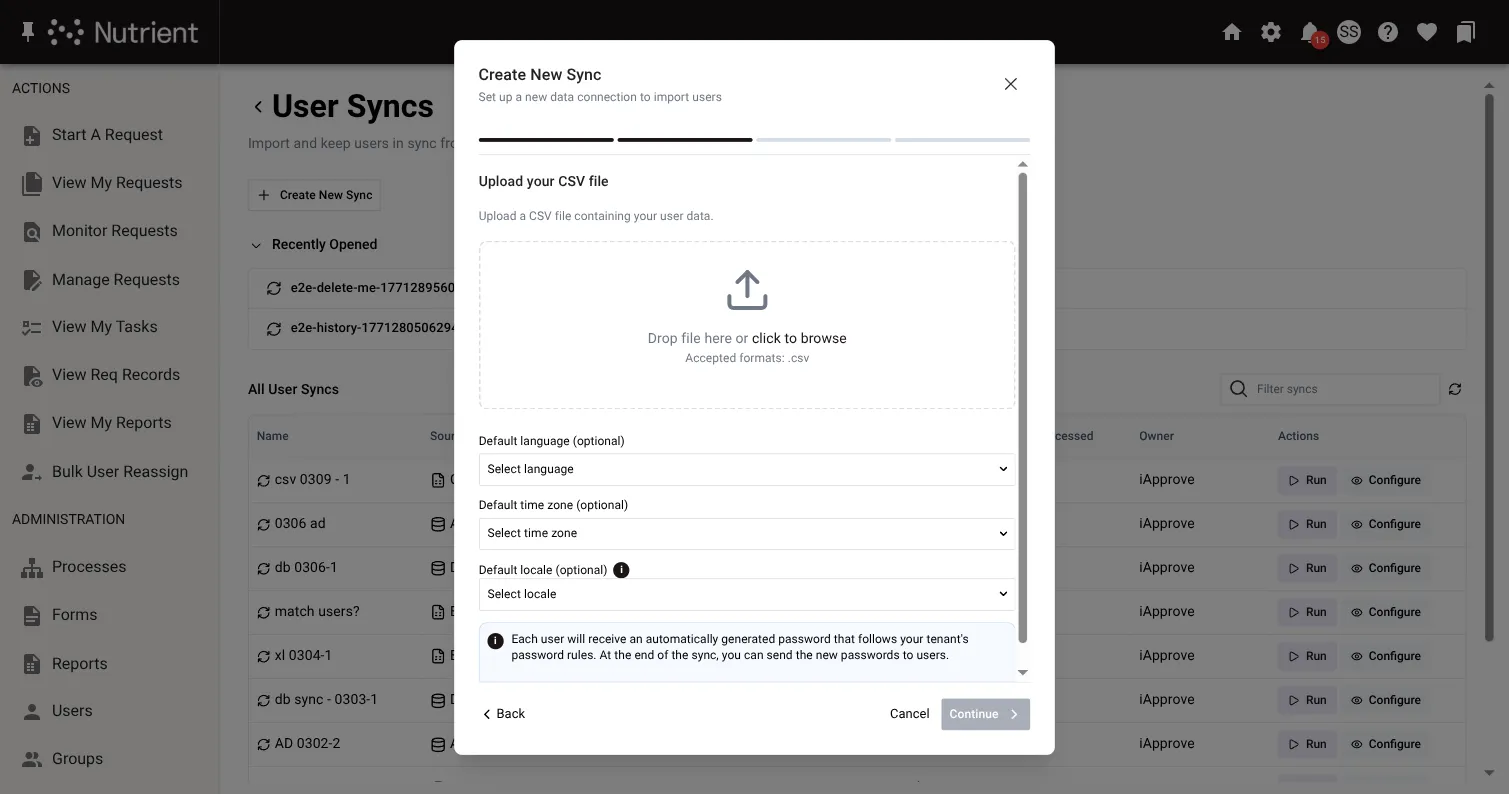
For a CSV-based sync, upload the file you want to use. The system stores this file with the sync configuration and reuses it each time you run the sync. The accepted format is .csv.
Select Download blank template to get a CSV file with all supported columns. Enter one user per row, and then upload the completed file.
The system reads the column headers from your file automatically. In the next step, you map those headers to user fields.
SQL Database
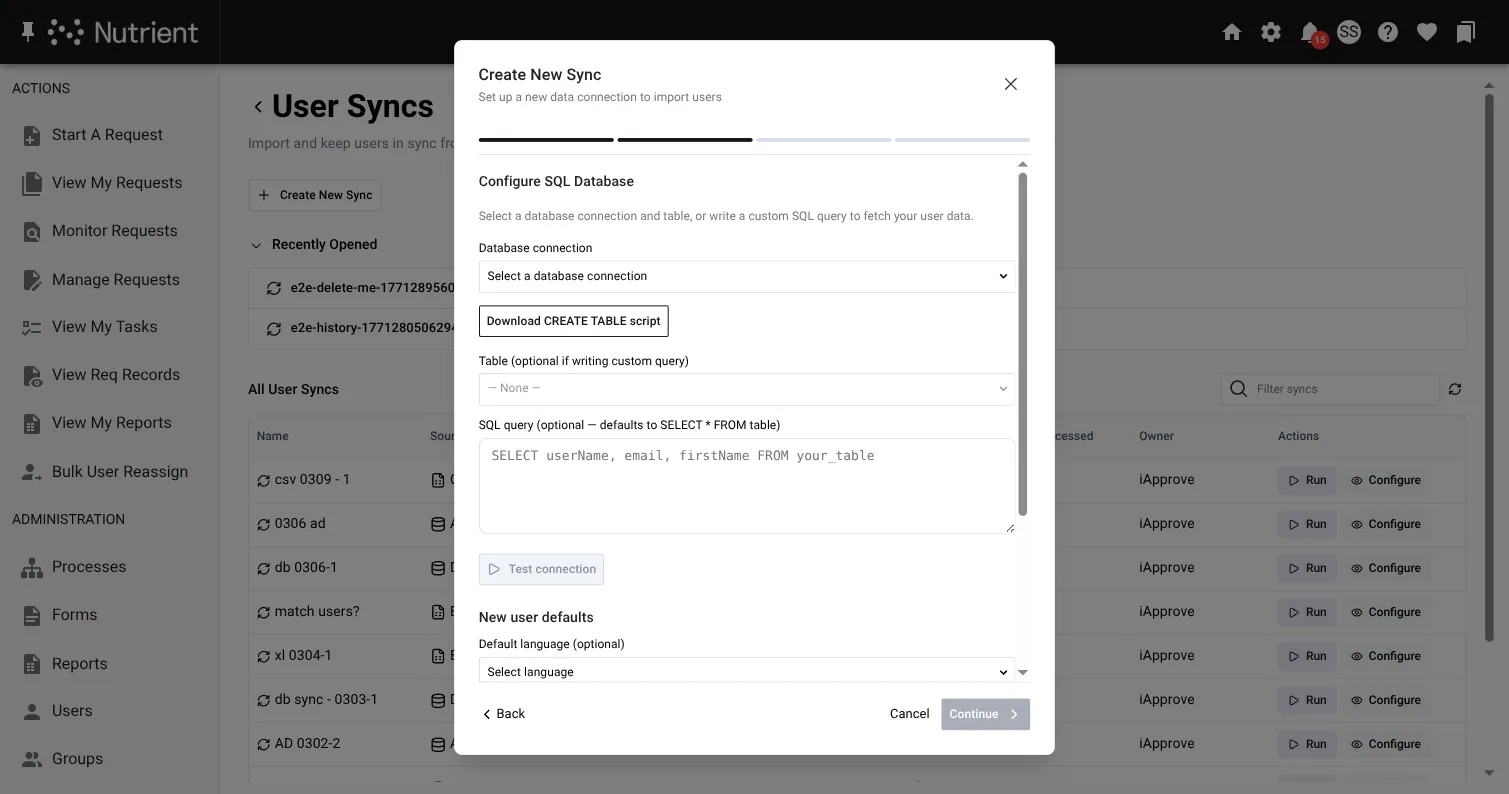
For a database-based sync, connect to an existing database to pull user data directly. This source requires a database connection that has already been configured in the Credential Center.
- Select a Database connection from the list of configured connections.
- Select a Table to use as the source, or leave it blank if you want to write a custom query.
- Optional: Write a custom SQL query. If you select a table, the query defaults to
SELECT * FROM [table]. You can modify it to filter rows or select specific columns. - Select Test connection to validate the configuration. The system runs the query and returns the column names and row count. The test must pass before you continue.
Select Download CREATE TABLE script to get a SQL script that creates a compatible source table with the recommended column structure.
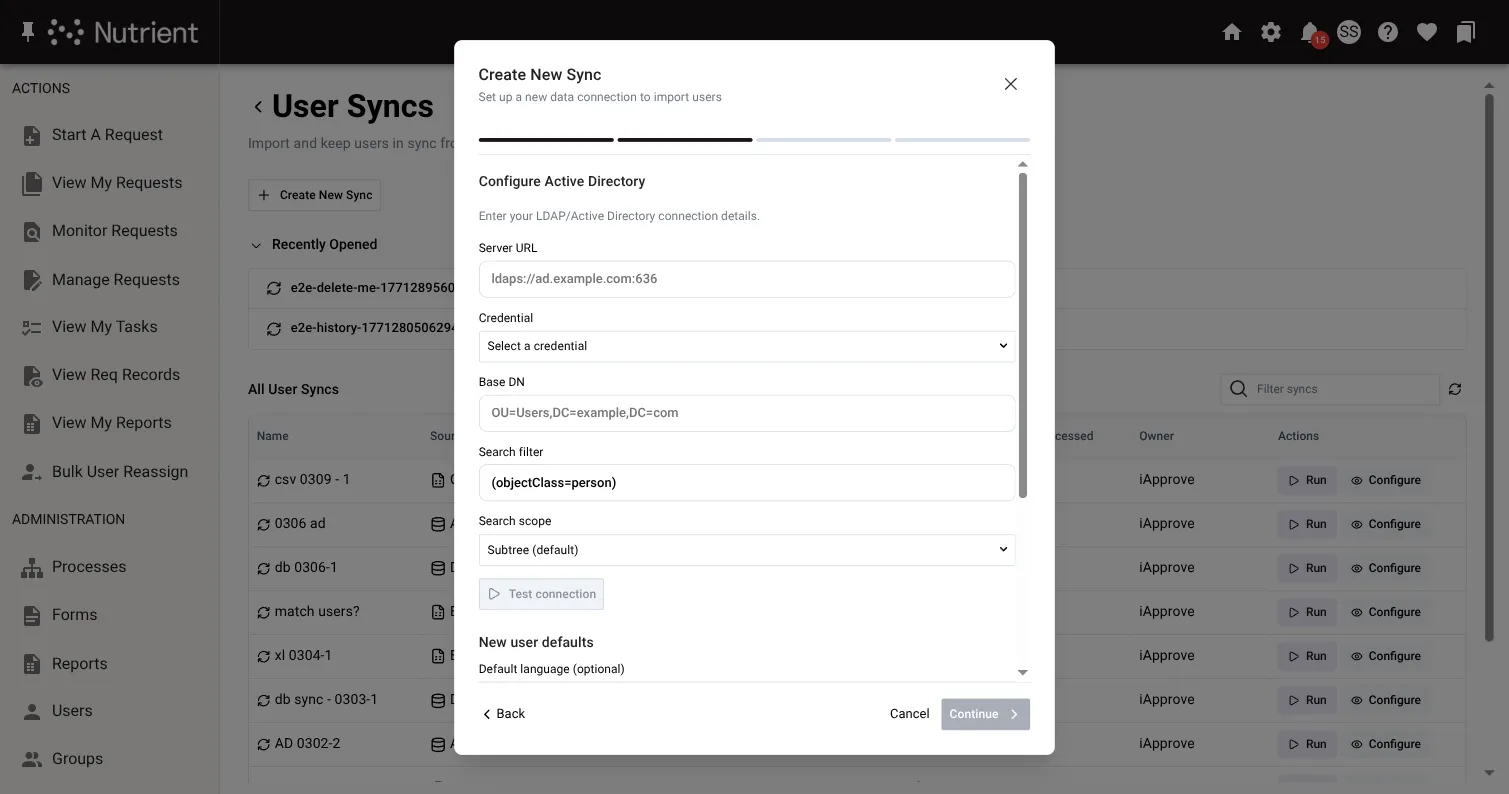
Active Directory
For an Active Directory sync, the system queries the directory each time you run the sync.
Fill in the following fields:
| Field | Description |
|---|---|
| Server URL | The address of your LDAP server, including protocol and port (for example, ldaps://ad.example.com:636) |
| Credential | A credential from the Credential Center that the system uses to authenticate with the server |
| Base DN | The distinguished name of the container to search (for example, OU=Users,DC=example,DC=com) |
| Search filter | An LDAP filter that determines which entries the system returns (for example, (objectClass=person)) |
| Search scope | How deep the system searches: Subtree (default) searches the base DN and all descendants; One level searches only direct children; Base only searches only the base DN entry |
Select Test connection to validate the configuration. The system connects to the server by using the provided settings and returns the number of matching user entries. The test must pass before you continue.
Step 3: Define sync behavior
In this step, you configure user-level rules and field-level sync rules.
User-level rules control how the sync responds to different user scenarios:
| Setting | Options | Description |
|---|---|---|
| If a user does not exist | Create new user/Skip | Determines whether the system creates user accounts that don’t exist. |
| If a user exists but is inactive | Activate user/Skip/Update without activating | Determines how the system handles a user in your source who is currently deactivated. |
| If a user is removed from the source | Deactivate user/Ignore/Do nothing | Determines how the system handles a user from your last run who is no longer in the source. |
If a user is removed from the source compares the current source against the most recent successful run of this sync configuration, not against all users in the system. On the first run, this rule has no effect because no prior baseline exists.
Field-level sync rules control what happens when a source value differs from an existing value for a user who is already in the system:
| Behavior | Description |
|---|---|
| Always update from source | Always overwrites the existing value with the source value. |
| Update only if empty | Updates the field only if it currently has no value. |
| Never update | Keeps the existing value and ignores the source value. |
| Ask to review | Prompts you to choose a value for each affected user when you run the sync. |
userName is always the match key that identifies existing users, and you can’t change its sync behavior.
How field mapping works depends on the source type:
- For Excel syncs, field-to-column mappings are preset based on the template structure and are shown for reference.
- For CSV and SQL Database syncs, the system auto-maps detected columns to user fields when the names match. You can adjust any mapping from the dropdowns.
- For Active Directory syncs, the system preloads common LDAP attributes and auto-maps them to user fields. You can adjust any mapping from the dropdowns.
Required fields (userName, email, firstName, and lastName) must have a source column mapped to them.
Step 4: Name and save
Finish the setup by naming the sync configuration and saving it.
Enter a descriptive name for the sync configuration, and then select Save sync.
A clear name helps when you manage multiple syncs for different sources or departments.
Running a sync
After you create a sync configuration, you can run it from the Import & Sync tab.
Find your saved sync configuration, and then select Run.
How the sync reads source data depends on the source type:
- For Excel and CSV syncs, the sync uses the file you uploaded when you created the configuration. If your source data changes, edit the configuration and upload a new file before you run the sync again.
- For SQL Database and Active Directory syncs, the system queries the source directly each time you run the sync.
Preview
Before the system applies changes, it classifies each source record so you can review the expected impact.
| Classification | Meaning |
|---|---|
| New | The user doesn’t exist, so the system will create a new account. |
| Updated | The user exists, and the sync will modify at least one field. |
| Reactivated | The user exists but was previously deactivated, and the sync will restore the account. This occurs only when If a user exists but is inactive is set to Activate user. |
| Deactivated | The user was present in the last run but is no longer in the source. This occurs only when If a user is removed from the source is set to Deactivate user. |
| Skipped | The user matches an existing record with no changes, or a behavior rule excluded the user. |
| Error | The record has validation errors, and the system won’t import it. |
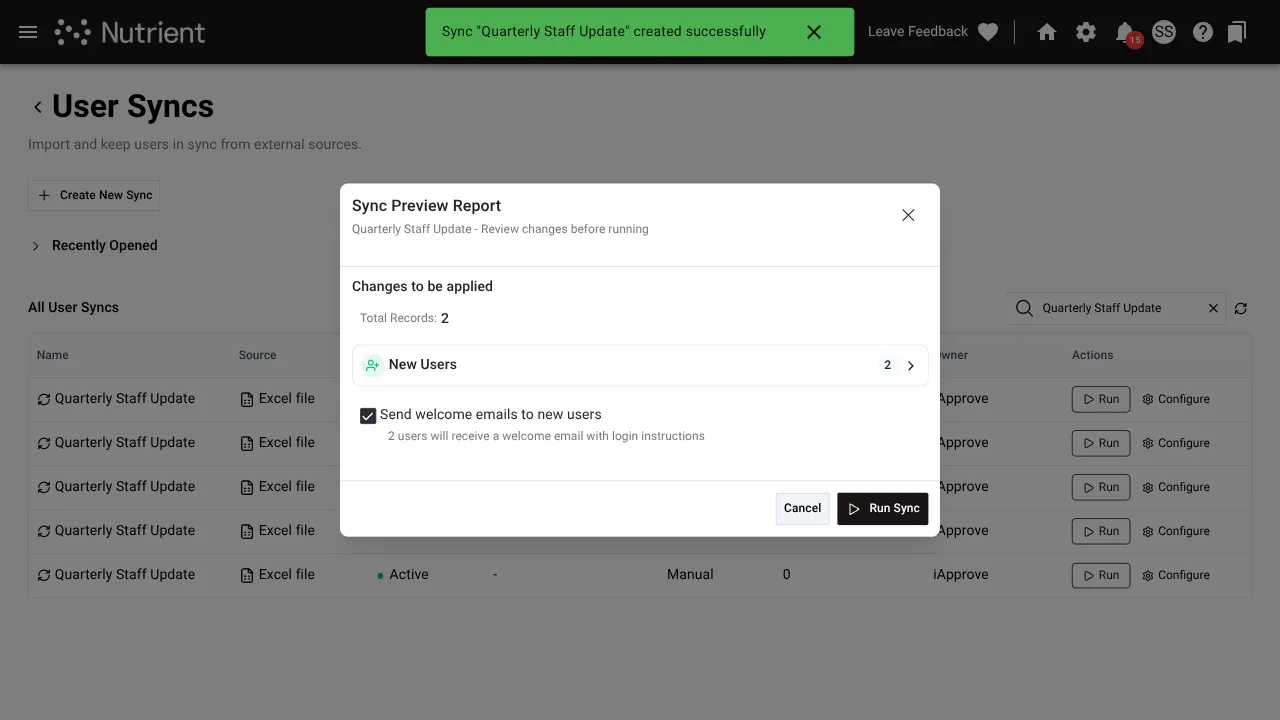
Review the counts, and then select Continue.
If your organization uses named licensing and the import would exceed your available seat limit, the preview displays a warning and disables the Run button.
Resolve conflicts
If any fields use the Ask to review conflict strategy and the system detects a difference, a conflict resolution step appears. For each conflict, the screen shows the current value and the incoming value side by side.
- Review the differences for each affected user.
- Choose which value to keep.
- Optional: Select the option to save your choice back to the sync configuration so the system resolves the same conflict automatically in future runs. This option is available for each field that triggered the conflict resolution screen because each one uses the Ask to review strategy.
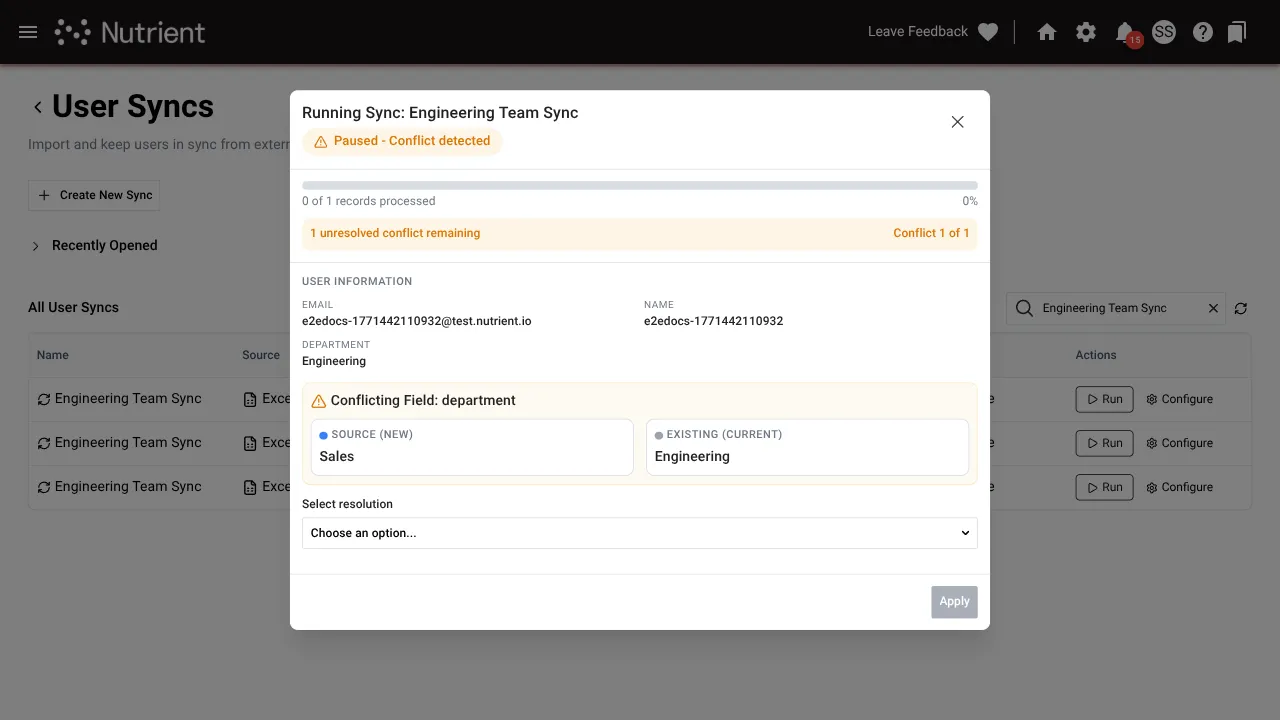
After you resolve all conflicts, select Run to execute the import.
Results
When the import finishes, the system shows a summary of the changes.
- Users added
- Users updated
- Users reactivated
- Users deactivated
- Users skipped
- Errors
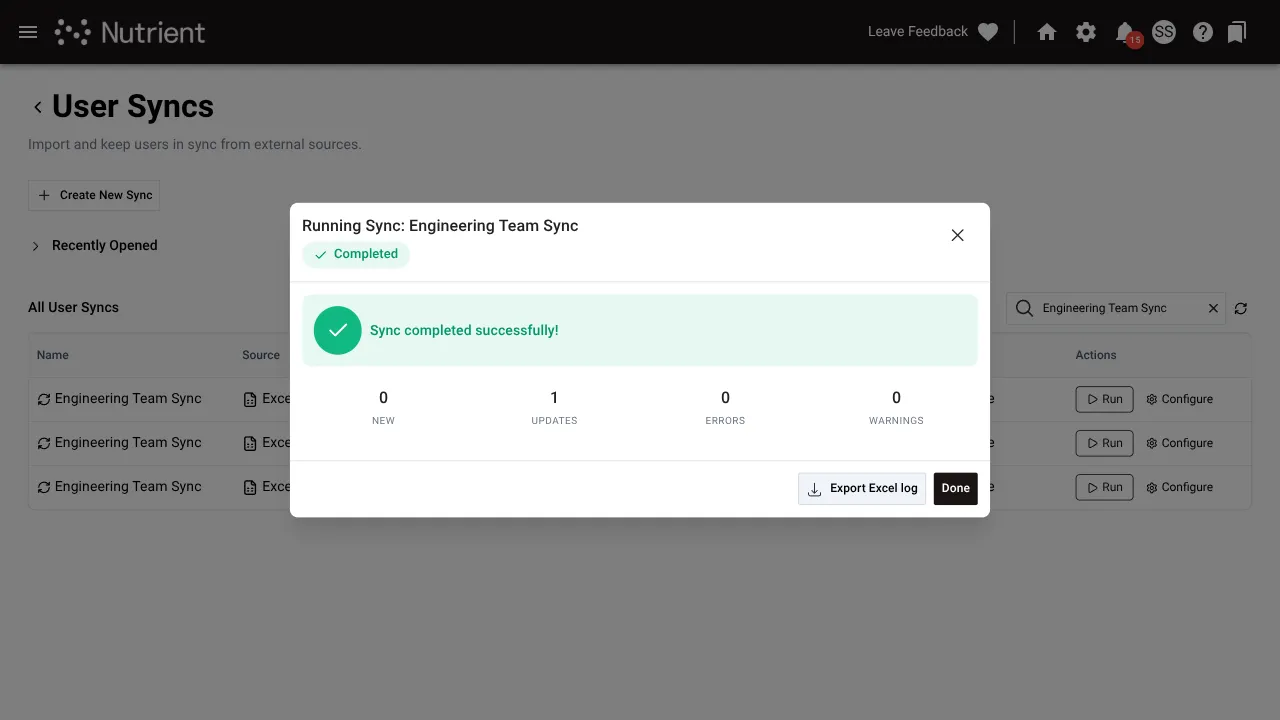
Select any category to view the list of affected users. If errors occurred, the details explain the issue for each record. Common causes include the following:
- Missing required fields — Specifically
userName,email,firstName, orlastName. - Invalid format — For example, an incorrectly formatted email address.
- Duplicates — Multiple instances of the same
userNamewithin the same source.
You can also download a detailed export of the run results as an Excel file for auditing or troubleshooting.
Sync history
Each sync configuration keeps a history of past runs.
To view this history:
- Select a configuration from the Import & Sync tab.
- Open the History tab.
The screen shows a list of past runs, including the date, status, and summary of results.
Managing sync configurations
You can manage saved sync configurations from the Import & Sync tab.
Available actions include the following:
- Edit — Update the name, source configuration, behavior rules, field mappings, or defaults.
- Pause — Prevent the sync from being run without deleting the configuration.
- Resume — Reenable a paused sync.
- Delete — Permanently remove the sync configuration and its entire run history.
A paused sync can’t run until you resume it. Users deactivated by a sync run remain in the system as inactive users and can be reactivated individually. Refer to the active and inactive users guide for instructions on manual reactivation.
Group sync
If you use Active Directory as the source, you can also sync group memberships.
Enabling group sync
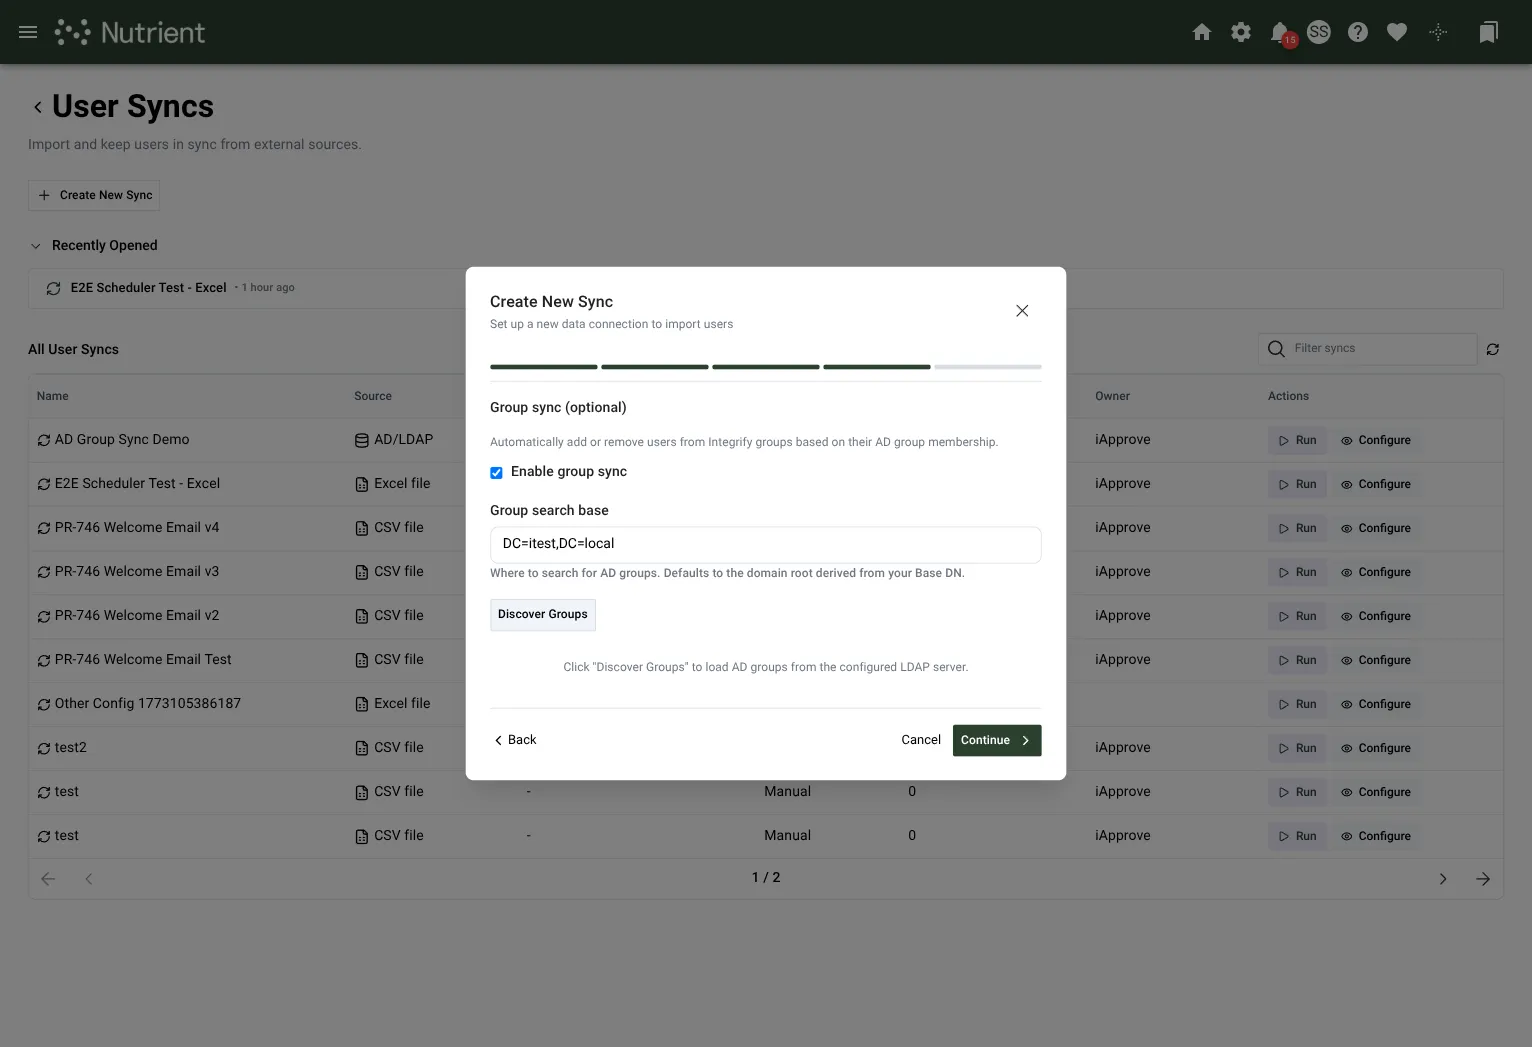
During sync creation, the wizard includes a Group sync (optional) step. Select Enable group sync to activate it, and then set Group search base to the organizational unit that contains your Active Directory groups. If you leave this field blank, the system uses the domain root derived from the Base DN.
Discovering and mapping groups
After you enable group sync, you can discover groups from the LDAP server and choose how to map them.
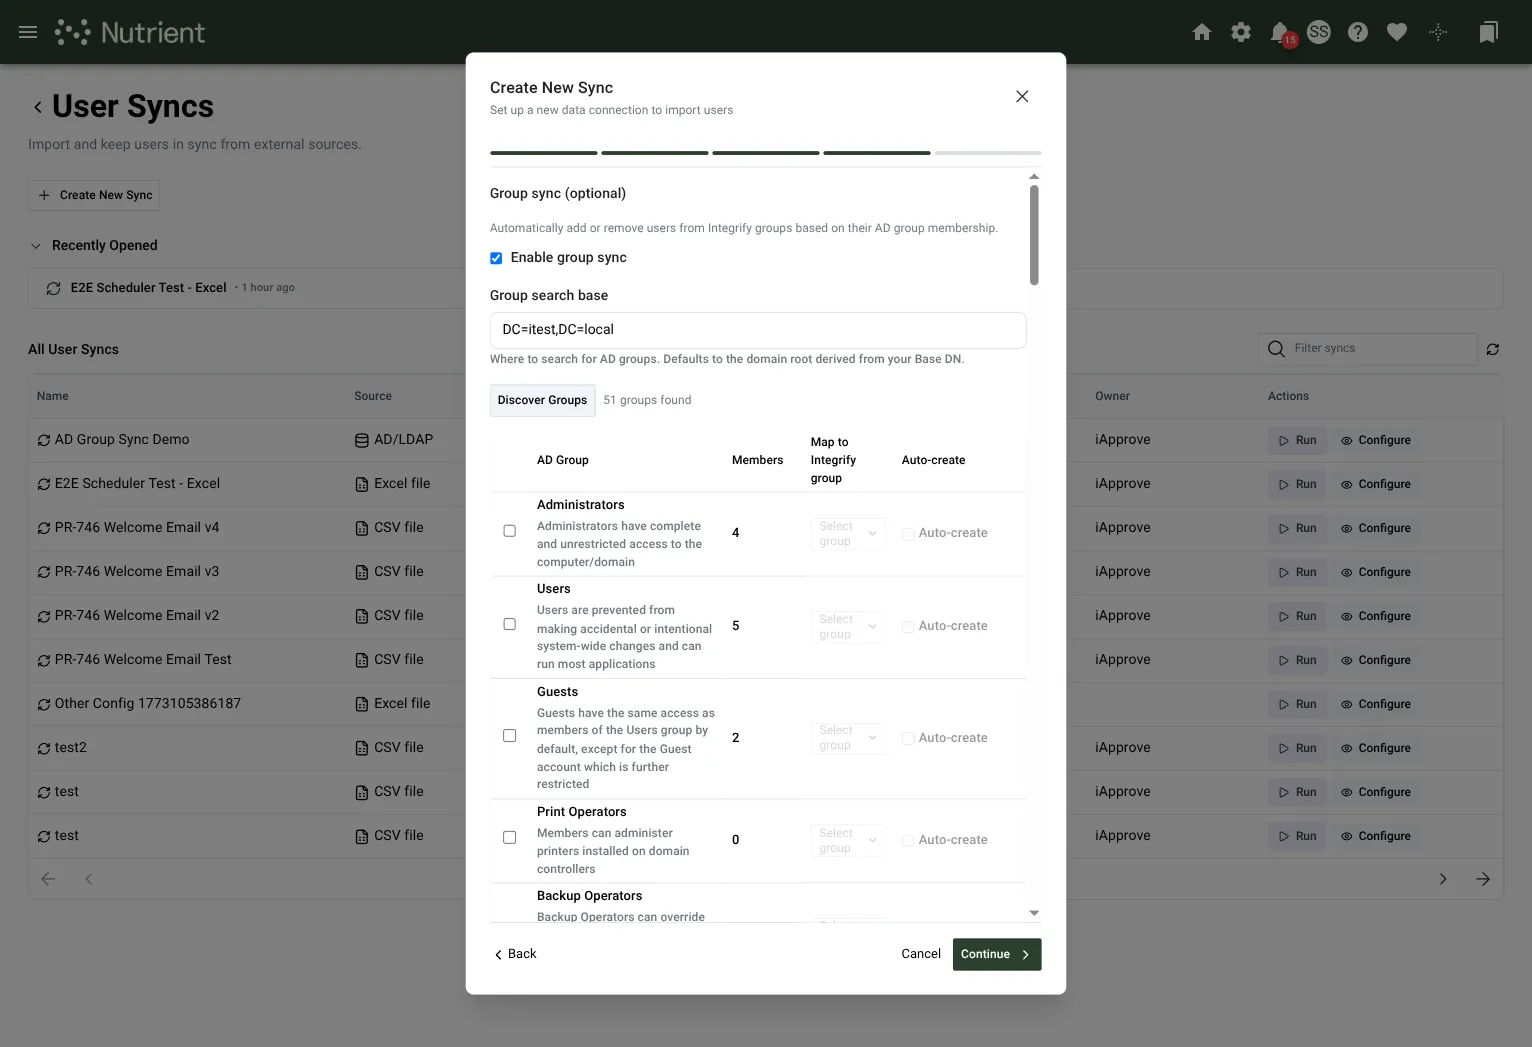
Select Discover Groups to query the LDAP server. The system returns a table of discovered Active Directory groups, including member counts, so you can review the available groups before you save the configuration.
For each discovered group:
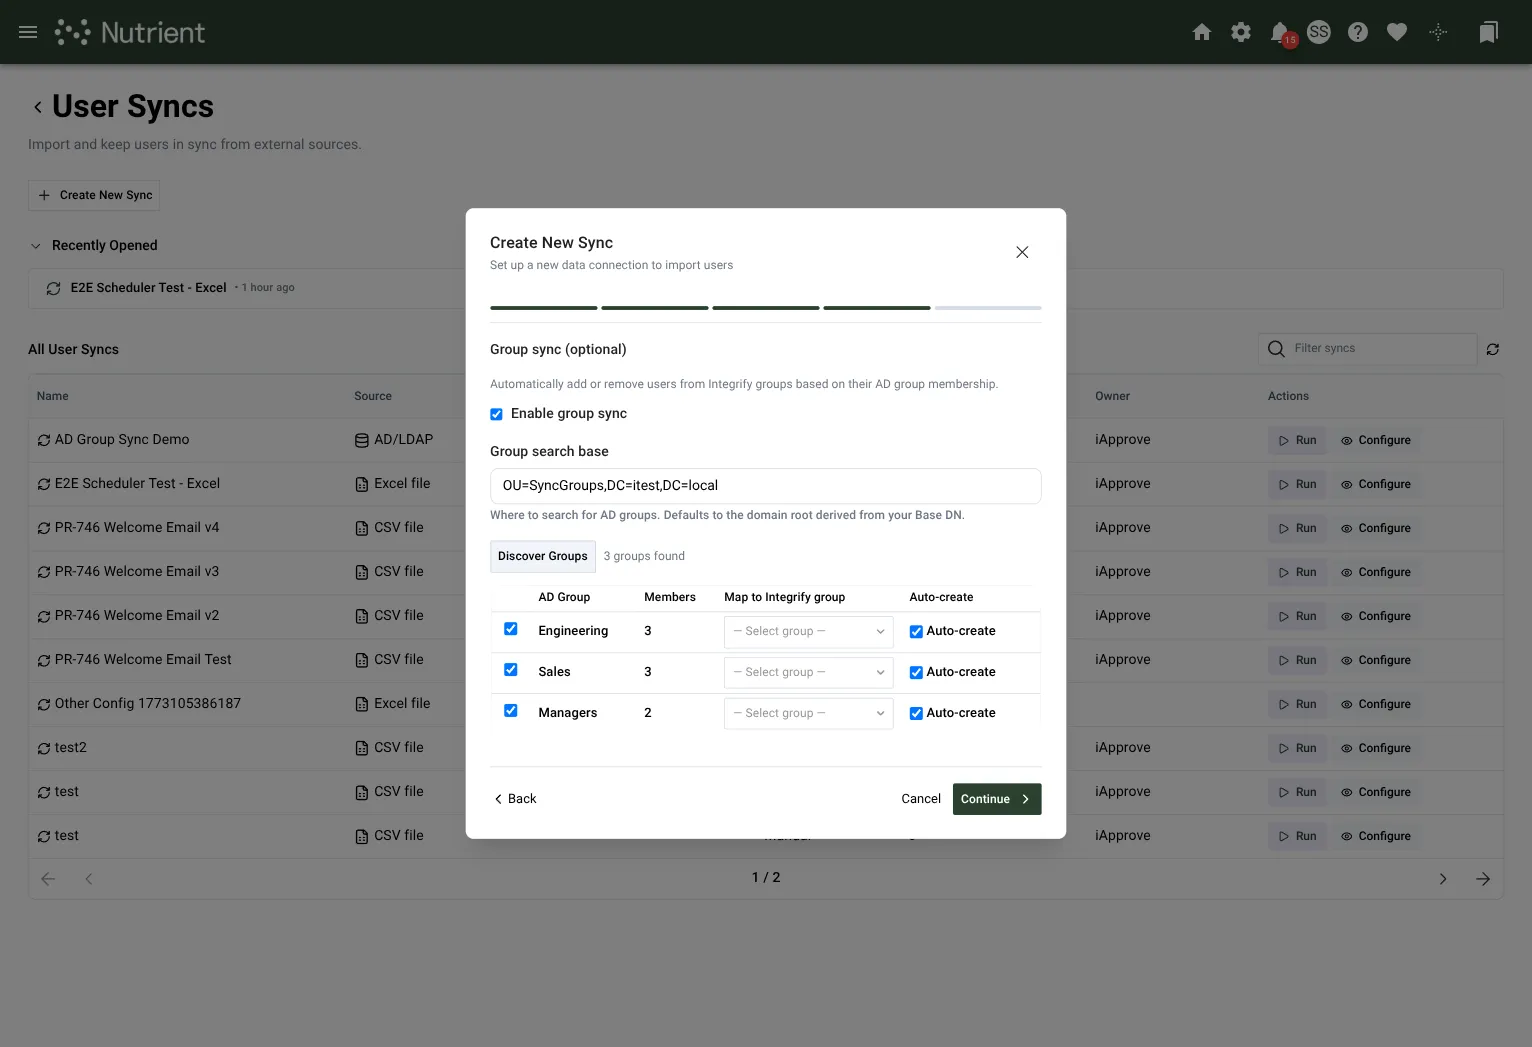
- Select the checkbox to include it in the sync.
- Map it to an existing group from the dropdown, or select Auto-create to create a new group with the same name.
- Leave it unselected if you don’t want to sync it.
The following example shows how selected groups appear after you map them for syncing.
Preview
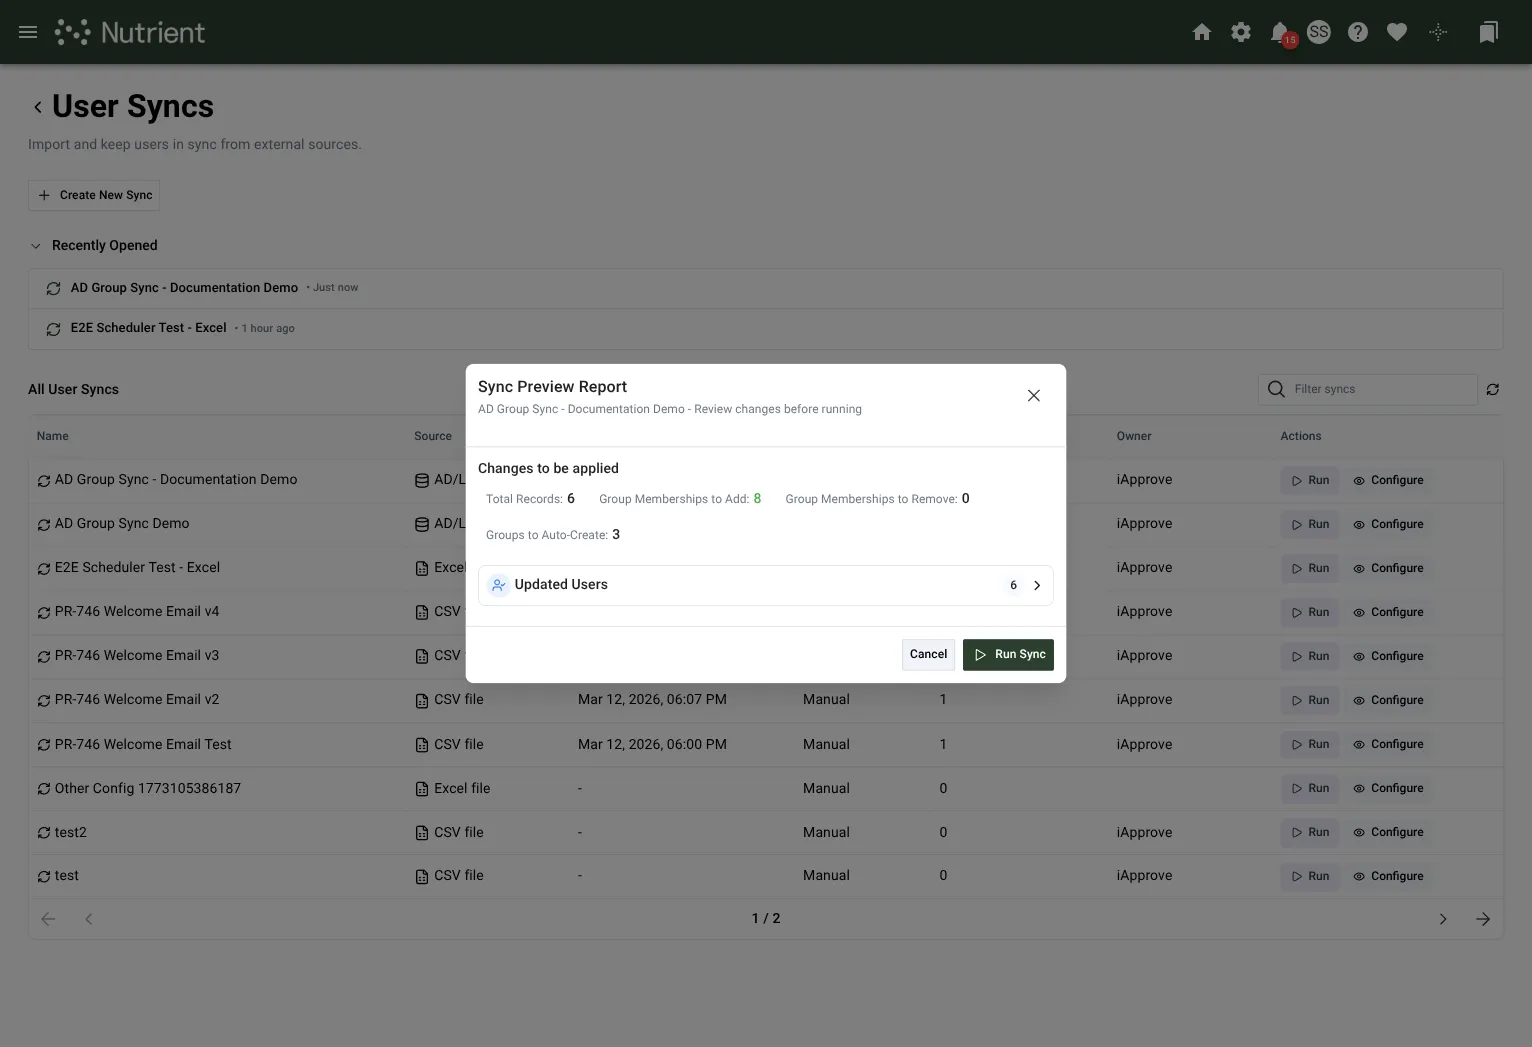
Before execution, the preview report shows group membership statistics alongside user syncing statistics.
The Group Changes section shows the following details for the mapped groups in the configuration:
- Memberships to add
- Memberships to remove
- Groups to auto-create
How membership sync works
After user import finishes, the system reconciles group memberships.
The system:
- Adds members who are present in the Active Directory group but missing from the mapped group
- Removes members who are still in the mapped group but no longer in the Active Directory group
- Updates only mapped groups, so manually managed groups remain unchanged
Users must already exist in the system from the current sync run or from a prior run.
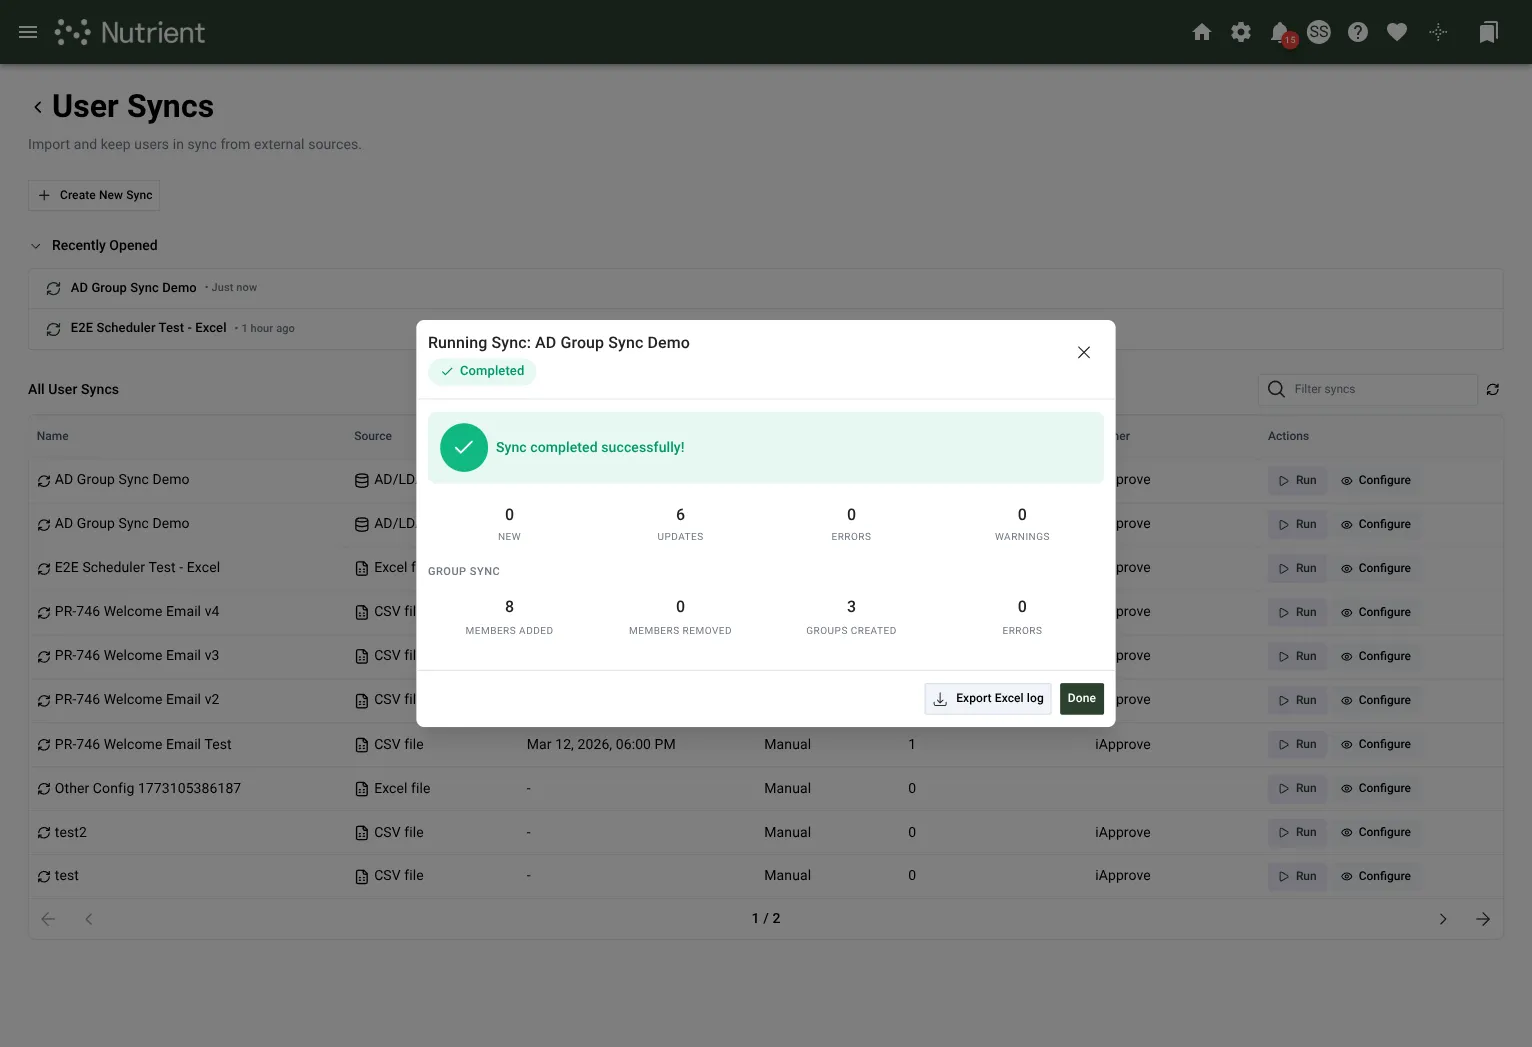
Results
After the sync finishes, the completion screen shows a Group Sync section with the following results:
- Members Added
- Members Removed
- Groups Created
- Errors
Field reference
This section lists the fields and default mappings used by user syncing.
User fields
The following fields are available as mapping targets in all sync types. For Excel syncs, these fields match the column names in the template. For CSV, SQL Database, and Active Directory syncs, you map your source columns to these fields in Step 3.
| Field | Required | Description |
|---|---|---|
userName | Yes | Unique login username. Used as the match key to identify existing users. |
email | Yes | User’s email address |
firstName | Yes | First name |
lastName | Yes | Last name |
middleName | No | Middle name or initial |
title | No | Job title |
department | No | Department |
division | No | Division |
costCenter | No | Cost center |
phone | No | Phone number |
location | No | Office location |
address1 | No | Street address line 1 |
address2 | No | Street address line 2 |
city | No | City |
state | No | State or province |
zip | No | Postal code |
country | No | Country |
locale | No | Locale code (for example, en-US). Falls back to the sync default if blank. |
timezone | No | Timezone name (for example, America/Chicago). Falls back to the sync default if blank. |
languageName | No | Display language (for example, US English). Falls back to the sync default if blank. |
manager | No | Username of this user’s manager. The system looks up the manager by username. |
networkId | No | Windows network login (NT ID) |
cField1 | No | Custom field 1 |
cField2 | No | Custom field 2 |
Column headers in Excel and CSV files are case-insensitive. The system ignores any columns it doesn’t recognize.
Active Directory attribute mapping
When you configure an Active Directory sync, the system preloads common LDAP attributes and auto-maps them to user fields when the names match. The following table shows the default mappings.
| LDAP attribute | Maps to |
|---|---|
sAMAccountName | userName |
mail or userPrincipalName | email |
givenName | firstName |
sn | lastName |
initials | middleName |
title | title |
department | department |
division | division |
telephoneNumber | phone |
physicalDeliveryOfficeName | location |
streetAddress | address1 |
l | city |
st | state |
postalCode | zip |
co | country |
manager | manager |
You can override any of these mappings or add mappings for additional LDAP attributes in Step 3.