Mastering form rules for dynamic responses
The Rules tab will allow you to add rules that define certain behaviors for questions or sections in your form that are based on responses to questions that you have defined in your form. For instance, you can make certain fields/sections Show or Hide based on user input.
You’ll want to add all of your questions to your form prior to adding rules. Form rules can also be used to perform calculations in forms. See our calculations in forms article.

Start by selecting the Rules tab. You’ll be presented with the following.

To add a rule, select Add Rule and then Add Condition:

You can add as many conditions and effects as you would like to your form. The conditions can be a mix of conditionally showing/hiding specific questions or sections in your form.
We’ll use a couple of examples of showing/hiding questions and sections in a form.
This example is a rule that uses a condition where a user selecting Yes to a question called Hardware? will be shown two other fields called Type and Other Hardware:
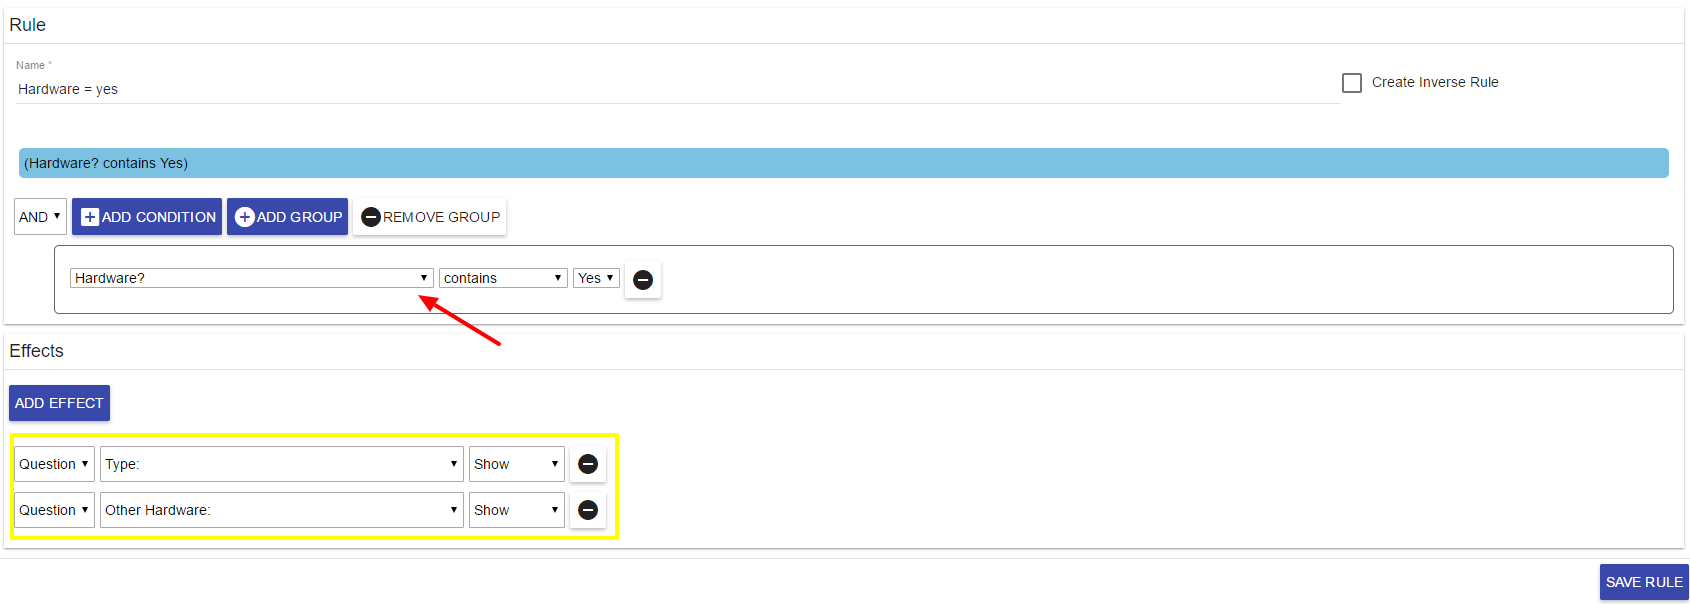
Steps for adding a rule:
Give the rule a Name (required):

Select Add Condition. This will present a dropdown list of all of the questions in your form. Select the question that you want to base your condition on:

Depending on the question (multichoice, short text, etc.), the choices will appear in the row of the question. Select the Operator and then the result:

You can optionally add multiple conditions for the Effect that you want. In this example, we are adding two conditions — if the answer is Yes to the Hardware? question AND the user enters Smith in the Last Name question:

When adding Conditions, you select:
- The question to base the condition on
- The Operator (equals, less than, less than or equal to, greater than, greater than or equal to, contains, does not contain)
- The answer/result for the question
You can optionally add groups of conditions to your form. Select Add Group, and then you can choose the AND/OR operator for the group of conditions.

You’ll then need to add the Effect that you want for the conditions that you defined. In this example, we are going to show the Other Hardware question AND the Other System Access Needed section if the user selects Yes to the Hardware? question and the user enters Smith into the Last Name field:

When adding Effects, you select:
- Either Question or Section in the form that you want an effect on.
- The specific question or section that you want
- The Effect of either Show, Hide, Disable, Enable, Required, Unrequired, or Set Answer. For more information on using Set Answer with a function, see our calculations in forms article.
Create Inverse Rule. Optionally select Create Inverse Rule to create an inverse of the rule that you created.
You’ll need to account for the inverse of the rule that you created for the rule to take effect. By selecting Create Inverse Rule, the rule definition will be created for you.

What this does is create the inverse of the rule so you can account for the inverse of the conditions and effects that you created for the user’s selections in the form:
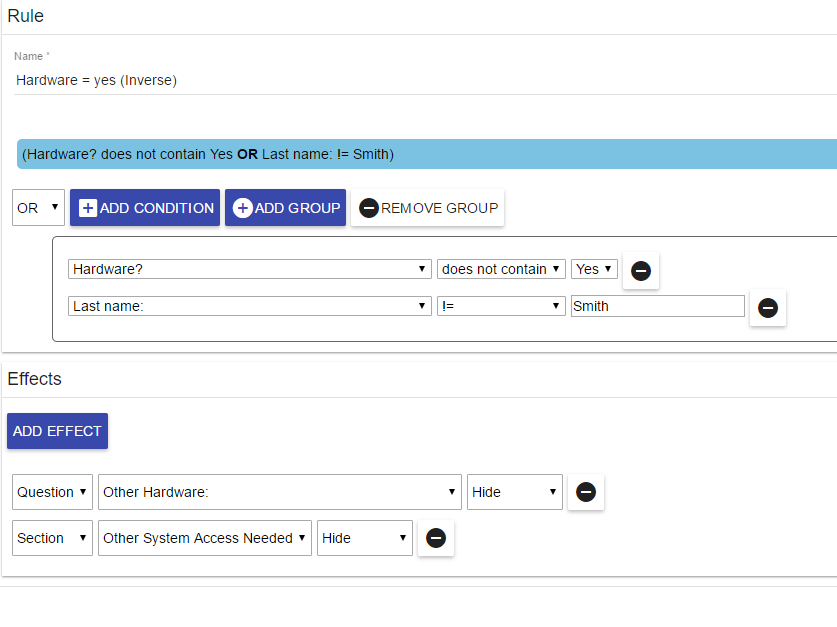
Once you have completed your Rule definitions, you’ll be able to edit or delete them from the Rules tab:

Use the Preview tab to test both sides of every condition. For the Hardware example, enter Smith in the Last Name question and answer Yes to the Hardware? question. Confirm the dependent question and section appear. Change either answer and confirm they return to the intended hidden state. Test this before you use the form in a live process. If the form doesn’t return to its original state after an answer changes, review the inverse rule.
Here are the questions available for our example should the user enter Smith in the Last Name field AND select No in the Hardware? field:

And if the user selects Yes in the Hardware? field, the Show conditions are met and both the Other Hardware question and the Other System Access Needed section are displayed:

Form rules can also be used to perform calculations in forms. See our calculations in forms article.