Workflow Automation MCP connector
Point your AI app at Nutrient Workflow Automation to work with requests, tasks, reports, and scheduled jobs. This applies to Claude, Cursor, and other apps that support the Model Context Protocol (MCP). You don’t need to open a portal tab or build an integration first.
The Workflow Automation MCP connector connects your AI app to Nutrient Workflow Automation. Your app may call it an MCP server, app connector, or custom integration. It works over MCP, an open standard that AI apps use to connect to other systems.
Nutrient Workflow Automation exposes the same functions that power Workflow Assistant over MCP. Your app works with your real requests, tasks, forms, processes, reports, user synchronizations, and scheduled jobs. It uses your permissions on your Workflow site. The connector also exposes actions that change workflow data, such as starting a request or changing a task due date. Your app can ask for your approval before it runs each action.
You can connect in two ways. Both methods create the same connection.
| Way to connect | What it means |
|---|---|
| Sign in with your Workflow account | The app opens your browser. You sign in normally, and the app remembers the connection. |
| Use a personal API key | You generate a key in Workflow and paste it into the app settings. |
Before you start
Before you connect, make sure you have the following items.
| You need | Details |
|---|---|
| The Workflow Assistant module | Your Workflow license must include it. Without it, the app can’t connect. Contact Nutrient Support(opens in a new tab) to add the module. |
| Permission to use Workflow Assistant | You need the Run permission on Workflow Assistant. The Assistant User and Assistant Admin roles include this permission. System administrators already have it. Refer to the Workflow Assistant guide. |
| Your web address and site name | Both values come from System Settings. Refer to the find your web address and site name section. |
| A connection between the app and Workflow | The app must reach your Workflow site. If Workflow runs inside your company network, connect your computer to that network or VPN. Cloud apps need internet access to your Workflow site. |
Find your web address and site name
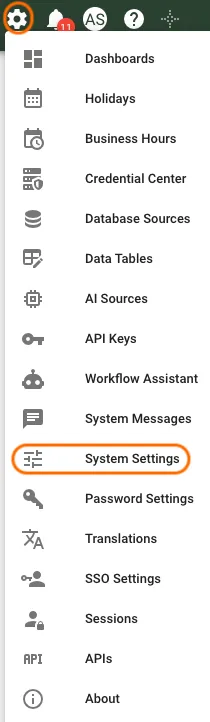
Select the Settings (gear) icon in the top-right corner of the portal. Then choose System Settings.
On the System Settings page, find the HostHeader row.
Copy the HostHeader value. This is your Workflow web address.
Find the ID row.
Copy the ID value. This is your site name for the
tenantpart of the address.
The API information guide also lists both values and covers the rest of the Nutrient Workflow Automation API.
Sign in with your Workflow account
Use this method if your app can connect to a server by web address. Paste the address into the app. The app opens your browser, you sign in with single sign-on or your username and password, and the app remembers the connection. If your company only uses single sign-on, the app sends you there.
This sign-in method needs a Workflow version that supports it and a license that includes the Workflow Assistant module. If your app says the server doesn’t offer sign-in, check the license first. Then check your version. If the issue remains unclear, contact Nutrient Support(opens in a new tab).
The address to give your AI app
Build the address from the two values you copied from System Settings:
https://<your-web-address>/api/integrations/mcp?tenant=<your-site-name>The tenant part tells Workflow which site you’re signing in to. It’s required here because the app uses it to find the correct sign-in page.
Add Workflow to your app
- Open your app settings.
- Find the MCP server or connector settings.
- Add a new server or connector.
- Paste the address from the previous section.
- Start the connection.
- Sign in on the Workflow sign-in page.
- Return to the app.
- Confirm that the app lists the Workflow functions.
Each app stores this setting in a different place. Use the following app instructions:
- Claude(opens in a new tab) — Custom connectors that use remote MCP in Claude apps.
- Codex(opens in a new tab) — MCP servers in the Codex CLI, desktop app, and IDE extension.
- Codex(opens in a new tab) —
codex mcp loginfor apps that sign in. - ChatGPT(opens in a new tab) — Server URL connections in ChatGPT.
- ChatGPT(opens in a new tab) — Developer mode under Settings > Security and login.
- Cursor(opens in a new tab) — MCP servers in
mcp.json, including remote servers.
Some apps, including Claude Desktop and Cursor, can’t open the browser step themselves. For those apps, add the following configuration to the app MCP settings. The mcp-remote helper handles sign-in and runs automatically. You don’t need to install it first.
{ "mcpServers": { "nutrient-workflow": { "command": "npx", "args": [ "-y", "mcp-remote", "https://example.integrify.com/api/integrations/mcp?tenant=yoursite" ] } }}Restart the app after saving. Sign in when the browser tab appears.
Which apps can sign in
For security, Workflow only completes sign-in for apps it recognizes:
- Apps running on your own computer, such as Claude Desktop, Cursor, and MCP Inspector.
- Approved online apps, which currently consist of Claude on the web (
claude.ai) and ChatGPT (chatgpt.com).
Want to connect a different AI app? Any MCP-capable app on your own computer already works. Workflow turns away other online apps when they try to complete sign-in. Tell Nutrient Support(opens in a new tab) which app your team wants, and we’ll review the request.
What signing in sets up
- A separate sign-in of its own — The app gets its own Workflow session. The sessions page shows it under the app name, separate from your browser sign-in. Signing out of one session doesn’t sign out the other. You can end the app session at any time.
- Access limited to this feature — The app receives access only for the MCP connection on your Workflow site. Workflow rejects that access everywhere else, including other APIs, portal sign-in endpoints, live-update connections, and the workflow engine. The app can’t turn that access into an ordinary session or use it to reach the rest of the platform.
- No repeated sign-ins — The app renews the connection in the background. If you don’t use it for a long time, it expires and you sign in again.
Use a personal API key
Use this method for apps that can’t complete sign-in, or when you prefer a fixed value. This section covers the address, key creation, and app configuration.
The address to give your AI app
Build the address from the web address you copied from System Settings:
https://<your-web-address>/api/integrations/mcpYou can omit the tenant part because the key identifies its site. If you include tenant, it must match that site.
The key travels with every request in the integrify-api-key header. Write the value as your site name, a single space, and then the key. Use the same site name that the tenant part takes:
integrify-api-key: <your-site-name> <your-api-key>Create the key
The key must be a personal key tied to a user account. Set the user through Owning user in the following steps. A key with no owning user is a system key, and it won’t work here.
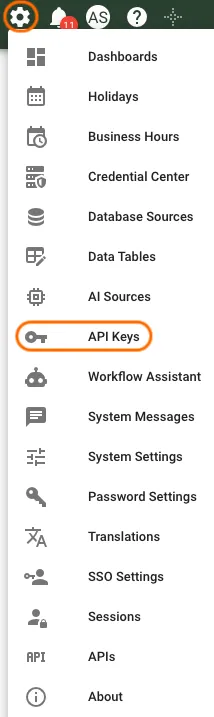
Select the Settings (gear) icon in the top-right corner of the portal. Then choose API Keys.
Select Add API Key.

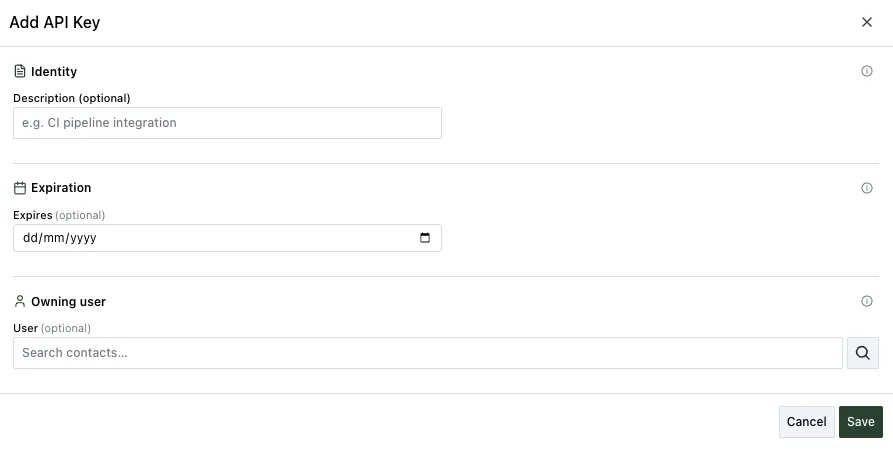
Under Identity, add a Description if needed.
Under Expiration, set Expires if needed.
Under Owning user, choose who the key acts as.
- If User appears, select the person the key should act as.
- Leave User empty to create a system key.
- If User doesn’t appear, the key uses your account automatically.
Select Save.
In the API key created dialog, select Copy key and store the key somewhere safe.
Select Close.
Nutrient Workflow Automation shows the key only once. If you don’t copy it, you’ll have to create a new key. Treat the key like a password. Anyone who has it can do everything its user can do in Nutrient Workflow Automation.
For more on managing, expiring, and auditing keys, refer to the api information guide.
Give the key to your app
{ "mcpServers": { "nutrient-workflow": { "command": "npx", "args": [ "-y", "mcp-remote", "https://example.integrify.com/api/integrations/mcp", "--header", "integrify-api-key:yoursite YOUR_API_KEY" ] } }}Paste the real key, not a variable. Claude Desktop passes these settings through exactly as written, so it won’t fill in a placeholder like ${MY_KEY}. Keep the space between your site name and the key.
MCP Inspector
- Run
npx @modelcontextprotocol/inspector. - Set the transport to Streamable HTTP.
- Set the URL to
https://<your-web-address>/api/integrations/mcp. - Add a header named
integrify-api-keywith the value<your-site-name> <your-api-key>. - Connect.
- Open the list of functions.