Schedule recurring email monitors
Email monitor schedules poll an IMAP mailbox on a recurring cadence. For each new message, Nutrient Workflow Automation starts a workflow process with a Power Form task and prefills its fields from the email, including the sender, subject, body, and attachments.
Manage email monitor schedules from the Email Monitors tab on the Schedulers page. This guide covers the list view columns and detail page tabs that are specific to email monitor schedules. For shared concepts, including permissions, run history, auto-disable behavior, and the Schedule and History detail tabs, refer to the schedulers overview guide.
Before you start
Before you create an email monitor schedule, make sure you have the required credential and workflow process.
- An IMAP credential must exist in the Credential Center. The schedule references the selected credential and doesn’t store the mailbox username or password directly. For OAuth2 mailboxes, the credential stores the Azure client ID and client secret.
- The target workflow process must include at least one Power Form task. The email monitor populates and submits that task. If the selected process has no Power Form tasks, the wizard’s Task dropdown is empty, and you can’t continue past step three.
Create an email monitor schedule
From the Email Monitors tab, select New Schedule in the page toolbar. The wizard includes five steps.
Step one — Basic information
Use this step to name the schedule and add an optional description.
| Attribute | Required | Description |
|---|---|---|
| Schedule Name | Yes | A descriptive name for this scheduled job. |
| Description | No | Optional description shown in the Email Monitors list view. |
Email monitor schedules don’t show a Send notifications checkbox in the create wizard. After you create the schedule, you can enable notifications from the Edit action on the Basic Info card on the detail page.
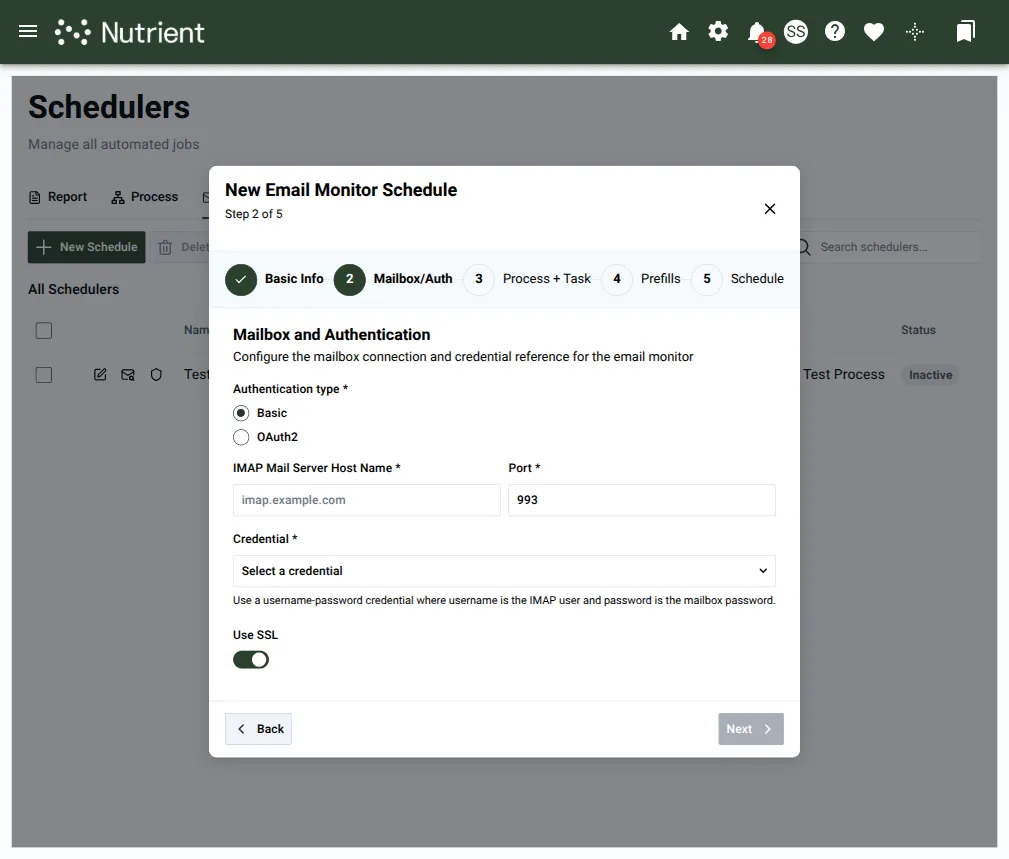
Step two — Mailbox and authentication
Use this step to configure the mailbox connection and credential reference.
| Attribute | Required | Description |
|---|---|---|
| Authentication type | Yes | Basic for username/password IMAP, or OAuth2 for mailboxes that require OAuth2 sign-in, such as Microsoft 365 or Google Workspace. |
| IMAP Mail Server Host Name | Yes | IMAP host — for example, imap.gmail.com. |
| Port | Yes | IMAP port. Defaults to 993. |
| Credential | Yes | A username/password credential from the Credential Center. Semantics vary by authentication type. |
| Use SSL | No | TLS connection to the IMAP server. Enabled by default. |
OAuth2 mode also requires these values.
| Attribute | Required | Description |
|---|---|---|
| Mailbox email address | Yes | The mailbox the OAuth2 token grants access to. |
| Tenant ID | Yes | Azure AD tenant ID of the OAuth2 application. |
| Client ID | Yes | OAuth2 application’s client ID. |
In OAuth2 mode, the credential stores the Azure client ID as the username and the client secret as the password. In Basic mode, the credential stores the IMAP username and mailbox password.
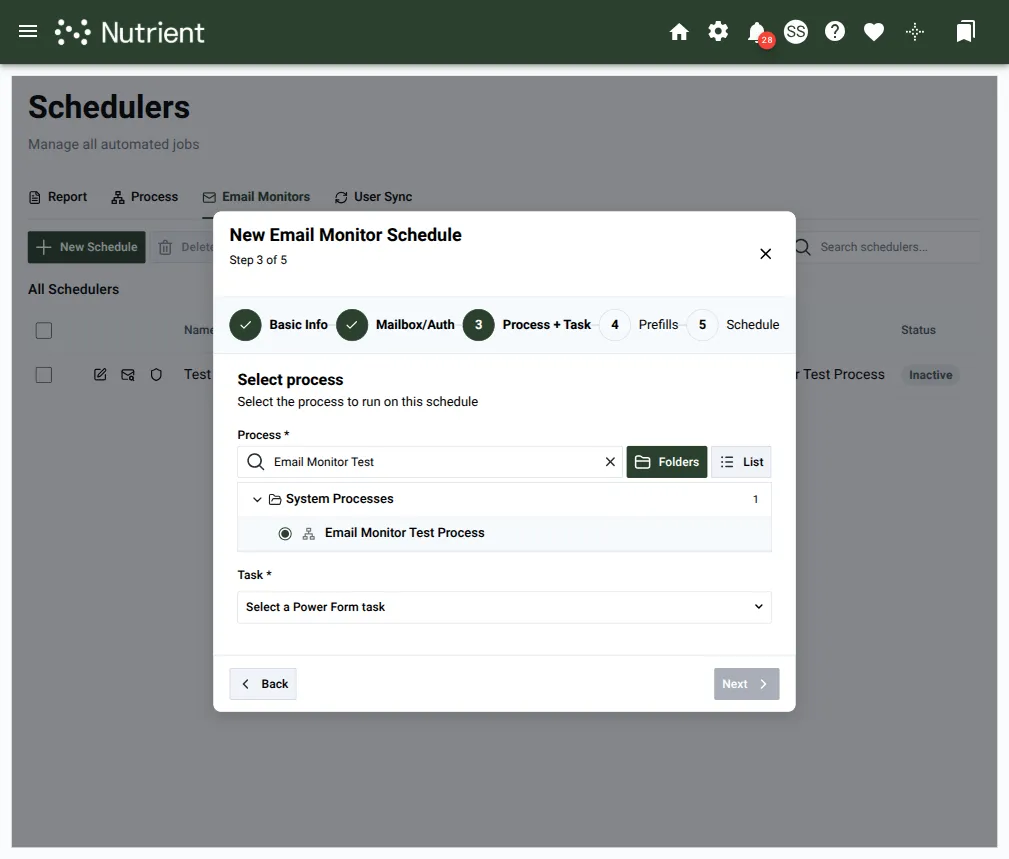
Step three — Process and task
Use this step to select the workflow process and Power Form task that the email monitor uses for each new email.
The process picker shows a folder tree of all processes visible to you. It opens in the Folders view by default. Switch to List view to search across all processes without folder navigation. The Task picker becomes enabled after you select a process.
| Attribute | Required | Description |
|---|---|---|
| Process | Yes | The workflow process to start for each new email. Each schedule can target one process. |
| Task | Yes | The Power Form task that receives the email’s prefilled fields. The dropdown only shows Power Form tasks within the selected process. It excludes other task types, such as Approval and Email tasks. |
Step four — Prefills
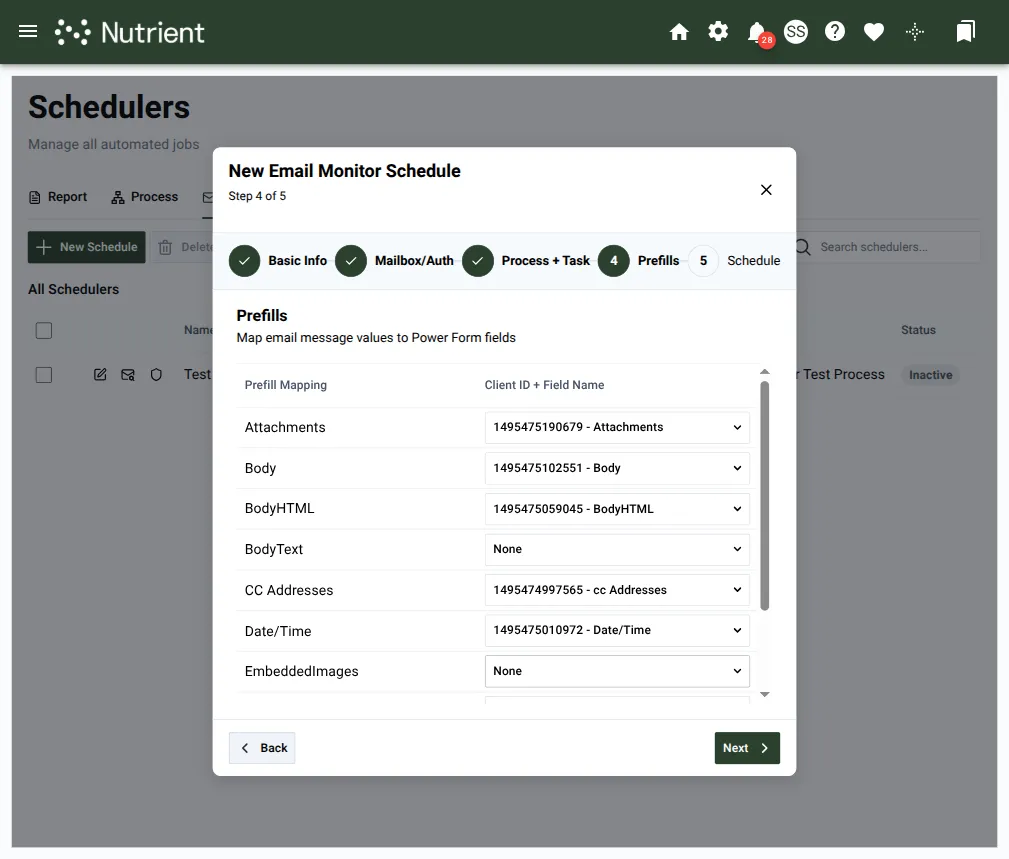
Use this step to map email message properties to fields on the selected Power Form task.
Each row maps one email property to a target form field by field Client ID. Available email properties include:
- Attachments
- Body
- BodyHTML
- BodyText
- CC Addresses
- Date/Time
- EmbeddedImages
- Sender Name
- Sender Address
- Subject
Set a row to None to skip mapping that property. When the monitor finds a new message, the workflow instance starts and the Power Form task receives the mapped values from the email.
Step five — Schedule
Use this step to set the schedule cadence, start date and time, and optional end date.
The default cadence is Recurring, Repeat interval, Throughout the day, every five minutes. This cadence works for frequent mailbox polling. For full field descriptions, refer to the schedule section in the schedulers overview guide.
Days to retain run history
Email monitor schedules include a Days to retain run history field at the bottom of the Schedule step and on the Schedule tab of the detail page.
The default is three days, which is shorter than the 30-day default for other scheduler types. Email monitors can poll often and create one history row per poll. Increase this value when you need a longer audit trail or troubleshooting window.
List view
The Email Monitors tab uses different list view columns than the other scheduler tabs because email monitor rows don’t show a per-row run schedule in the same way.
| Column | Description |
|---|---|
| Name | The schedule name from step one of the wizard. |
| Description | The optional description from step one. |
| IMAP Mail Server Host Name | The mailbox host configured in step two. |
| Port | The IMAP port configured in step two. |
| Process | The workflow process this monitor starts for each new email. |
| Status | Current status. Refer to the status values section in the schedulers overview guide. |
The toolbar doesn’t include a Frequency filter. Email monitors all run on an interval, so the filter would have only one value.
Row actions
Each row on the Email Monitors tab supports three actions.
- Edit (pencil icon) — Reopens the wizard for the schedule’s settings.
- Check for new email (envelope icon) — Triggers an immediate IMAP poll outside the regular cadence. Use this action to verify a new monitor without waiting for the next scheduled run.
- Manage Roles (shield icon) — Opens the per-schedule role assignment screen.
Detail page
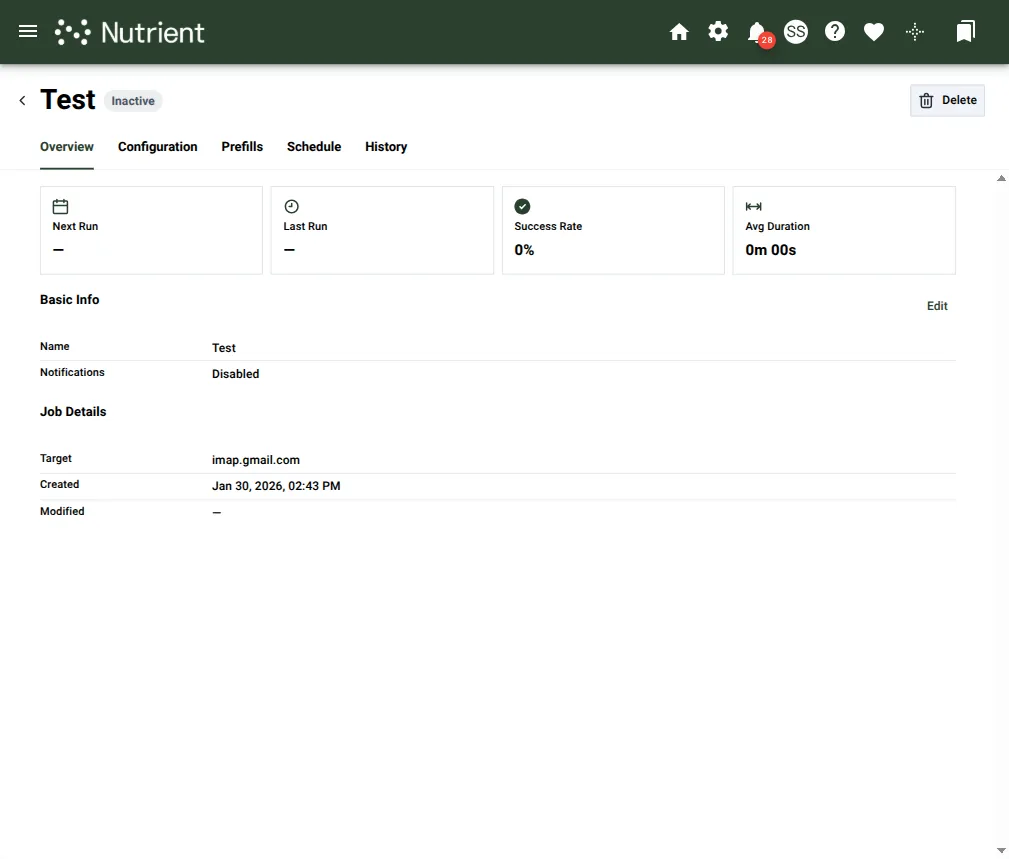
The detail page includes five tabs: Overview, Configuration, Prefills, Schedule, and History.
Overview
The Overview tab shows the standard four stat cards: Next Run, Last Run, Success Rate, and Avg Duration. It also shows two information cards specific to email monitor schedules.
| Card | Contents |
|---|---|
| Basic Info | Schedule name. Edit action available. |
| Job Details | Target (the IMAP mail server host), Created, and Modified dates. |
Email monitor schedules don’t include a Run As User card, because the monitor doesn’t impersonate a user — it starts each workflow instance under a system identity instead. This differs from Process and Report schedules, where the Run As user determines what the schedule can do.
Configuration
The Configuration tab shows a read-only summary of these wizard steps:
- Mailbox and Authentication — Authentication type, mail server, port, SSL, and credential status.
- Process Target — Process name and task name.
Use the Edit action to change these settings. The action reopens the wizard at the relevant step.
Prefills
The Prefills tab shows a read-only view of the email-property-to-form-field mapping configured in step four of the wizard.
Use Edit to change mappings. The action reopens the wizard at the Prefills step.
Schedule
The Schedule tab shows the standard schedule settings and a Run History Retention row with the configured retention window. The default retention window is three days.
For the rest of the tab, refer to the schedule section in the schedulers overview guide.
History
The History tab shows a paginated list of past poll cycles. Each entry shows the timestamp, duration, and status. Successful polls that found and submitted at least one new message also show a count or link summary.
For full details, refer to the history section in the schedulers overview guide.
Notes
- One mailbox per schedule. Each email monitor schedule polls one mailbox and starts one process. To poll multiple mailboxes, or to start different processes from messages in the same mailbox, create one schedule for each mailbox-and-process pairing.
- System identity for instances. Workflow instances launched by an email monitor schedule run under a system identity, not the schedule creator or a per-message Run As user. Design access controls in the launched process, such as assignments and conditions that reference the requester, with this behavior in mind.
- Short default retention. The default cadence polls the mailbox every five minutes, so history rows can accumulate. The three-day default keeps the history tab focused. Increase it temporarily when you investigate an issue, and lower it again after you resolve the issue.