Schedule workflows, syncs, and reports
Use the Schedulers page to manage recurring jobs in Nutrient Workflow Automation. The page supports four scheduler types: User Sync, Process, Report, and Email Monitor. Each scheduler type has its own tab and shares the same toolbar, list view, role-based permission model, run history, and failure handling.
The Create wizard changes based on the scheduler type you select. You can use schedules to:
- Schedule recurring jobs at configured intervals.
- Manage who can create, edit, run, and grant access through role-based permissions.
- Track run history, success rate, and average duration for each scheduled job.
- Disable a job automatically after repeated failures to protect downstream systems.
Existing scheduled processes, scheduled reports, and Email Monitor configurations are migrated to the unified scheduler automatically, preserving their configurations. For mailbox setup details, including Gmail and Outlook 365 authentication, refer to the email monitor settings guide.
This guide covers the concepts that apply to every scheduler type. For scheduler-specific wizard steps and detail page differences, refer to the scheduler type guides below.
Scheduler types
Nutrient Workflow Automation supports these scheduler types.
- User Sync schedules — Recurring user-source imports from Active Directory, CSV, SQL, or Excel. Refer to the user sync schedules guide.
- Process schedules — Recurring workflow process starts. Refer to the process schedules guide.
- Report schedules — Recurring report delivery by email or SFTP. Refer to the report schedules guide.
- Email Monitor schedules — IMAP mailbox polling that starts a workflow process with form fields prefilled from each new email. Refer to the email monitor schedules guide.
Open the Schedulers page
Open the Schedulers page from the administration navigation.
- In the left-side navigation pane, navigate to Administration.
- Click Schedulers.
- Use the tabs to manage User Sync, Process, Report, or Email Monitor schedules.
The page opens to the User Sync tab by default. Each tab lists the schedules of that type that are visible to you.
Permissions
Each tab on the Schedulers page maps to a separate permission object type. This enables administrators to grant access to one scheduler type without granting access to the others.
| Tab | Permission object type |
|---|---|
| User Sync | Scheduled User Sync |
| Process | Scheduled Process |
| Report | Scheduled Report |
| Email Monitors | Scheduled Email Monitor |
Within each object type, Nutrient Workflow Automation scopes access to individual schedules. Administrators can grant access per schedule, not only per type.
Built-in roles
Each object type includes four standard roles and the System Administrators group. Role names use the {object type} {role} pattern, such as Scheduled User Sync Admin, Scheduled Process Admin, and Scheduled Report Admin.
| Role | Permissions |
|---|---|
| Admin | View, Edit, Create, Delete, Run, Grant |
| Manager | View, Edit, Create, Delete, Run |
| Creator | Create |
| User | Run |
The System Administrators group has the same permissions as the Admin role across all four scheduler types.
Creator access
When you create a schedule, Nutrient Workflow Automation assigns you the Admin role for that schedule on the matching object type. You can then edit, run, delete, and grant access to that schedule without a separate administrator assigning per-schedule permissions.
Users with the Creator role on a scheduler type can create schedules of that type. They inherit admin permissions on any schedule they create.
Manage roles for a specific schedule
You can manage access to one schedule from its row in the list view.
- Click the Shield icon in the schedule row.
- Assign members to roles for that schedule’s type.
Only Admin, Manager, and User roles are assignable per schedule. Creator is a system-level role only.
To manage roles at the system level for a scheduler type, open the relevant tab and click Manage Roles & Permissions in the page toolbar.
List view
Each tab shows the schedules of its type that are visible to you. The list includes schedules you created through your automatic admin role and schedules where someone assigned you a role.
Use the toolbar to filter or search the list:
- Status filter — Filters schedules by status.
- Frequency filter — Filters schedules by frequency. This filter appears only on the User Sync, Process, and Report tabs. For Email Monitor columns, refer to the email monitor schedules guide.
- Search box — Narrows the list by matching schedule details.
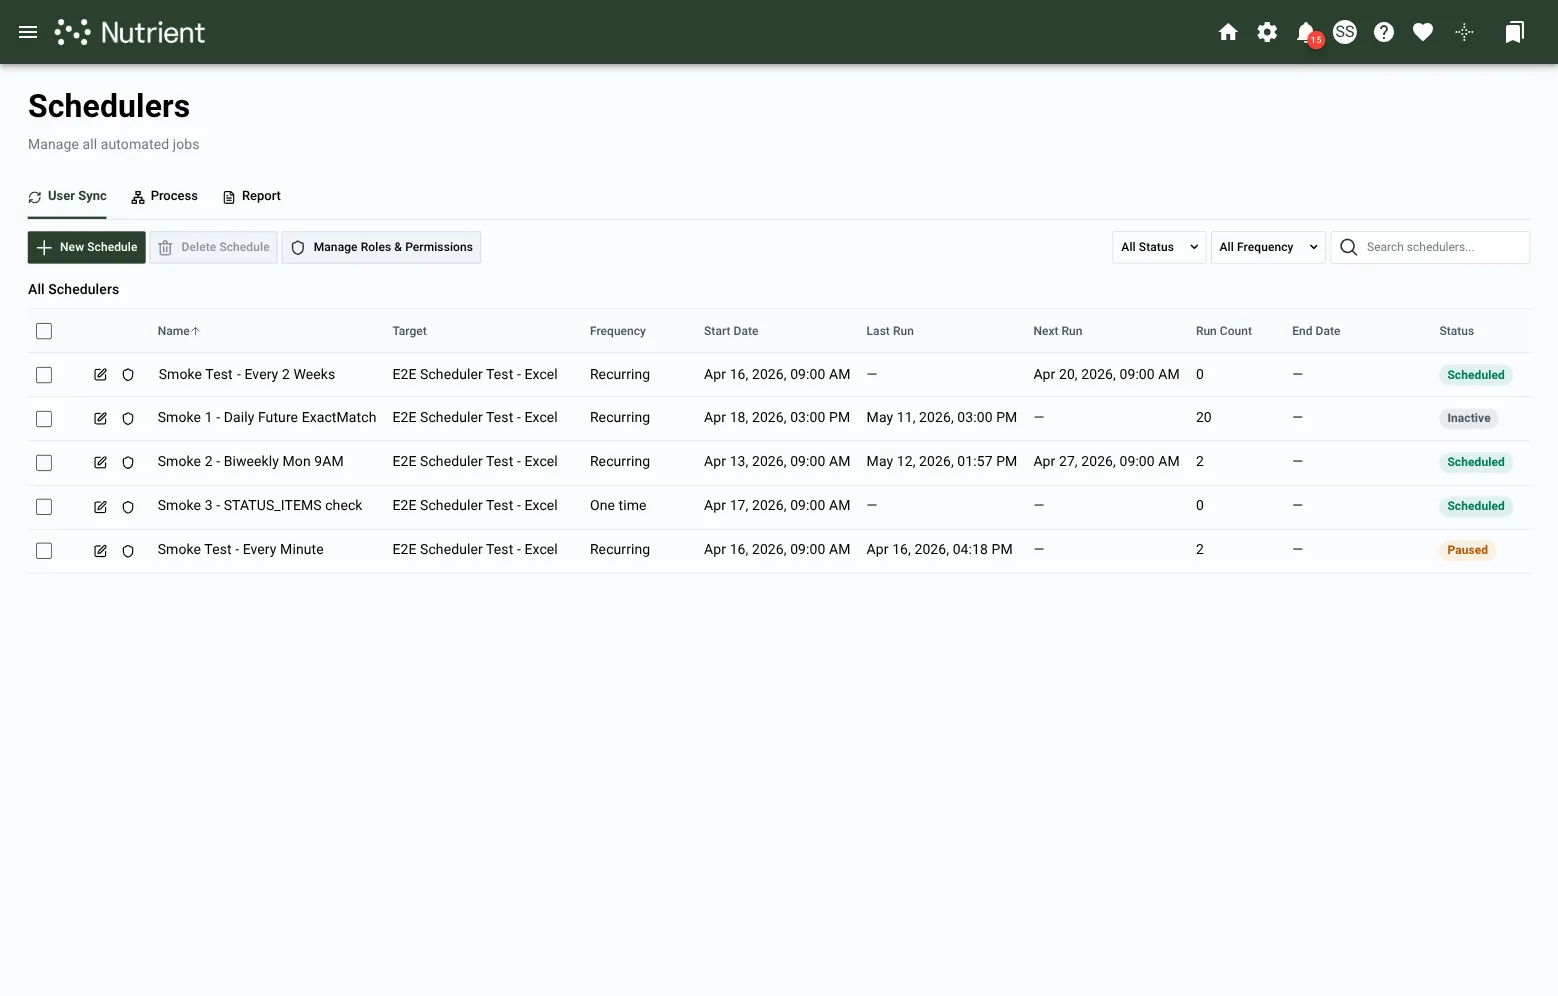
The list view includes these columns.
| Column | Description |
|---|---|
| Name | The schedule name from step one of the wizard. |
| Target | The sync configuration selected in the wizard. This column appears only on the User Sync tab. The Process and Report tabs omit it; the schedule detail page shows the process or report. |
| Frequency | One time or Recurring. |
| Start Date | The first scheduled run. |
| Last Run | Timestamp of the most recent execution. |
| Next Run | Timestamp of the upcoming execution. |
| Run Count | Total number of completed executions. |
| End Date | Configured deactivation date. This field is blank when no end date exists. |
| Status | Current status. Refer to the status values section. |
Status values
Schedules can have these status values.
- Scheduled — The schedule is active and runs at its next scheduled time.
- Paused — Execution is suspended. The schedule remains in the list but doesn’t run on its cadence. Use Run Selected to trigger a one-time run without resuming the schedule.
- Inactive — Nutrient Workflow Automation sets this status after five consecutive failures, or a user sets it manually with the Schedule Status dropdown in the wizard. Inactive schedules don’t run until a user resumes them. For failure behavior, refer to the auto-disable section.
Row and bulk actions
Each row supports these actions.
- Edit (pencil icon) — Reopens the wizard for the schedule’s settings.
- Manage Roles (shield icon) — Opens the per-schedule role assignment screen.
Selecting one or more rows enables Delete Schedule in the page toolbar and shows more bulk actions in a selection bar at the bottom of the list.
- Run Selected — Triggers an immediate one-time run for each selected schedule. Run Now executions appear in the schedule’s run history with automated runs.
- Pause Selected — Suspends each selected schedule. The schedule remains in the list but doesn’t run on its cadence.
Delete Schedule permanently removes each selected schedule.
Detail view
Select a schedule name in the list view to open its detail page.
User Sync, Process, and Report schedules include three tabs: Overview, Schedule, and History. Email Monitor schedules include two more tabs: Configuration and Prefills. For Email Monitor details, refer to the email monitor schedules guide.
Overview
The Overview tab summarizes the schedule with four stat cards.
- Next Run — When the schedule will run next.
- Last Run — When the schedule last ran.
- Success Rate — Percentage of successful runs out of recent attempts.
- Avg Duration — Average wall-clock time of recent runs.
The Overview tab also shows one or more information cards. The cards vary by scheduler type:
- Basic Info and Job Details appear for every scheduler type.
- Run As User appears for Process and Report schedules.
- Delivery appears for Report schedules only.
Use the Edit action on a card to change that section’s settings.
Schedule
The Schedule tab shows the status, frequency in plain language, next scheduled run, start and end dates, and timezone. Use the Edit action to change the frequency or end date.
The Schedule step in the create wizard uses the same main fields across scheduler types. Email Monitor schedules add a Days to retain run history field with a three-day default, instead of the 30-day default for other scheduler types. For Email Monitor details, refer to the email monitor schedules guide.
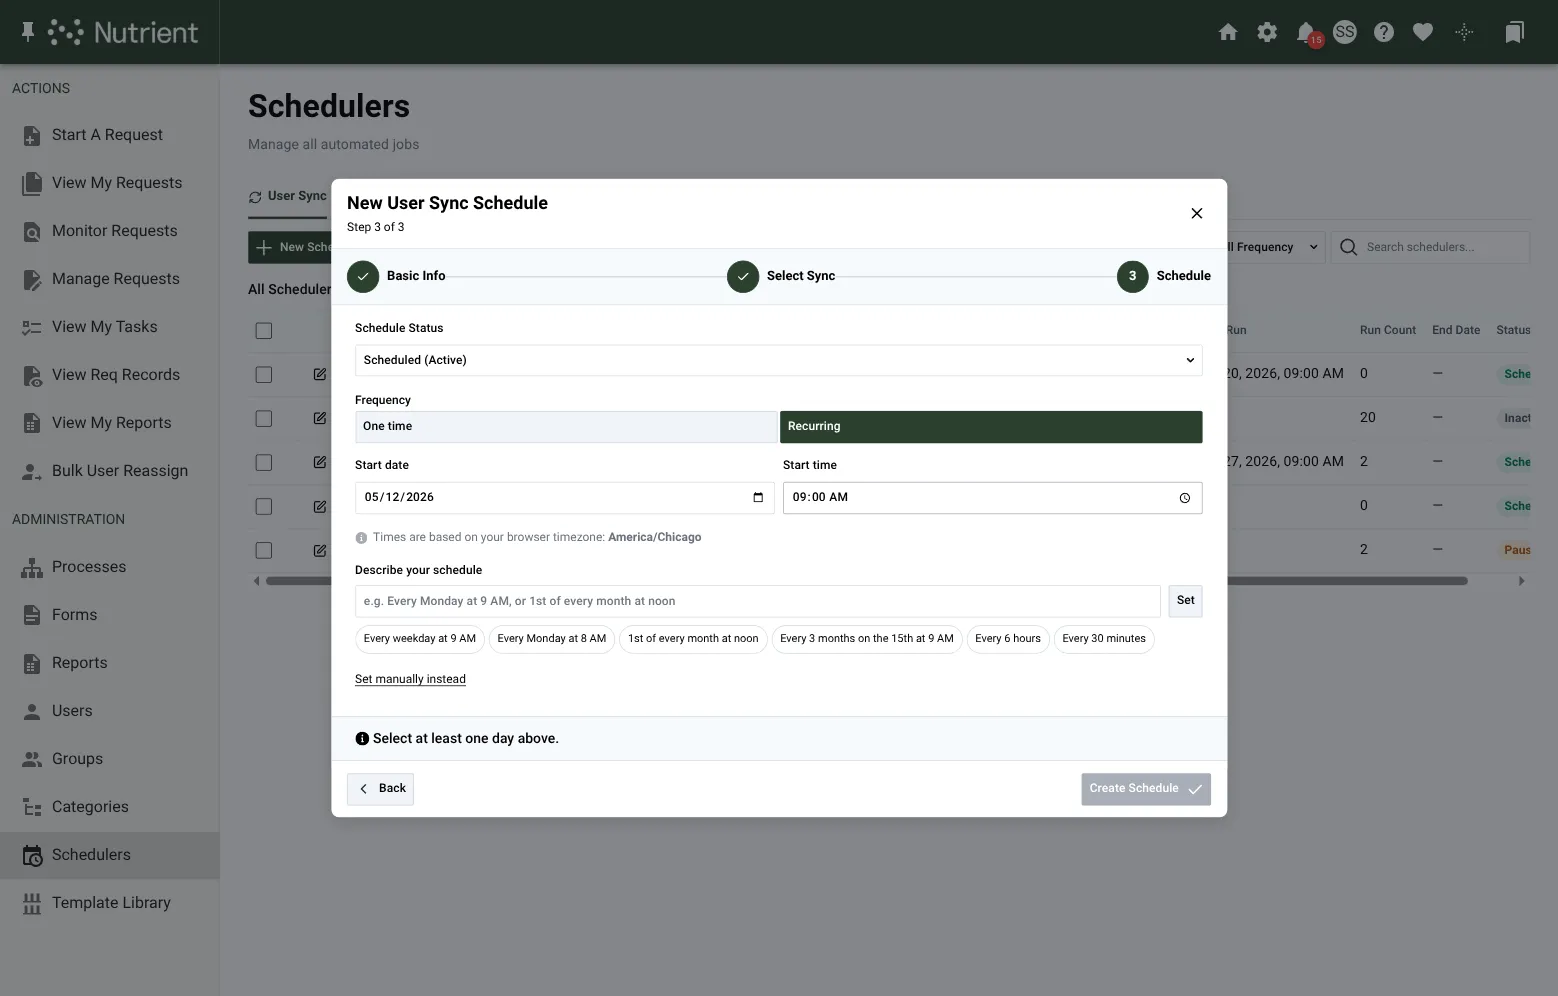
Choose between two frequency modes.
| Frequency | Description |
|---|---|
| One time | Runs once at a specified future date and time. |
| Recurring | Runs on a repeating cadence, such as every weekday at nine AM, every Monday at eight AM, or every six hours. |
For Recurring, describe the cadence in plain language, such as “Every Monday at nine AM” or “First day of every month at noon.” Then select Set to apply it. You can also select a suggested cadence chip.
The wizard’s Schedule step also includes a Schedule Status dropdown with these values: Scheduled (Active), Inactive, and Paused. This dropdown sets the initial status of the new schedule. Most creators keep the default value.
Manual schedule mode
Use manual schedule mode for schedules that don’t fit a natural-language pattern.
Select Set manually instead to switch to a fielded form. The available fields depend on the How to schedule mode you select.
Specific times runs at a fixed wall-clock time on selected days.
- Run on — Days of week with a chip picker, or days of month with an Every day of the month toggle or specific day grid.
- Month(s) — Every month toggle, or specific months with a chip picker.
- Time — Wall-clock time for each run.
Repeat interval runs on a repeating interval.
- Cadence — By date, anchored to a day of week or month, or Throughout the day for a sub-day interval.
- By date — Select a Day of week with Every N weeks or a Day of month with Every N months, plus an At time.
- Throughout the day — Set Repeat every to N hours or minutes.
Both modes include End date and End time fields for optional automatic deactivation. End date is available only in manual mode. It isn’t shown in One time schedules or the default natural-language view.
Select ← Use natural language instead to switch back.
Schedules run in the timezone of the user who created the schedule. Nutrient Workflow Automation captures that timezone when the user first saves the schedule. Date and time fields display in your local timezone, but the schedule runs at the same wall-clock time regardless of which timezone another administrator uses to view it later.
When the wizard finishes, the schedule appears in the list with the status selected in the wizard’s Schedule Status dropdown. The default status is Scheduled.
History
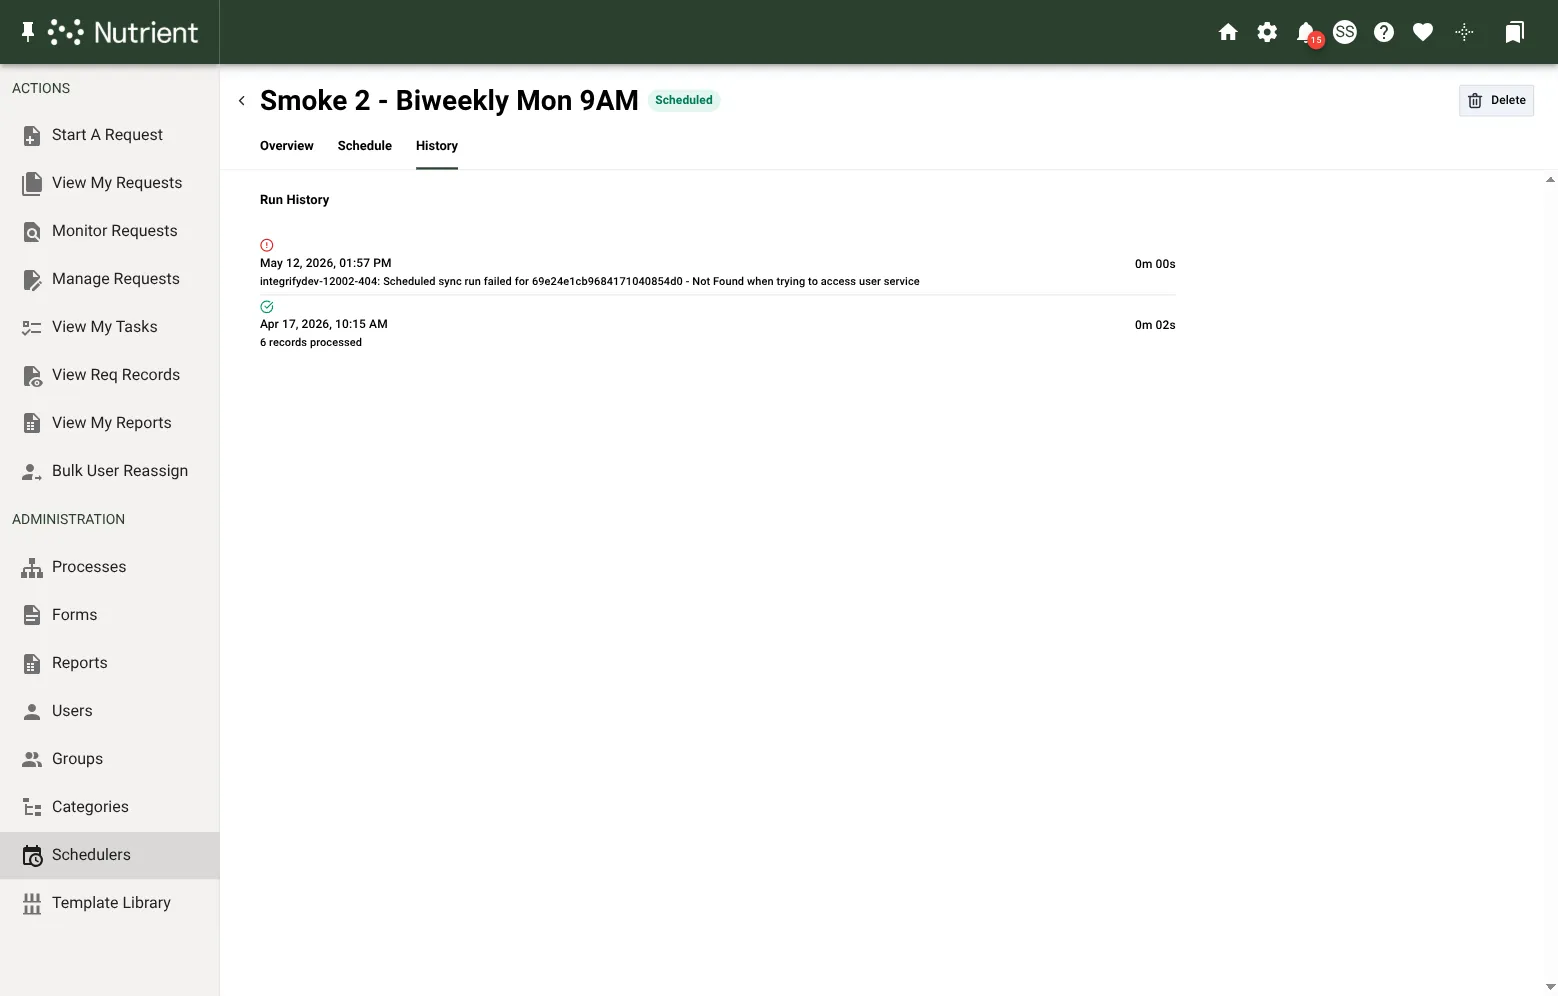
The History tab shows a paginated list of past runs.
Each entry shows:
- Timestamp of the run.
- Duration.
- Status badge: Success, Failure, or Skipped.
- Error message for failed runs.
- Summary for successful runs. The summary depends on the scheduler type: records processed for User Sync, the launched workflow instance for Process, the delivered report for Report when the target receives one, and the poll-cycle outcome for Email Monitor.
Auto-disable
Nutrient Workflow Automation marks a scheduled job as Inactive after five consecutive failed runs and stops scheduling future runs. The schedule remains visible in the list with an Inactive badge so an administrator can investigate.
To resume an auto-disabled schedule, complete these steps.
- Open the detail page and review the run history to understand the failure pattern.
- Resolve the underlying problem, such as a sync configuration issue, downstream system outage, or credential change.
- Edit the schedule and set its status back to Scheduled.
The consecutive-failure counter resets to zero after any successful run.
Concurrency for User Sync schedules
User Sync schedules include a scheduler-level concurrency guard.
If a scheduled user sync run starts while a prior run of the same sync is still in progress, Nutrient Workflow Automation records the new attempt as Skipped in the run history instead of running a second copy. Skipped runs don’t count toward the five-failure auto-disable threshold.
Process, Report, and Email Monitor schedules don’t include this scheduler-level guard.
Notes
- Timezone behavior — Schedules run in the timezone of the user who created them. Nutrient Workflow Automation captures that timezone at create time. Administrators in other timezones see next-run times converted to their own timezone, but the execution timezone doesn’t change.
- Run As user changes — For Process and Report schedules, Nutrient Workflow Automation captures the Run As user at create time. If that user is later deactivated or loses Run permission on the underlying target, the schedule’s runs fail and count toward the auto-disable threshold.
- One target per schedule — A schedule runs one target. To run multiple targets on the same cadence, create one schedule for each target.